In this blog, we will be discussing about, ‘Filter menu in Photoshop‘. I am Lalit Adhikari and we are at LTY. Let’s begin!
Table of Contents
Introduction
Filter Menu in Photoshop are like Edit menu. They have various types of effects and combination of effects which you can apply. And you can use these filters and work with them very deeply to come up with many creative combinations and images.
Before using any option in the filter menu convert your image into a smart object because if we apply any effects, there will be lot more options to customize the effect besides the fact that it is non-destructive.
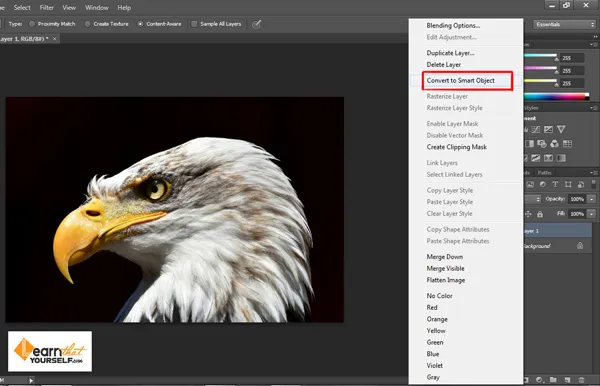
You can convert any image to a smart object by right clicking over its layer panel and click on the menu ‘Convert to smart object’ or directly change it to a smart object by clicking on the ‘Convert to Smart Filter Option’ on the Filter menu.
Try to apply the filter options one by one and check what they are really doing with your image. Because the output of any particular filter is totally dependent upon the image on which you are working.
Filter Gallery
Apart from ‘Last filter’ and ‘Convert to Smart filter’, ‘Filter gallery’ is the first option of the filter menu in Adobe Photoshop. The filter gallery is the option where you can see the preview of all of the effects of the filter before we apply them. You can apply this option only in 8- bit images. To use this option, go to filer menu and click on the ‘filter gallery’.
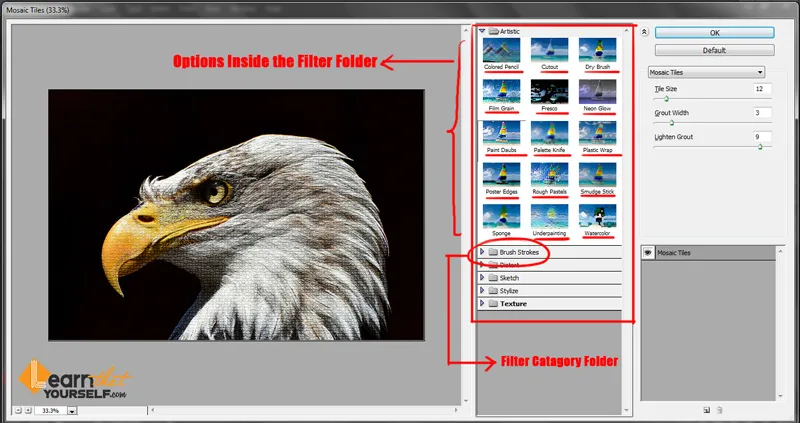
As you click on this option the filter gallery a dialogue box will appear. After that, you can click on your desired ‘filter category‘ folder. In the ‘filter category’, click on the folder you want to choose and it will show a number of other effects inside it.
For example, in ‘artistic’ filter folder there are different options like colored, dry brush, film grain, fresco etc. It is a drop-down menu where options will appear if you click on it and it will close if you again click on it for the second time.
You can customize the filter by changing the settings that appear on the right side of the preview panel and when you are done with your settings click ‘ok’ to close the dialogue box. If you want to add more than one filter to your artwork or image, you can click on the ‘new effect layer button’ at the bottom of the panel.
Clicking this button duplicates the filter that you’ve used recently. To delete the existing filter effect, select it from the list at the bottom of the dialogue box and click on the ‘delete effect layer button’.
Related Topics:
Adaptive Wide Angle
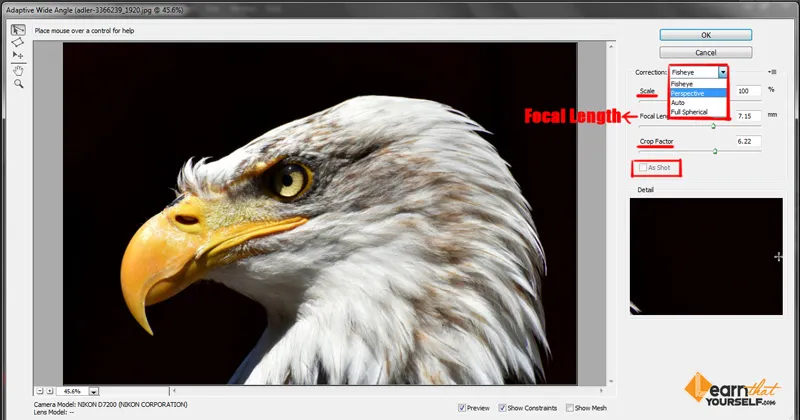
This menu is used to correct images which have a large field of view e.g. panorama shots of the cityscape. Slight distortions appear in the images when those images are clicked and this menu is used to refine those distortions. To use this option click on the ‘adaptive wide angle’ menu in the filter panel and a dialogue box will appear.
There are a few options which you can change to modify your effect: Correction is a drop-down menu where you can choose from fisheye, perspective, auto and full spherical. There are three sliders underneath the correction option and these are scale, focal length and crop factor.
The scale slider is used to set the scale of your image by 50 to 150%.
Through the focal length slider, you can adjust the focal length of your camera. As the focal length gets shorter, the angle of view gets wider and as the focal length gets longer, the angle of view becomes narrower.
And the crop factor slider is used to reframe or resize the image by cropping it.
Underneath these three sliders is a small checkbox called ‘As Shot’. Usually, this option is unchecked by default but if the filter obtains camera and lens metadata of raw image then this checkbox gets selected.
The shortcut key for this option is Shift + Ctrl + A
Related Topics:
Lens Correction
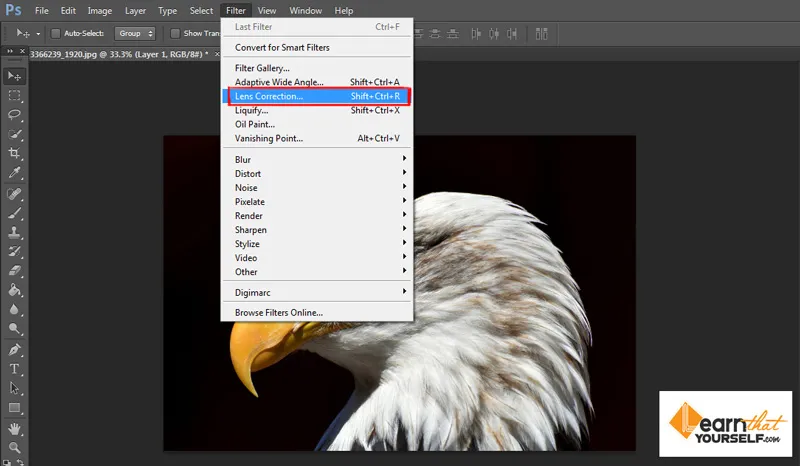
This option is used when we need to fix any distortion in the image caused by the camera lens. To use this option first go to the filter menu and choose ‘lens correction’ option. As you click on this option a dialogue box will open up where you will find various settings. This filter only works on 8 bit and 16-bit images.
There are two sets of options in the dialogue box:
- Auto Correction
- Custom
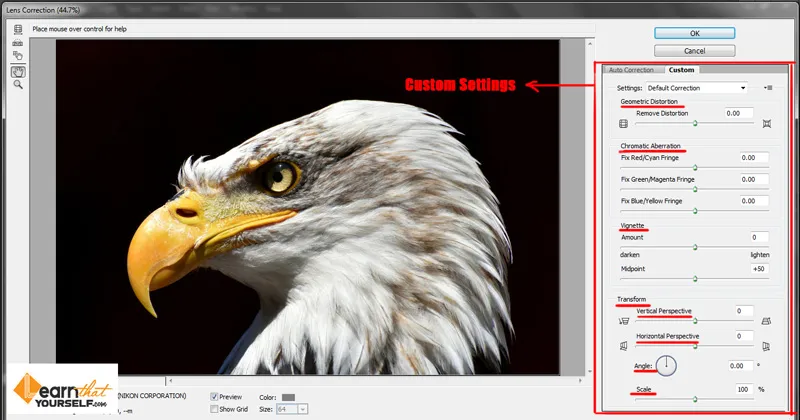
Under custom correction there are:
- Geometric distortions: This option is used to correct abnormalities in the images which have distortions like barrel or pincushion.
- Chromatic Aberrations: This option is used for color corrections. And you can change it by adjusting the given three sliders inside this option.
- Vignette: This option is used to make the edges darker than the center. You can adjust this effect by adjusting the amount slider and midpoint slider.
- Transform: This option is used to correct perspective issues. Sometimes, distortions are caused by the camera while shooting. And in this option, you can tilt, rotate or straighten the image. There are other options inside this option like Vertical perspective, Horizontal perspective, angle, and scale. The shortcut key for this filter is Shift + Ctrl + R
Related Topics:
Liquify
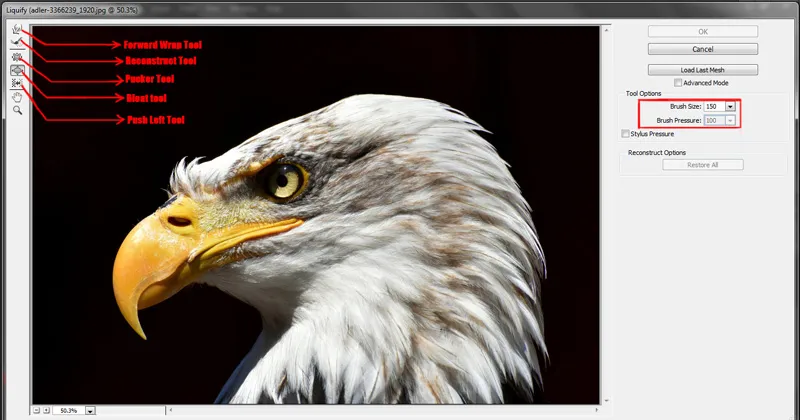
This tool is used to adjust the shape of any element of your image and is generally used in retouching. To understand the concept of this tool, imagine that when your image enters into this filter option it converts into a thick liquid and hence the name ‘liquify’.
The shortcut key for this option is Shift + Ctrl + X
To use this tool go to filter menu and click on ‘Liquify‘, a dialogue box will open up as you click on this option.
The first tool in the ‘liquify’ dialogue box is Forward warp tool. The shortcut key for this tool is W
And in this tool, you can move around the pixels of the image. On the right-hand side of the dialogue box, there are brush options. And as the name suggests the ‘size’ controls the size of the brush, ‘density’ controls how dense is the brush.
Next tool is Reconstruct tool where you can partially revert the changes that you’ve done by ‘forward wrap tool’ or any other liquify tool.
Pucker tool is used to make elements of the image smaller means it moves the pixels to the center of the brush area.
Bloat tool is just the opposite of pucker tool and it makes the elements of the image bigger. It moves the pixels away from the brush area.
Push Left tool: It moves the pixels of the image to the left when you drag the tool straight through the image.
Related Topics:
Vanishing Point
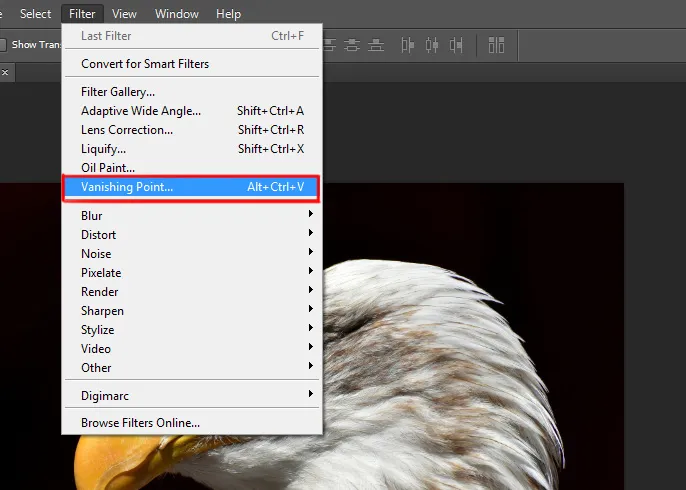
Vanishing point filter allows you to place any objects like a photo into any surface in Photoshop using the correct perspective.
For example, you want to add an image of a painting on a wall and the wall is in one point perspective. To place the image of the painting on the wall in the correct perspective you can use this tool. The shortcut key for this tool is Alt + Ctrl + V
Blur Filter
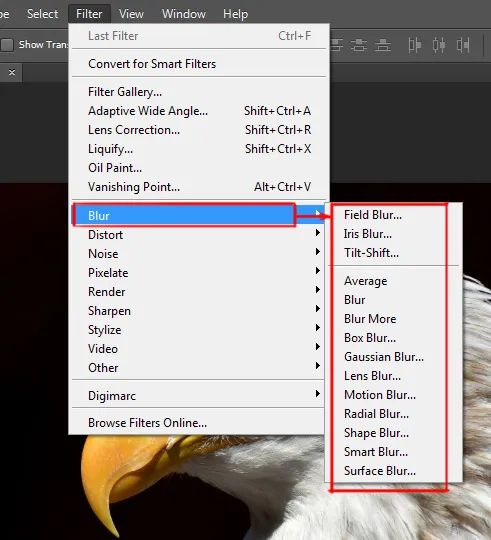
This filter blurs the pixels of the image and acts just like the blur tool. But there are different types of blur available inside the flyout menu of this tool like the Gaussian blur, lens blur, motion blur etc. and the most used tool in this option is Gaussian Blur. And this is most useful when using masks.
There are other options which are also regularly used. For example, ‘Iris blur’ which is used to synthesize a shallow depth of field and to use this filter, just drop the pin where you want to focus.
Related Topics:
- Step by Step guide for Retro 3D Movie Effect in Photoshop
- 5 Types of Masking in Photoshop
- Photoshop Gold Text Effect
Distort
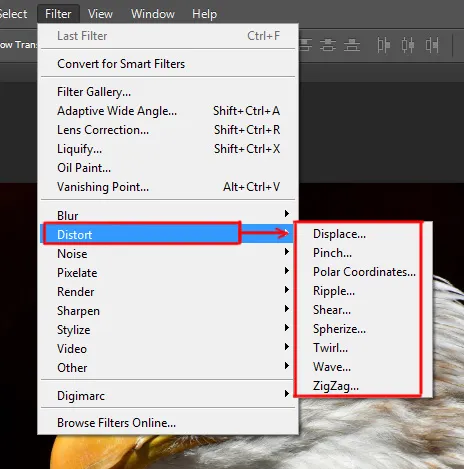
In this option, you can apply really interesting effects. Most of the options inside the ‘distort filter’ open up with a dialogue box where there are different other options available.
The options available in the flyout menu are:
Displace: This option allows us to determine how to distort a selection. For example, you can create a distorted effect of an image that appears to be printed on a surface held by its corners.
Pinch: This filter squeezes a selection. The positive value shifts towards the center and negative value shifts tend to shift outwards.
Polar Coordinates: This filter converts the image from rectangular to polar coordinates and vice versa. You can adjust the amount of distortion through the sliders.
Ripple: This filter allows creating ripple like undulating distortions in the image or selection of the image. There are options available to increase and decrease the size and number of ripples.
Shear: This filter distorts an image along a curve. You can adjust the shape of the curve by dragging the line on the box above. To change it back to the straight line, you can click on the ‘default’. There are two options to choose from for undefined areas, ‘wrap around’ and ‘repeat edge pixels’.
Spherize: This filter allows us to give the image a three-dimensional effect by wrapping it around a sphere.
Twirl: This filter rotates the selection more sharply in the center rather than the edges. You can choose the angle of the twirl pattern.
Wave: This filter works the same as the twirl but with much greater control. There are various options like the number of wave generators, wavelength, the height of the wave and wave type by which you can control your filter more precisely.
Zig Zag: This filter radically distorts the image or the selection.
Related Topics:
Noise
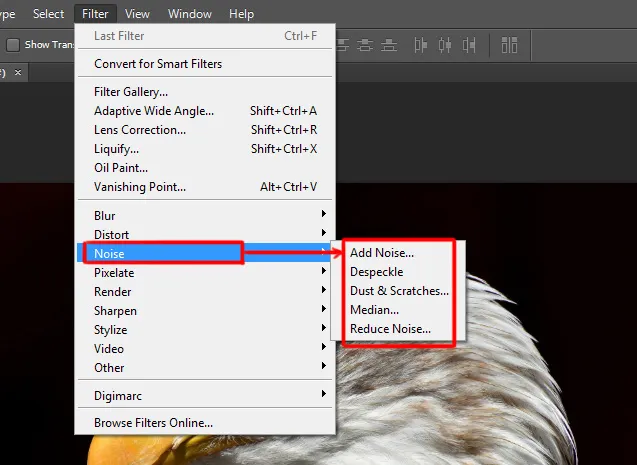
This filter adds or removes noise. There are five filters available in your noise fly-out menu in the CS6 version of Photoshop.
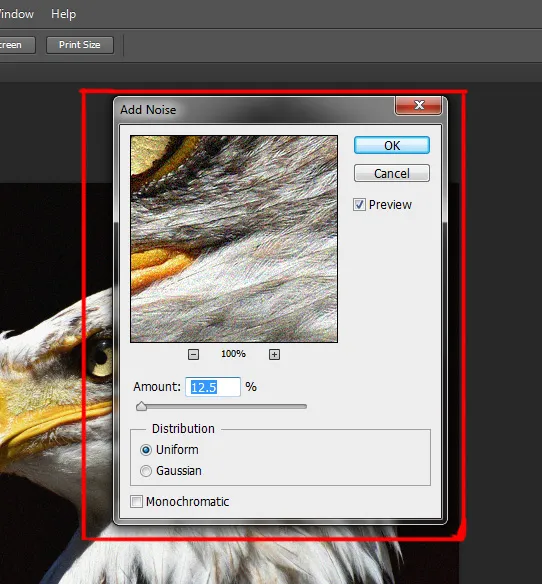
The first option in this menu is ‘add noise’ filter and it creates some random pixels in the photo. You can adjust the ‘amount’ of pixels by adjusting the amount slider. There are two distribution options available in this image i.e. Uniform and Gaussian.
The Uniform distribution creates a subtle distributional appearance and Gaussian creates the spackle distributional appearance. Underneath these options, there is a ‘monochromatic’ checkbox which is usually unchecked, but if it is checked then pixels will be in color of your photo.
The second option is the Despeckle. And this filter detects the edges or the areas where the significant color change occurs. And it blurs all the areas except those edges. Therefore, it’s actually removing the noise from the photo and preserves the details.
The third filter is the Dust and Scratch filter which allows us to reduce the visual noise by changing the similar pixels. You can control its effect by adjusting the radius and threshold sliders.
The fourth filter is ‘Median’ filter and it searches for the pixels of similar brightness and discards the pixels that differ too much from the one that is next and to them and replaces the center pixels with the average brightness value of certain pixels thus giving the image a painted effect. And you can control the effect by adjusting the radius slider.
The fifth and the last filter is the Reduce Noise filter. And this filter reduces the brightness and color noise thus reducing the overall nose of the image.
Related Topics:
Pixelate
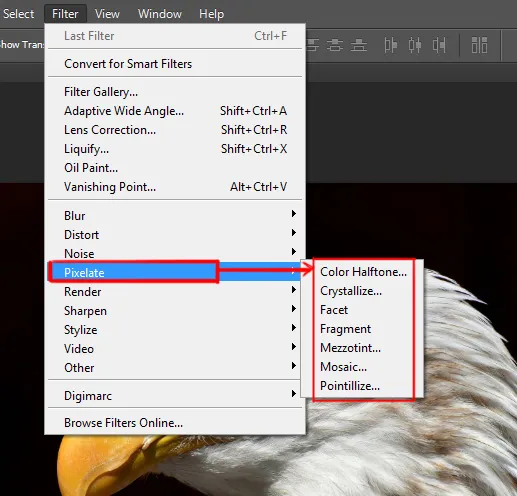
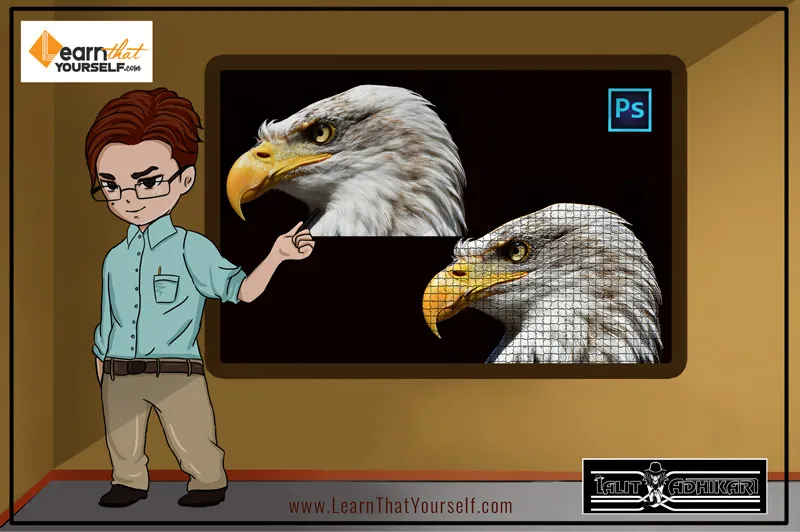
This filter clumps the pixels of similar color values in defined cells and distorts the image. There are six options in the flyout menu of this filter. And these filters are Color Halftone, Crystallize, Facet, Fragment, Mezzotint, Mosaic, and Pointillize.
But the most widely used and the best method to pixelate is ‘Mosaic Filter’. This particular filter clumps up the pixels into blocks. When you will click on this option a dialogue box will open up which have a ‘cell size’ slider. If we increase the cell size, the size of the square boxes increases as well. The square boxes are of the same color and represent the area where the filter is applied.
Render Filter
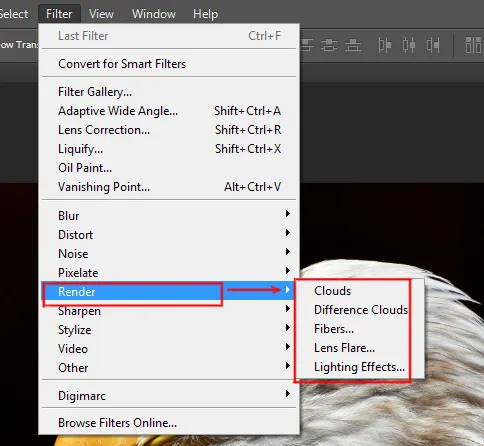
This filter allows you to create various effects like clouds, fibers, lens flares, and lighting effects.
Related Topics:
Sharpen Filters
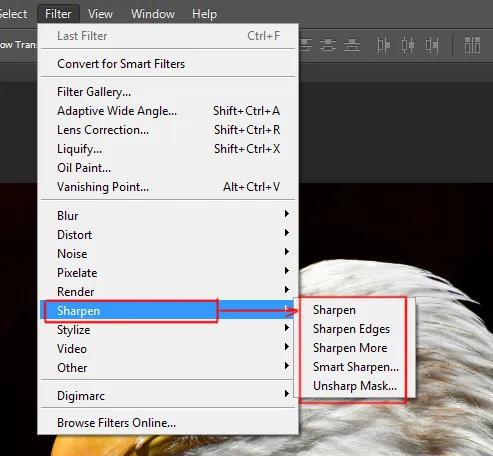
This filter allows you to increase the contrast of the adjacent pixels and focus on the blurred images. There are many options in the flyout menu of this filter.
Sharpen and Sharpen More: This filter allows you to sharpen the image automatically and hence improve its clarity. ‘Sharpen more’ option allows you to sharpen your image more than the ‘Sharpen’ option itself.
Sharpen Edges: This filter allows you to sharpen the edges of the image while maintaining the overall smoothness or blurriness of the image.
Unsharpen Mask: This filter allows you to sharpen the image by adjusting the contrast of the edge and produces a lighter and darker line on each side of the edge giving it an illusion of sharpness.
Smart sharpen: As you click on this option a dialogue box will open up where you will see various settings and sliders. The first slider in this option is the amount slider adjusts the amount of sharpness you need to apply in an image.
The slider is the ‘radius’ slider and here radius is the size of the texture. If the radius is too low the noise in which the smallest texture will be accentuated. If the radius is larger, then bigger objects will be more accentuated.
Reduce Noise: Now, when you apply sharpness you might see that sharpness along with it brings a lot of noise. So, ‘reduce noise’ option helps you lessen that noise. If you increase the value of ‘reduce noise’ slider, the sharpness will also fade away.
Related Topics:
Stylize
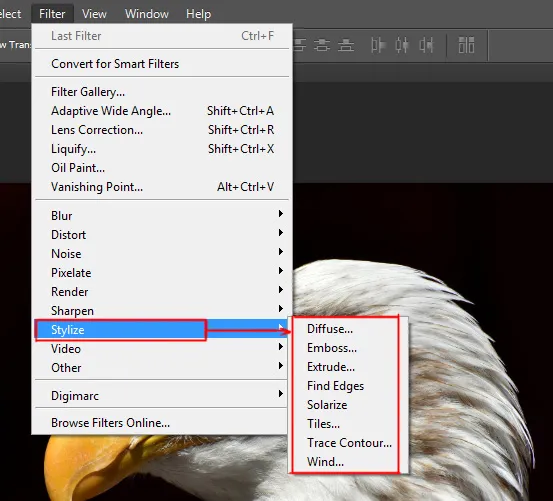
This filter gives the image an artistic effect by displacing the pixels and increasing the contrast of the highlights. There are eight options available in the flyout menu of this filter.
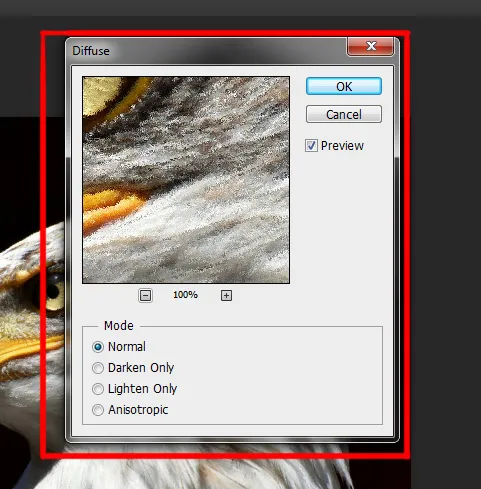
Diffuse: This filter displaces the pixels of the image to soften the focus.
There are four modes available in this option.
- Normal: Randomly displaces the pixels while ignoring the color values.
- Darken Only: Replaces the lighter pixels with the darker ones.
- Lighten Only: Replaces the darker pixels with the lighter ones.
- Anisotropic: This option replaces the pixels to the direction where there is the least change of colors.
Related Topics:
Emboss: This filter gives the image a stamped appearance. It converts the image’s fill color to grey and traces its edges with original fill color giving it an ‘extruded from the surface’ look. There are various options in the dialogue box of this filter like embossing angle, height, percentage and amount.
Extrude: This filter gives a 3D effect to the image. There are two options to extrude the image i.e. blocks and pyramids. You can specify the size and depth of the blocks and pyramids.
Find Edges: This filter emphasized the edges of the image by outlining the edges with dark lines against a lighter or which background thus giving it a sketch effect.
Solarize: This filter gives a photographic print effect on the image by blending the negative (inverted) and original (positive) image.
Tiles: This filter breaks the images into a series of tiles. You can specify the number of tiles and the maximum offset in this filter.
Trace Contour: This filter finds the major transition of brightness in the image and traces it with thin outlines of different colors for each color channel.
Wind: This filter creates tiny horizontal lines over the image giving a windblown effect.
Other Filters
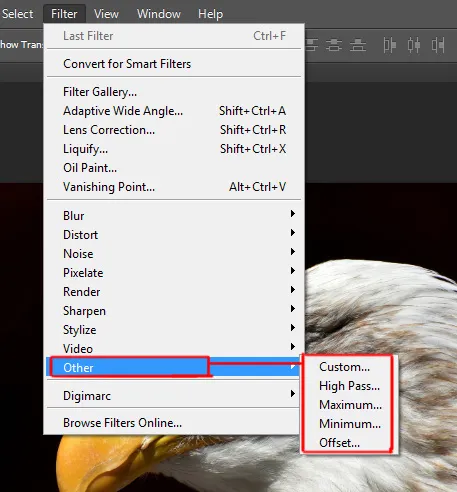
There are five additional filters included in this category:
Custom: This option allows you to design your own filter.
High Pass: This is an edge detection filter which increases the contrast of the edges. There is a radius slider in its dialogue box which enhances or decreases the edge details. I advise you to use this filter in an ‘overlay’ blend mode as it converts the fill color into solid grey.
Maximum and Minimum: These filters allow creating a spread and choking effect in the image. In the maximum filter, the white areas are spread out while black areas are choked and in minimum filter black area is black areas are spread out while white areas are choked.
Offset Filter: This filter allows you to make continuous patterns by repeating your image. This filter moves your images in a specified horizontal and vertical amount and fills the empty part with the copy of the original image.
Related Topics:
- Define Brush Preset in Photoshop
- Define Pattern in Photoshop
- Define Custom Shape in Photoshop
- Purge in Photoshop
- Adobe PDF Presets in Photoshop
- Presets in Photoshop
- Remote Connections in Photoshop
- Assign Profile in Photoshop
- Convert to Profile in Photoshop
- Keyboard Shortcuts in Photoshop


