In this Photoshop Lesson, we’ll learn about ‘Content-Aware Fill in Photoshop’. Content-Aware Fill command is available under Edit menu in Photoshop.
My name is Lalit Adhikari and we are at LTY. Let’s begin!
Table of Contents
What is Content-Aware Fill
Content-Aware Fill is an advanced Algorithm Powered option in Photoshop which allows user to Fill, Move or Remove unwanted objects from a photograph with ease.
Photoshop Fills the selected area with the help of surrounding similar pixels which are called as Sampling area.
Remove objects with Content-Aware Fill
We will learn to remove objects with Content-Aware Fill in Photoshop.
- Select the Object to be removed
Make a quick, rough selection of the object to be removed using any of the Selection Tools in Photoshop.
- Open Content-Aware Fill
- Right-click within the selection and choose Content-Aware Fill…
- Or go to Edit > Content-Aware Fill…
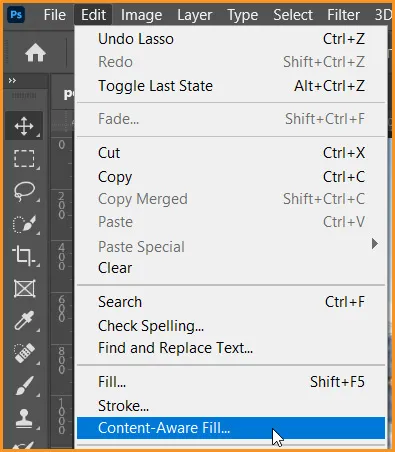
- Refine the selection
We don’t need to create a perfect selection but still don’t deviate to much from the edges. Try to keep selection few pixels away from edges.
- Click OK when the result seems appropriate.
Related Topics:
Tools in Content-Aware Fill Workspace
While working with Content-Aware Fill, the Workspace of Photoshop gets modified a little as shown below.
It’s called Content-Aware Fill Workspace. The tools provided in this workspace are discussed below.
Sampling Brush Tool
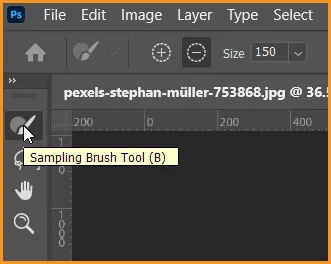
We can paint with the Sampling Brush Tool in the document window to add or remove sampled image areas (as done in case of layer mask) used to fill the selection.
- If we’ve to add to the default sampling area, we’ve to choose the Add mode in the Options bar and brush over the areas in the image we want to include in the sampling area overlay.
- If we’ve to remove from the default sampling area, we’ve to choose the Subtract mode in the Options bar and brush over the areas in the image we want to exclude from the sampling area overlay.
- In case if we need to toggle between Add and Subtract modes, we can simply hold down Alt (Windows)/ Option (macOS) key while brushing with the Sampling Brush Tool.
- If we need to increase or decrease the Sampling Brush size, we simply use the Size option in the Options bar or use the left/right curly bracket keys.
Related Topics:
Selection Refinement Tools

We can use either the Lasso Tool or Polygonal Lasso Tool to change or modify our original selection (are to be filled) in the document window.
- We can press E key to cycle through the Lasso Tool selection modes – New Selection, Add To Selection, Subtract From Selection and Intersect With Selection.
- With either of the Lasso Tool selected, we can use the Expand or Contract buttons to expand or contract the selection by a specified number of pixels, respectively. We can click these buttons in the Options bar.
- To reset all changes made in this workspace to the original selection, click the reset icon in the Options bar.
Note: In case we change the selection, the sampling area gets reset but the previous brush strokes are preserved. The selection also gets updated in the document when we exit the Content-Aware Fill workspace after completing the fill.
Related Topics:
Navigational Tools
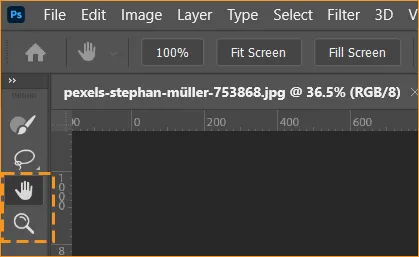
- Hand Tool: It is used to pan over different parts of the image in the document window as well as the Preview panel. We can quickly toggle to the Hand Tool by holding the Spacebar key while using any other tool.
- Zoom Tool: Zoom in or zoom out the view of the image in the document window or the Preview panel.
Related Topics:
Content-Aware Fill Panel Settings
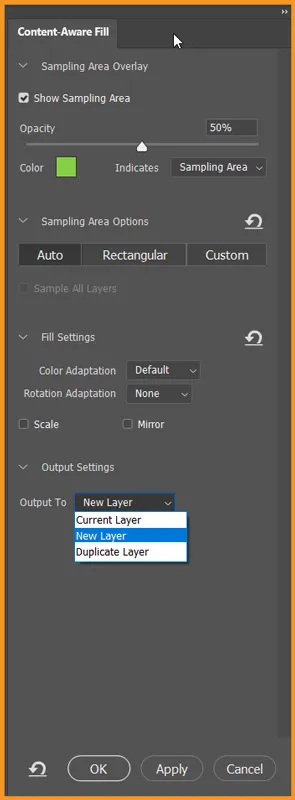
We can adjust the following settings in the Content-Aware Fill Panel.
Sampling Area Overlay
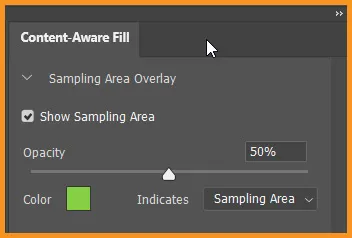
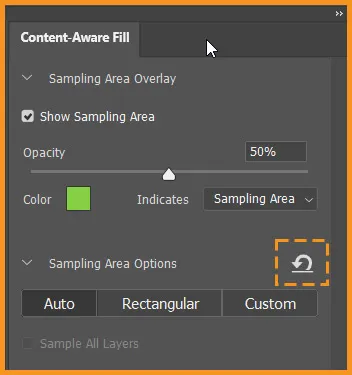
- Show Sampling Area: Selecting this option will show the sampling area or the excluded area as an overlay on the image in the document window.
- Opacity: To determine the opacity of the overlay displayed in the document window. To adjust the opacity, drag the slider or type a percentage value in the text box.
- Color: To determine the color of the overlay displayed in the document window. Click the color selection box and then choose a color from Adobe Color Picker.
- Indicates: To determine where to show the overlay in the sampling or the excluded area. Choose an option from the drop-down list – Sampling Area or Excluded Area.
Related Topics:
Sampling Area Options
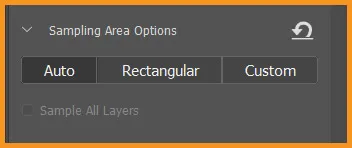
Sampling area is used to determine the area in the image where we want Photoshop to look for source pixels to fill content.
- Auto: Selecting this option, Photoshop will use content similar to surrounding fill area.
- Rectangular: Selecting this option, Photoshop will use rectangular region around fill area.
- Custom: Selecting this option, we have to manually define a sampling area. Use the Sampling Brush Tool to add to the sampling area.
- Sample All Layers: Selecting this option, Photoshop will sample source pixels from all the visible layers in the document.
To reset to default sampling area, click the reset icon next to the Show Sampling Area option.
Related Topics:
Fill Settings
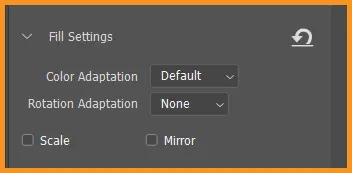
- Color Adaptation: This options allows for contrast and brightness to adapt for a better match. It is useful for filling content with gradual color or texture changes. Choose an appropriate option from the drop-down list – None, Default, High or Very High
- Rotation Adaptation: This options allows content rotation for a better match. It is useful for filling content with rotated or curved patterns. Choose an appropriate option from the drop-down list – None, Low, Medium, High or Full
- Scale: Selecting this option will allow content resizing for a better match. It works well for filling content with repeating patterns of different sizes or under perspective.
- Mirror: Selecting this option will allow content to be flipped horizontally for a better match. This is useful for images with horizontal symmetry.
To reset to default fill settings, click the reset icon in the Fill Settings menu.
Related Topics:
- Toolbar in Photoshop
- List of websites for Royalty Free images
- List of websites for Royalty Free Raw images
Output settings
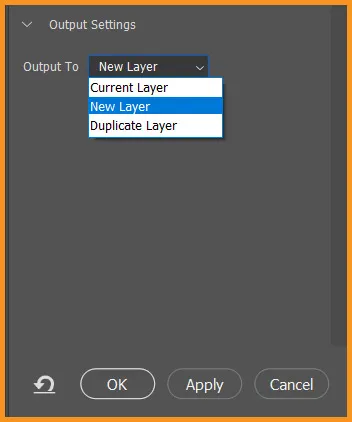
- Output To: Apply Content-Aware Fill to Current Layer, New Layer, or Duplicate Layer.
- Click on OK button to commit Fill and Close the Content-Aware Fill Workspace.
- Click on Apply to commit Fill and keep the Content-Aware Fill Workspace open.
- Click on Cancel, to cancel Fill and exit workspace.
To reset all setting changes made in the Content-Aware Fill Panel, click reset icon.

Related Topics:
- What is Photoshop
- Tools in Photoshop
- Selection Tools in Photoshop
- Type menu in Photoshop
- How to Crop in Photoshop
- Brush Tool in Photoshop
- Pen Tool in Photoshop
- What is Digital Painting
- History Brush Tool in Photoshop
- Color Replacement Tool & Mixer Brush Tool


