In this Photoshop Lesson, we’ll learn about Color Settings in Photoshop, Working Spaces, Color Management Policies etc. Color Settings is available under Edit menu in Photoshop.
My name is Lalit Adhikari and we are at LTY. Let’s begin!
Table of Contents
Introduction
As we already know, Adobe Photoshop is the most powerful and popular image editing software in the world. Yet, it doesn’t offer us the best color range by default. In fact, the default Color Settings offer the least color range to work with.
To work with higher range of colors and have better control of colors in our editing, we have to understand ‘Color Settings in Photoshop’ under Edit menu.
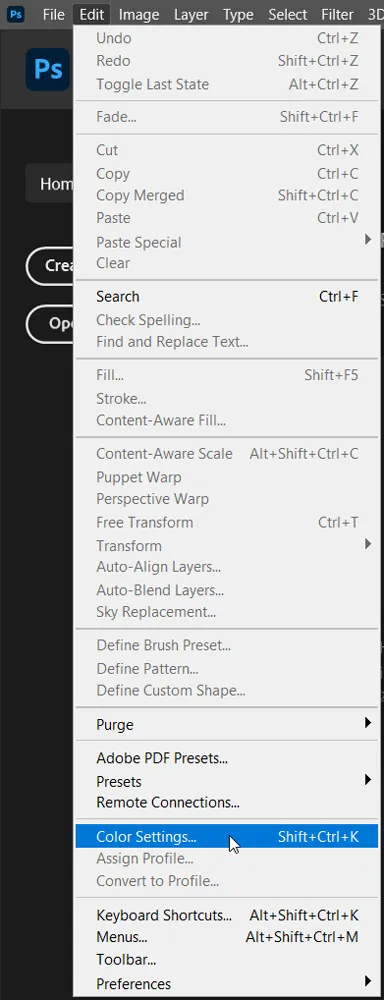
As you click on the Color Settings option in Edit menu, a dialog box will open up. Even though it may look a bit daunting at first but as you precisely go through it, there are only a few things that you will need to understand and change to get higher range of colors.
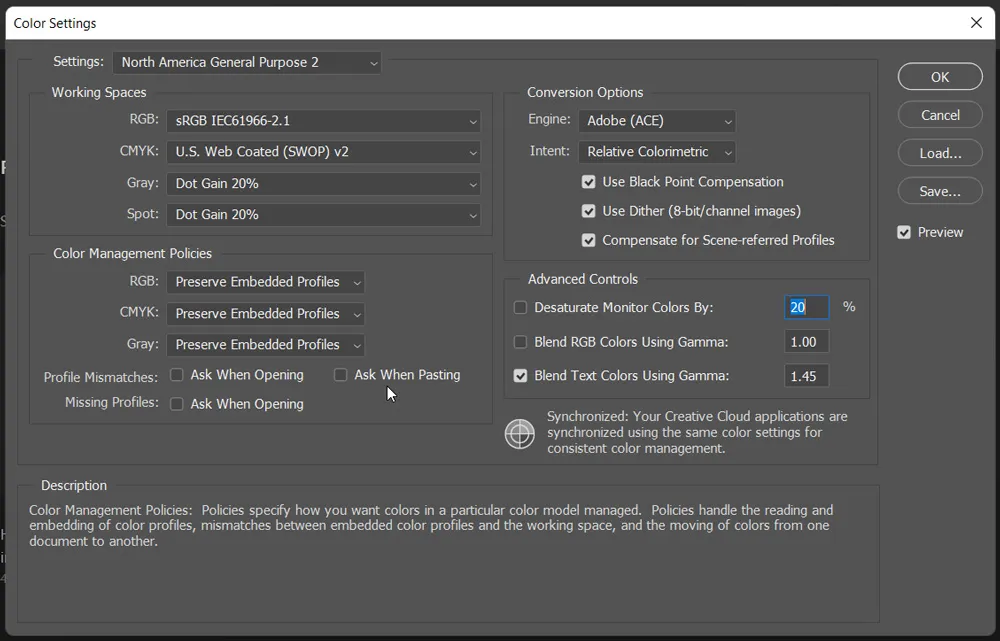
Now, if you start from the top, the first option you will see, ‘Settings’ drop down menu which has several presets to choose. You can also set your own custom configuration according to the relevance of your artwork and design.
Depending on your country, your preset may have a different value selected. If it is something else, it’s also okay, as we will be making our own changes anyway.
Related Topics:
Working Spaces
A Working Space is usually considered as a Color Profile (Color Space or ICC profile) that you use when editing and adjusting your images. It’s not device specific but it has a large enough color range that it can actually contain all the colors that are present in your digital image.
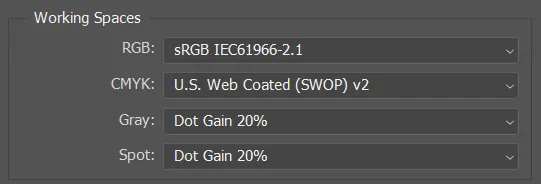
Now, underneath ‘Settings’ option we have ‘Working Spaces’ and this is where you specify a default Color Profile (Color Space or ICC profile) for each Color Mode. So we have RGB, CMYK, Grayscale and Spot as categories, for which we have different options available.
In simple terms, here you specify the Color Profile for the respective Color Mode you have chosen for your document.
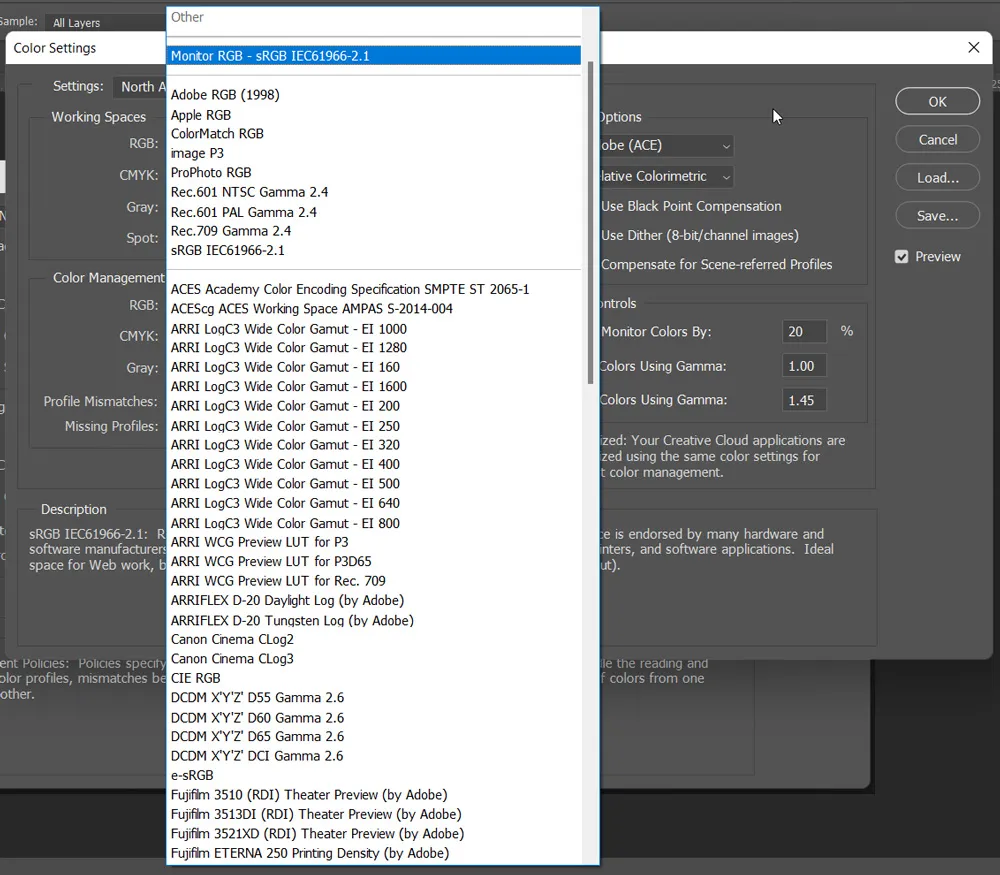
Now, there are many options available for the RGB working space. And some of the important profiles are:
- Monitor RGB: It sets the working space according to the current monitor space. In this option, Photoshop turns off its color management properties.
- Color Sync RGB: This profile is specified to Apple Color Sync, and is not for windows.
- Adobe RGB (1998): This is the best color profiles to see 8-bit images and for converting RGB mode to CMYK mode. This profile provides a larger range of RGB of colors.
- Apple RGB: This profile is specified for Mac computers.
- Color Match RGB: This profile works only with Radius Press View Monitors.
- Pro Photo RGB: This working space provides the widest color range. It was originally named ROMM RGB and later it was named Pro Photo RGB. It is very good for viewing 16-bit images.
- Wide Gamut RGB: This color profile also provides a large color range. This profile can display many colors that can’t be displayed by the monitor.
Related Topics:
- How to Create Rain Effect in Photoshop
- How to Add Falling Snow in Photoshop
- Step by Step guide for Retro 3D Movie Effect in Photoshop
Color Management Policies
In color management policies, you have three modes and these are RGB, CMYK and Grayscale. In these three drop-down menus, you can actually select if you want to turn them off or whether you want to preserve profiles that are embedded in the digital file or whether you want to convert to working RGB space.
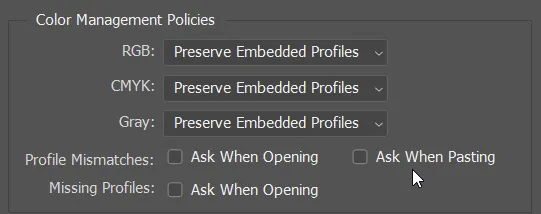
Once you’ve chosen your preferred Working Spaces we can proceed to configure Photoshop’s Color Management Policies which determine, ‘How Photoshop handles Color Profiles when opening and working with images’.
Underneath these particular color modes, we have a couple of checkboxes primarily for ‘Profile Mismatches’ so when you actually open up your documents it will ask you, whether you want to actually embedded profile or convert to your existing default working space.
You also have a checkbox called ‘Missing Profiles’ which means if you open an image and it doesn’t have an Embedded Color Profile, it will actually ask you if you want to leave it without a profile or convert once again to your default Working Space.
Related Topics:
Color Conversion Options
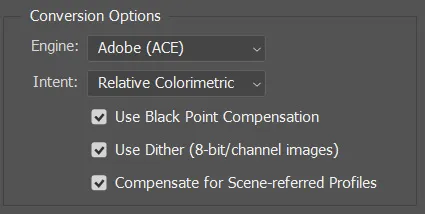
Then, we have ‘Conversion Options’ which, as the name suggests, tells us ‘How Photoshop actually manages the conversion process between Color Profiles’.
My suggestion would be to leave the Engine setting to Adobe (ACE). You’ll also need to actually adjust the ‘Intent’ and that is a drop-down window below the Engine option.
You will have four options under Intent and these are Perceptual, Saturation, Relative Colorimetric and Absolute Colorimetric.
I recommend that you can use either ‘Perceptual’ or ‘Relative Colorimetric’ for photographs and utilize ‘Black Point Compensation’ option which controls whether to adjust for differences in the black point when actually converting colors between different Color Spaces. So, leave this thing checked.
Underneath this, we have a ‘Dither’ option and also keep this option checked as it helps in reducing banding when converting 8-bit images between different Color Spaces.
Next option is ‘Compensate for Scene-referred Profiles’ and this profile is used for videos.
Related Topics:
Advance Controls
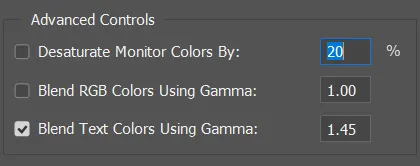
The option that largely assists you with calibrating your monitor is ‘Desaturate Monitor Colors By:’ which is under the Advanced Controls.
So if your photographic or inkjet prints are actually coming out less saturated than that which you are viewing on your monitor, then you can turn on this setting and add a specific percentage value that will desaturate your monitor and you will be able to balance the two in order to match them more closely which will help with your Color Management. The default value is given 20%.
Under this setting there is another option which is ‘Blend RGB Colors Using Gamma’ and you should also uncheck this option.
Although it’s result is better than default still I would advice to keep it unchecked as it’s a software level setting and if you send your photoshop file to someone, they might have this unchecked and hence it will hinder their preview experience.
Note: If you still have any doubts and would like to know more information about any specific option within the color setting, all you need is to do is hover your cursor over that particular option that you have doubt about and you will notice that there is a Description panel in the bottom of that dialogue box. And this panel will give you a small technical description of that particular option.

And finally, once you are satisfied with your settings you can save them by going up to this ‘Save…’ button at the top-right and click it.
Thus, you have saved your custom settings as a new preset and they will appear in the settings drop-down menu as whatever you choose to save them and name them by.
Related Topics:
- Find and Replace Text in Photoshop
- Fill in Photoshop
- Stroke in Photoshop
- Content-Aware Fill in Photoshop
- Content-Aware Scale in Photoshop
- Puppet Warp in Photoshop
- Perspective Warp in Photoshop
- Transform command in Photoshop
- Auto-Align layers in Photoshop
- Auto-Blend Layers in Photoshop


Great information. It shows you have a lot of experience in graphic arts.