In this Photoshop Lesson and Tutorial, we’ll learn about, ‘How to enlarge an image in Photoshop without losing too much quality’, ‘How Image Size works for screen and print’, ‘What is Image Interpolation’, ‘Resample options in Photoshop’ and ‘Best way to enlarge an image in Photoshop’.
My name is Lalit Adhikari and we are at LTY. Let’s begin!
Table of Contents
Introduction
Whenever we talk about resizing an image in Photoshop, the general rule of thumb has always been that we can make an image smaller than its original size but we should avoid making it larger. Or we can’t make it larger if we want the image quality intact.
While making an image smaller, Photoshop needs to take some of the pixels from the original image and delete them. It doesn’t sound like a cool thing but the results are just opposite. The smaller version, in most cases, ends up looking sharper than the original.
On the other hand, making an image larger is exactly opposite. In this case, Photoshop needs to add pixels to replicate detail and increase the size of the image. Remember, Photoshop can’t create details that wasn’t there before.
What Photoshop does here is guess ‘What the new pixels should look like and then it tries to blend the new pixels in with the originals’. Depending on the upsampling method we used, our larger version usually ends up looking soft and dull or chunky and oversharpened.
Photoshop has several methods or algorithms for resizing an image. It is important to understand the concepts behind these methods to achieve the best results after resizing.
Related Topics:
Image Size: Screen Vs. Print
The size of a single image is different in both conditions:
- when we view it on-screen
- when we print it
This understanding helps us to better understand which settings to change when we resize an image.
Screen Size
The screen resolution of our monitor is the number of pixels it can display.
For Example: A monitor with screen resolution of 1920 x 1080 pixels.

It displays 1920 pixels for the Width and 1080 pexels for the height.
There are different screen resolutions available, typically depending on the physical size of the monitor. We don’t just need a bigger monitor, we should also have a powerful GPU to power it up.
We can check our screen resolution in the Display Setting of our PC.
Related Topics:
Image Size on-screen
Images have fixed number of pixels. There could be two situations here:
- Image have more pixels than the screen
- Image have fewer pixels than the screen
In case of more pixels, the image will be shown on the maximum size possible with the screen resolution. All the extra pixels will be compressed to show the final output. Although zooming in to see details will be possible.
The physical size and resolution of the image are not used in on-screen display.
In case of fewer pixels, the image will be completely visible on the screen and depending upon screen resolution, it may appear big or small.
For Example: A image with Width and Height of 600 pixel will appear bigger on a screen resolution of 1024 x 768 than on a screen resolution of 1920 x 1080
Image Size in print
The physical size and resolution of an image are used in printing. Both these values along with the pixel dimensions determine the amount of data in the image and hence it’s print quality.
Related Topics:
Image Interpolation
Whenever we resize an image in Photoshop, either we scale it up or down. The Photoshop has to either add new pixels or remove pixels from it, respectively.
This process is called Image Interpolation, it occurs when we resize or distort an image from one pixel grid to another.
By default, Photoshop have Image Interpolation option in it’s Preferences set to Bicubic Automatic.

There are several other Resampling values for Image Interpolation:
- Nearest Neighbor (preserve hard edges)
- Bilinear
- Bicubic (best for smooth gradients)
- Bicubic Smoother (best for enlargement)
- Bicubic Sharper (best for reduction)
- Bicubic Automatic
These Resampling values work whenever we transform an image using Free Transform mehtod.
Resampling changes the total number of pixels in an image. When we increase the size, the number of pixels increases it’s called upsampling, Photoshop adds data to the image.
Related Topics:
Remember: Photoshop can not create new details which were not already present in the image.
When we decrease the size, the number of pixels decreases it’s called downsampling, Photoshop removes data.
Whether the data is removed from or added to the image, the image quality degrades to some extent. Removal of data from an image is typically preferable than the addition of data.
It’s so because upsampling requires that Photoshop to guess which pixels to add. This procedure is much more complex than guessing which pixels to remove when we downsample.
Adobe recommends if we resample our images, we should do so only once.
Remember: This default value doesn’t apply to the Save for Web dialog box. For Save for Web, we have to chose the one suitable for our requirement.

Related Topics:
Nearest Neighbor
Nearest Neighbor is the most basic and it’s very fast. To create a new pixels, Photoshop simply looks at the pixel next to it and copies its value.
Unfortunately, the results are usually lousy unless the image is made of colored lines or shapes (like an image from Illustrator or FreeHand) but it’s often useful for preserving the readability of screen shots.
Bilinear
Bilinear is slightly more complex and produces somewhat better quality compared to Nearest Neighbor.
Photoshop sets the color or gray value of each pixel according to the pixels surrounding it. Some pictures can be upsampled pretty well with bilinear interpolation. But we usually use one of the bicubic options explained below.
Bicubic
Bicubic interpolation creates better effects than Nearest Neighbor or Bilinear but takes longer time.
Similar to Bilinear, it looks at surrounding pixels but the equation it uses is much more complex and calculation intensive, producing smoother tonal gradations.
Related Topics:
Nearest Neighbor Vs Bicubic
Although Bicubic is far more better and complex Image Interpolation Algorithm than Nearest Neighbor but it doesn’t mean it’s always better than Nearest Neighbor.
The Image Interpolation method, we use depends on our image and requirement.
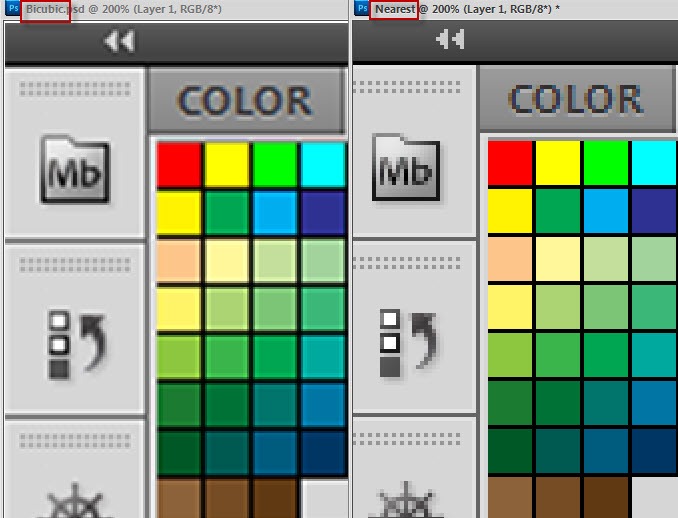
As we can clearly notice, in case of screenshots, Nearest neighbor outperforms Bicubic here.
Bicubic Smoother
Bicubic Smoother is a new interpolation method specifically designed for upsampling. As its name suggests, it gives a smoother result that handles subsequent sharpening better than Bicubic sampling.
Bicubic Sharper
Bicubic Sharper is another new interpolation method, only this time designed for downsampling. It does a better job of preserving detail than Bicubic.
Bicubic Automatic
This is the default option in the Image Interpolation setting of Photoshop. In this case, Photoshop automatically applies the best Bicubic option according to upsampling or downsampling.
Related Topics:
Comparison
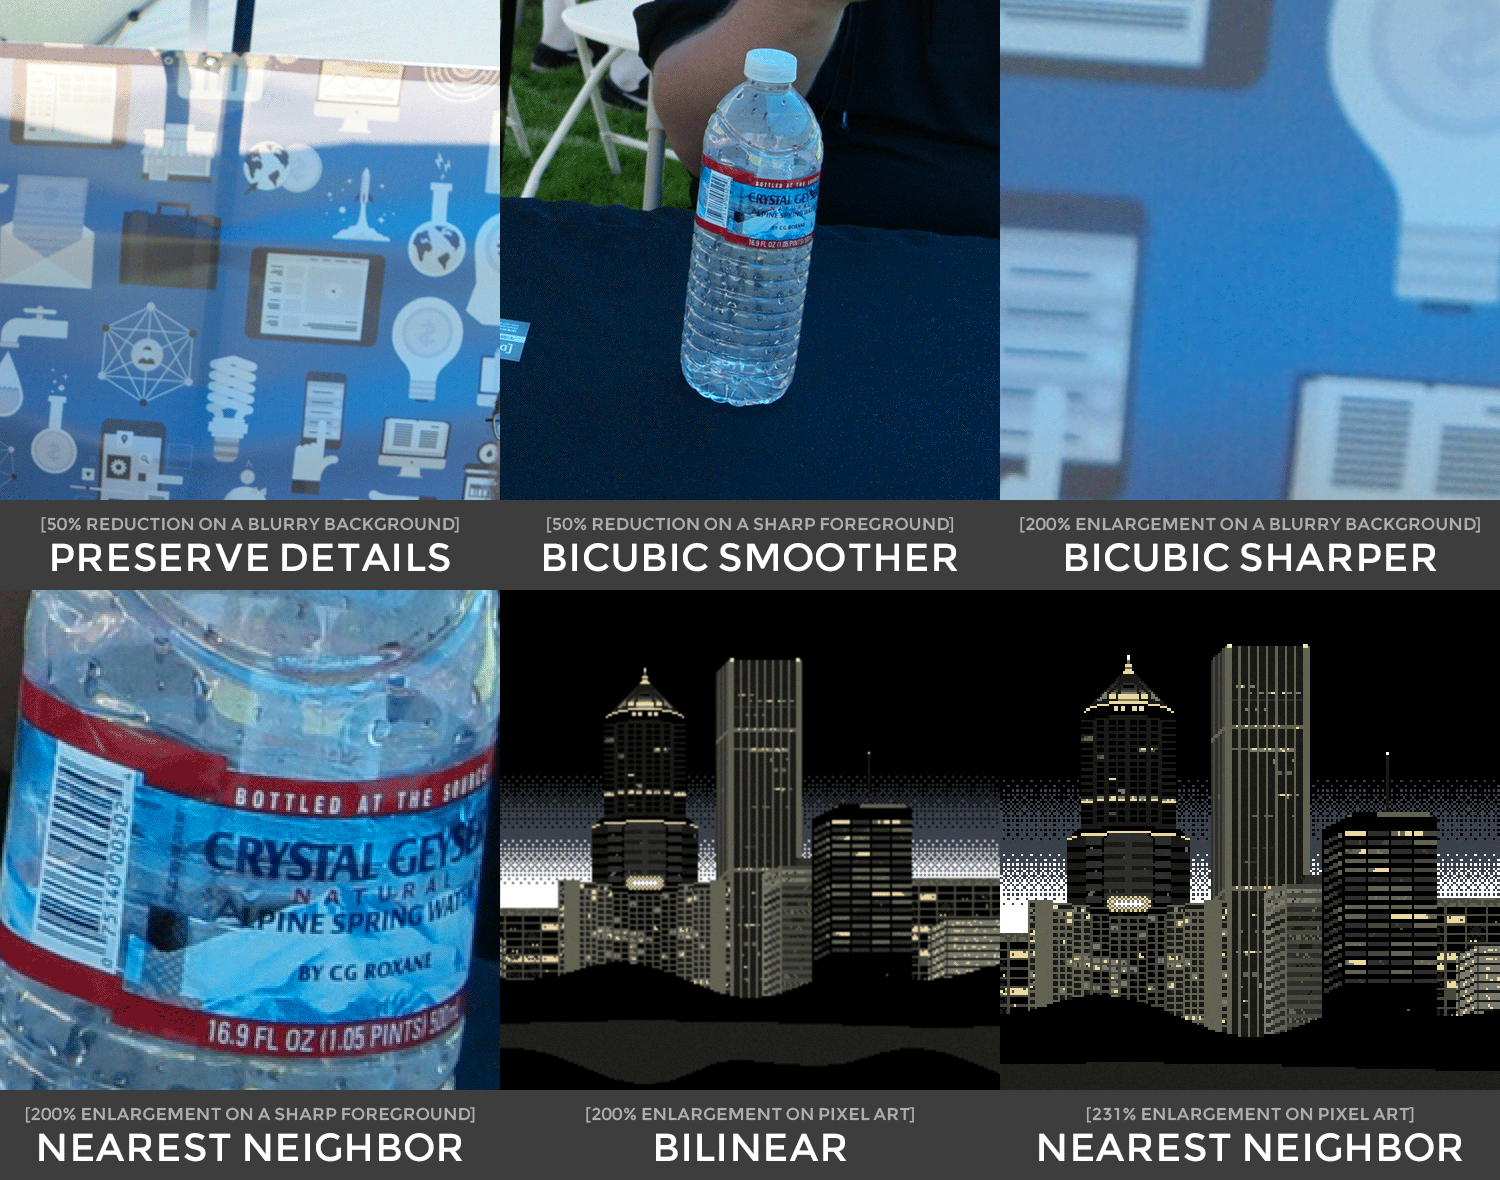
The above GIF shows result of all the above Image Interpolation methods on different images.
Image Size
Other than the above options, we also have two more options available in Resampling in Image Size dialog box under Image menu:
- Preserve Details (enlargement)
- Preserve Details 2.0

Here, Automatic value of Resample is the default value where Photoshop itself decide which of the Image Interpolation method should be used.
Related Topics:
Image Size dialog box
When we use Image Size option to resize our images (from Image > Image Size), four aspects of our image can change:
- Pixel dimensions: The width and height of the image.
- Image size: This value appears at the top of the dialog box.
- Resolution: This value appears in pixels per inch or pixels per centimeter.
Photoshop calculates the physical size, resolution and pixel dimensions of an image as follows:
- Physical size = resolution x pixel dimensions
- Resolution = physical size / pixel dimensions
- Pixel dimensions = physical size / resolution
The Image Size dialog allows us to resize our images in two ways:
- We can increase or decrease the amount of data in the image (resampling).
- We can maintain the same amount of data in the image (resizing without resampling).
When we resample, the image quality can degrade to some extent. We may have to do some extra work, such as using the Unsharp Mask filter to sharpen our image to compensate for the resampling.
Tip: To reset the Image Size dialog box to its original state, press Alt (Windows) or Option (macOS). Pressing these keys changes the Cancel button to a Reset button.
What is Resample
Resampling is changing the pixel dimensions of an image. Resampling can degrade image quality. Downsampling decreases the number of pixels in the image, while upsampling increases the number.
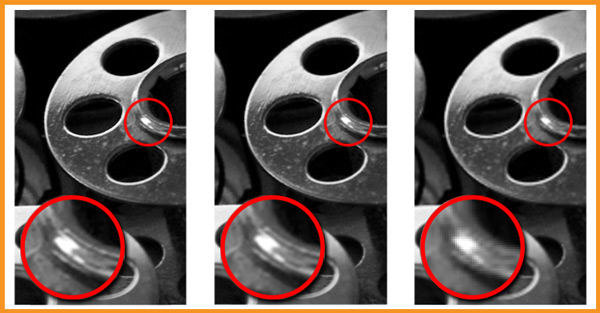
| Image | Pixel Dimensions | Size | File Size |
|---|---|---|---|
| Left Image | 470 x 1000 | 2.75″ x 4.75″ at 240 ppi | 1.34 MB |
| Center Image | 940 x 2000 | 2.75″ x 4.75″ at 480 ppi | 5.38 MB |
| Right Image | 157 x 333 | 2.75″ x 4.75″ at 80 ppi | 153 KB |
Related Topics:
Resizing with Resample
When we resize with resampling an image, we change the amount of data in the file too. To resample our image, ensure that Resample box is checked at the bottom of the Image Size dialog box. Resample is checked by default.
Resample option changes total number of pixels in the image, which are displayed as Width and Height in pixels in the Image Size dialog box.
When we increase the number of pixels (upsampling), then Photoshop adds data to the image. When we decrease the number of pixels (downsampling) then Photoshop removes data.
Whenever data is removed from or added to an image, the image quality degrades to some extent. Removal of data from an image is typically preferable to the addition of data.
That’s because upsampling requires Photoshop to guess which pixels to add. This procedure is more complex than guessing which pixels to remove when we downsample.
We get the best results working with images we bring into Photoshop in the proper resolution for the output we want. We could get the results we need by resizing our image without resampling.
When we turn on Resample, we can change any of the values in the Image Size dialog box: pixel dimensions, physical size or resolution. If we change one value, we affect the others.
The pixel dimensions are always affected in following ways:
- Changing the pixel dimensions affects the physical size but not the resolution.
- Changing the resolution affects the pixel dimensions but not the physical size.
- Changing the physical size affects the pixel dimensions but not the resolution.
We cannot set the file size; it changes when we change the total amount of data in the image (the pixel dimensions). Note the file size value before we change other values in the dialog box.
Then, we can use the file size information to understand how much data is removed or added to our image when we resample it.
For example: if the file size changes from 250KB to 500KB, we add twice as much data to the image which can degrade it. Degraded images can look blurry, jagged or blocky.
Related Topics:
Resizing without Resample
When we resize an image without resampling it, we change the image’s size without changing the amount of data available in the image.
Resizing without resampling changes the image’s physical size without changing the pixel dimensions in the image. No data is added to or removed from the image.
When we uncheck the Resample option, the pixel dimension fields are not available. The only two values we can change are:
- the physical size (Width and Height in Document Size)
- the resolution (pixels/inch)
When we resize without resampling, we can set either the physical size or the resolution of the image.
To keep the total amount of pixels in the image same, Photoshop compensates for the value we set by increasing or decreasing the other value.
For example: if we set the physical size, Photoshop changes the resolution.
When the pixel dimensions are constant and we decrease the physical size of an image, the resolution increases correspondingly.
If we decrease the physical size of an image by half, the resolution doubles. Twice as many pixels can fit into the same space.
If we double the size of an image, the resolution decreases by half because the pixels are twice as far apart to fit the physical size.
For example: A 400 x 400 pixel image, has a physical size of 4 x 4 inches and has a resolution of 100 pixels per inch (ppi). To reduce the image’s physical size by half without resampling, we set the physical size to 2 x 2 inches.
Photoshop increases the resolution to 200 ppi. Resizing the image this way keeps the total number of pixels constant (200 ppi x 2 x 2 inches = 400 x 400 pixels).
If we double the physical size to 8 x 8 inches, the resolution decreases to 50 ppi. Adding more inches to the image size means that there can only be half as many pixels per inch.
Similarly, if we change the image resolution, the physical size changes as well.
Remember: The pixel dimensions control the amount of data and the resolution and the physical size are used only for printing.
Also Note: Pixels per inch (ppi) is the number of pixels in each inch of the image. Dots per inch (dpi) relates only to printers and varies from printer to printer. Generally, there are 2.5 to 3 dots of ink per pixel.
For example: a 600 dpi printer only requires a 150 to 300 ppi image for best quality printing.
Related Topics:
Preserve Details
Preserve Details is great choice for creating large prints. This option will give us a noise reduction slider to smooth out noise as the image gets larger.
While resizing the image, this method places primary importance on the preservation of image details and sharpness.

In the above image, I’ve increased the size to 300%.
Related Topics:
Preserve Details 2.0
Preserve Details 2.0 was introduced with Photoshop CC 2018. It’s the sequel to the original Preserve Details algorithm that was added in an earlier release of Photoshop CC. It is the most advanced upscaling technology that Photoshop has ever seen.
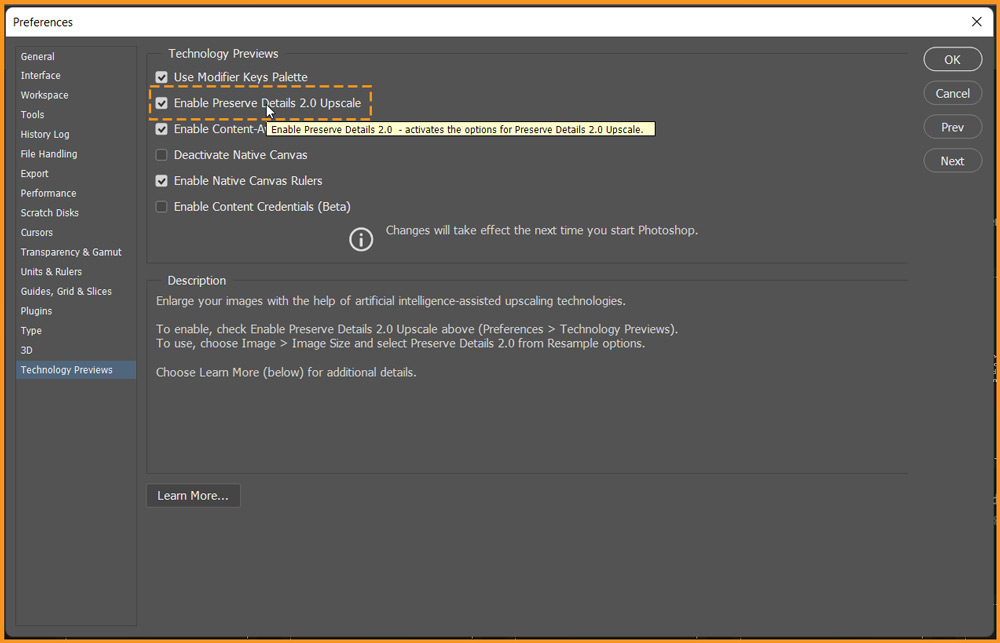
If Preserve Details 2.0 is not available in Image Size dialog box then open Preferences of Photoshop, go to Technology Previews tab on the left side and check the box for ‘Enable Preserve Details 2.0 Upscale’ as shown below.
Related Topics:
- History Brush Tool in Photoshop
- Color Replacement Tool & Mixer Brush Tool
- Healing, Clone & Pattern Stamp Tools in Photoshop
Stair Step Interpolation
Stair Step Interpolation isn’t really a resizing algorithm in Photoshop but more of a clever technique for effectively changing the size of an image.
When we want to upscale an image, instead of changing the size dimensions to the final ones, we can scale it up by increments of 10%.
This process seems to improve the quality and sharpness of the image when we’re using older resampling algorithms. However, it doesn’t seem to be necessary with Preserve Details 2.0
Best way to Enlarge an image in Photoshop
The way to enlarge an image in Photoshop will depend on the image as shown above but still, if you are using a Digital Photograph then chosing Preserve Details 2.0 will be your best bet!
Open the image in Photoshop.
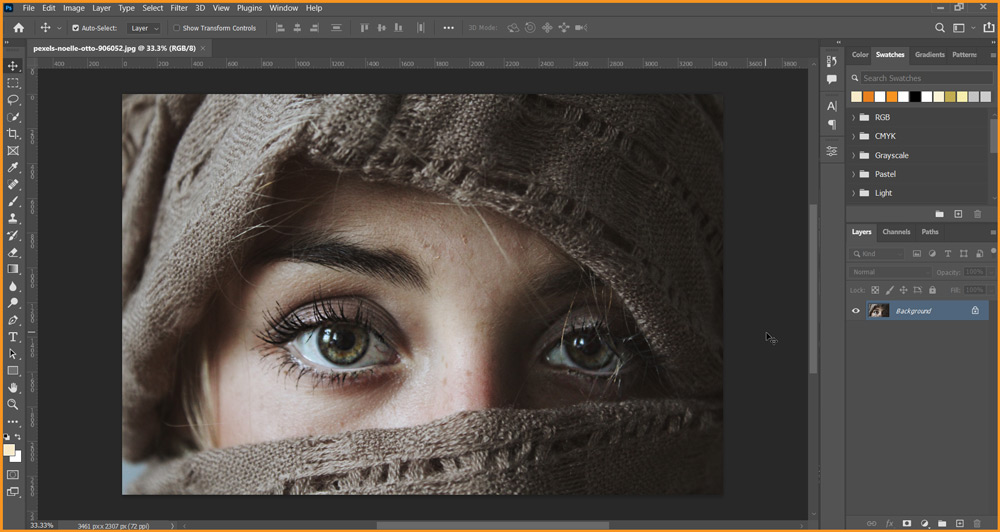
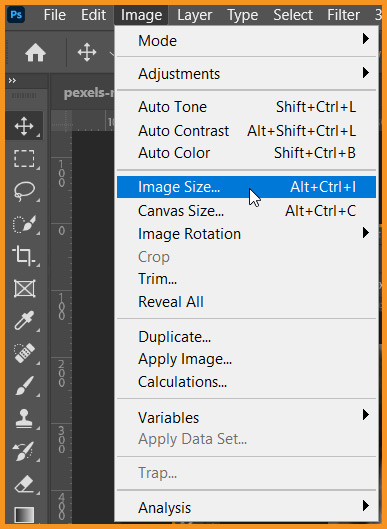
Go to Image menu, chose Image Size.
In the Image Size dialog box, change Width and Height unit to percentage and chose Preserve Details 2.0 in Resample drop-down menu.
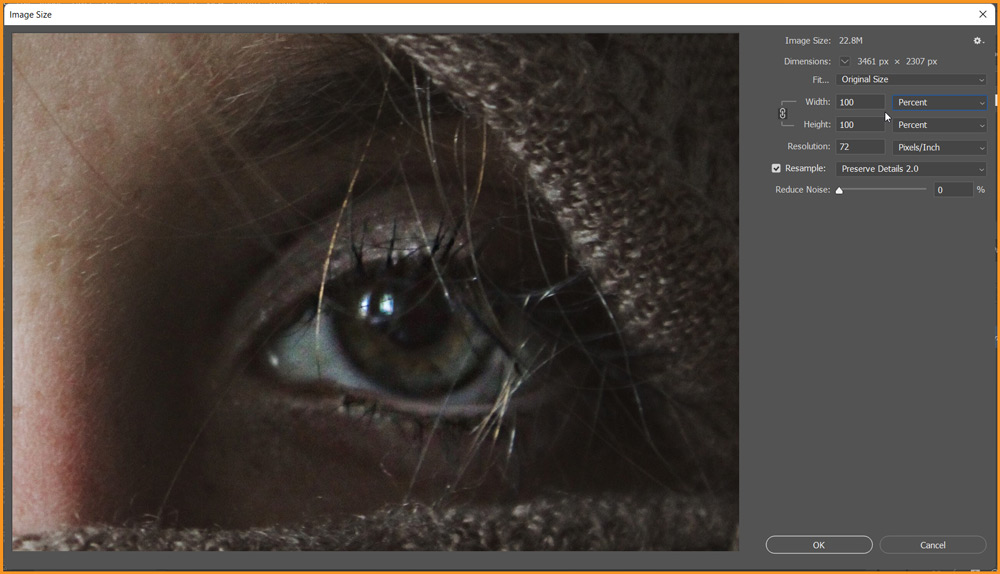
Let’s increase the size to 200%
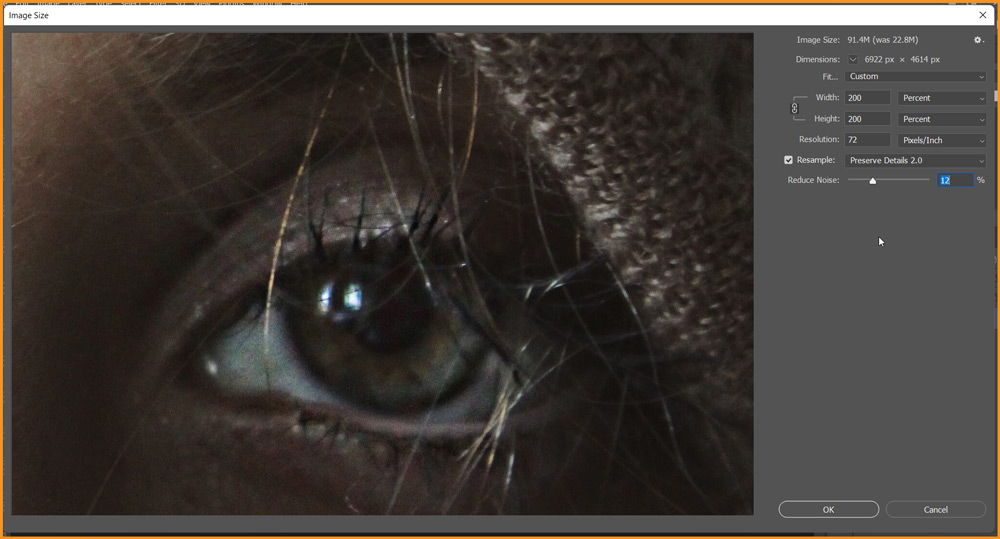
Even after 200% enlargement, the image still has clarity and sharpness. I have also reduced the Noise by 12%.
As it’s not possible to show results on the website, click check the following link to compare the original and result.
Related Topics:
- How to use Gradient Tool in Photoshop
- Burn, Dodge & Sponge Tool in Photoshop
- Blur, Sharpen & Smudge Tool in Photoshop
- Foreground Color, Background Color, Stroke & Fill
- Eraser tool in Photoshop
- Skin Retouching
- Retouching – How To Do It Professionally
- Edit menu in Photoshop
- Image menu in Photoshop
- Select menu in photoshop


