In this Photoshop Lesson, we’ll learn about ‘Fill in Photoshop‘. Fill command is available under Edit menu in Photoshop. Do not forget to read important shortcuts related to different types of fill at the end.
My name is Lalit Adhikari and we are at LTY. Let’s begin!
Table of Contents
Fill

To use the Fill command under Edit menu in Photoshop, make sure to chose the desired colors in Foreground and Background Colors.
While using the Fill command, we can either:
- Fill in the selected part of a layer. For this we need to create a selection using Selection Tools in Photoshop.
- Fill in the entire layer. For this we need to select the layer in the layer panel.
Related Topics:
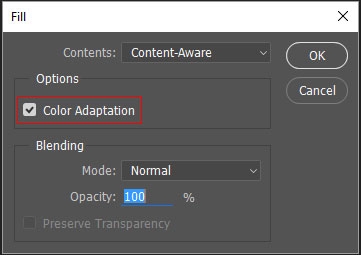
Fill dialog box

Different Contents options available in Fill dialog box are:
- Foreground Color: Chose this option to fill the Foreground color.
- Background Color: Chose this option to fill the Background color.
- Color: Chose this option to fill with a color, we will select from Color Picker.
- Content-Aware: Chose this option to seamlessly fill the selection with similar image content nearby the selection.
- Pattern: To fill the pattern in the selected area or layer.
- History: To restore the selected area to source state or snapshot set in the History Panel.
- Black: To fill Black color.
- 50% Gray: To fill 50% gray color.
- White: To fill White color.
The remaining options in the Fill dialog box are self-explanatory like Color Adaptation for Content-Aware and Blending Modes and Opacity.
If we’re working in a layer and want to fill only areas containing pixels, then we should choose Preserve Transparency.
Then click OK, to apply all.
Note: If we fill a CMYK image using the Black option, Photoshop will fill all the channels with 100% black. This may result in more ink than is allowable by the printer. Hence for best results when filling a CMYK image, we should use the Foreground option with the foreground color set to an appropriate black.
Let’s have an independent look at Content-Aware Fill, as it is one of the most used option available in Fill command.
Related Topics:
Content-Aware Fill
As described above, it is used to seamlessly fill the selection with similar image content nearby the selection.
For best results, we should create a selection that extends slightly into the area we want to replicate. (A quick lasso or marquee selection is often sufficient.)
Follow the steps:
- Open the image in Photoshop.
- Select the part of the image to be filled.
- Go to Edit > Fill… or in case of Background Layer, simply press Delete or Backspace to quickly access Fill dialog box.
- Chose Content-Aware from the drop down.
- Color Adaptation should be checked (by default). It’ll algorithmically blends the color of the fill with the surrounding color.
Example-1
For this example, I’ll be taking the following image from Pexels.

- Open image in Photoshop and create a rough selection around the top rock using Lasso Tool in Photoshop.

- Go to Edit > Fill…
- In contents, select Content-Aware and check the box of Color Adaptation

- Then click OK.

Related Topics:
Example-2
It’s a short example from Adobe.


Related Topics:
Important shortcuts for Fill
Mentioning all the shortcuts related to Fill command in Photoshop as per their working.
Fill with Background/ Foreground Color
- Alt + Backspace for Windows, Option + Delete for Mac; fills Foreground color.
- Ctrl + Backspace for Windows, Command + Delete for Mac; fills Background color.
Note: They work with several types of layers, including Type and Shape.
Fill dialog box
- Shift + F5
- Shift + Backspace for Windows and Shift + Delete on Mac
Fill with History
- Alt + Ctrl + Backspace for Windows and Option + Command + Delete on Mac
Fill Content only
- Alt + Shift + Backspace for Windows and Option + Shift + Delete for Mac will fill Foreground Color with Transparency preserved.
- Ctrl + Shift + Backspace for Windows and Command + Shift + Delete for Mac will fill Background Color with Transparency preserved.
Fill Content with History
- Alt + Ctrl + Shift + Backspace for Windows and Option + Command + Shift + Delete on Mac will fill History with Transparency preserved.
Related Topics:
- Purge in Photoshop
- Adobe PDF Presets in Photoshop
- Presets in Photoshop
- Remote Connections in Photoshop
- Assign Profile in Photoshop
- Convert to Profile in Photoshop
- Keyboard Shortcuts in Photoshop
- Menus in Photoshop
- Toolbar in Photoshop
- List of websites for Royalty Free images


