If you are already familiar with Photoshop then you know, Creating a New Document in Photoshop is as important as the Artwork itself. In this blog, we will look at, ‘How to create a New Document in Photoshop’, ‘When we should create a New Document’ & ‘When we should avoid creating a New Document’. My name is Lalit M S Adhikari and we are at LTY. Let’s begin!
Table of Contents
Creating a New Document in Photoshop
You can create a New Document by using one of several options available in Photoshop. Follow these steps to create a New Document:
- Open Photoshop
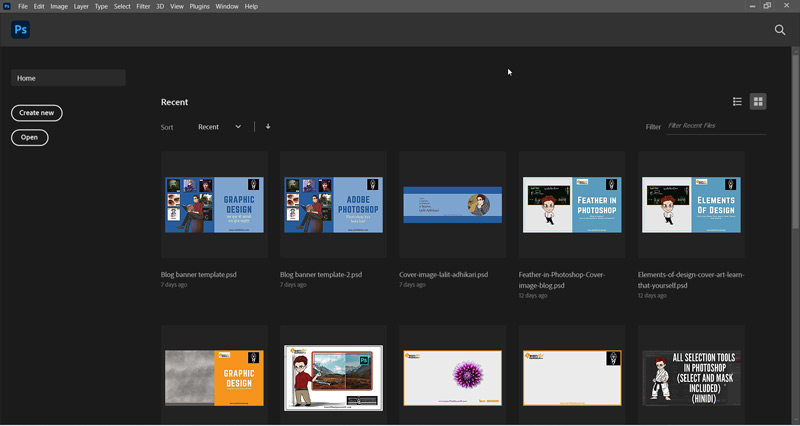
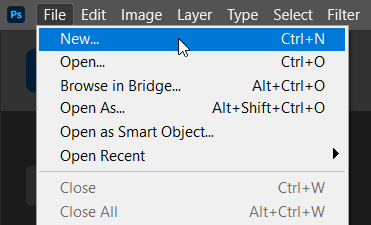
If you are using Photoshop CC, you will have your Home Screen opened up. This screen keep on changing from time-to-time. - Choose File – New or press Ctrl + N (cmd + N)
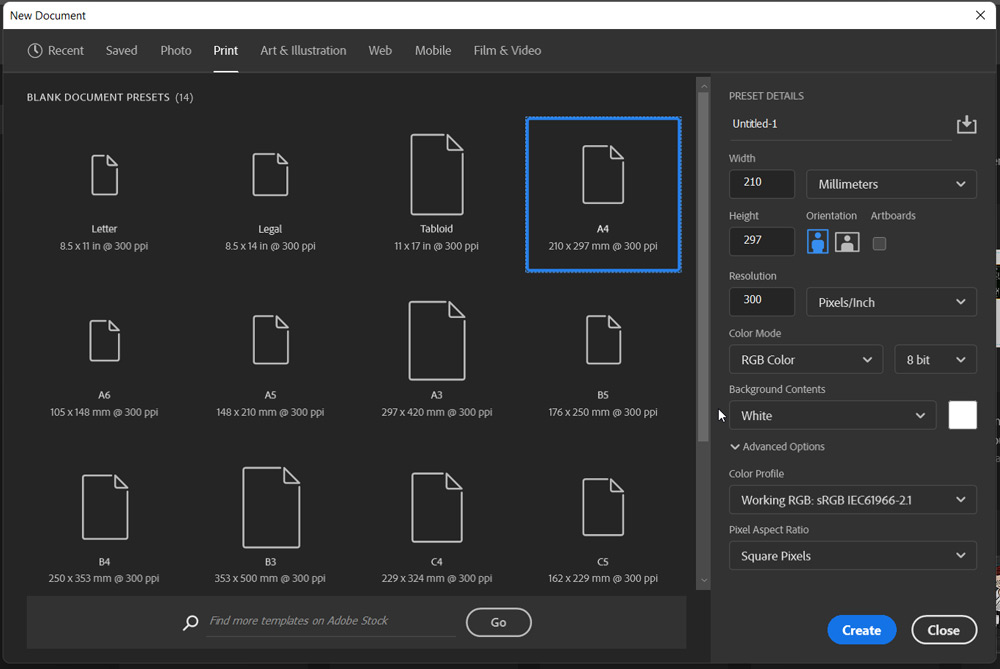
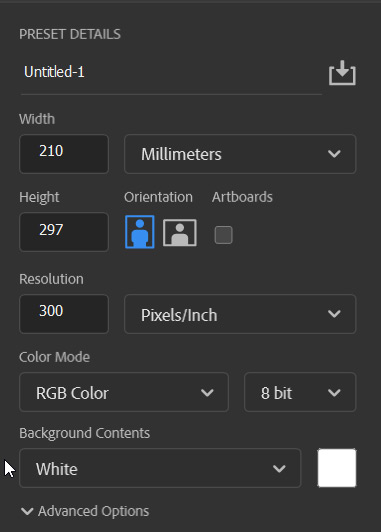
Either way, the New Document dialog box opens. - Modify the setting, before creating the New Document, in the preset from right pane.
You have several options as choice:
- Preset: ‘Photo’, ‘Print’, ‘Art & Illustration’, ‘Web’, ‘Mobile’ and ‘Film & Video’
- Name: Specify a file name for New Document
- Width and Height: Specify the size of the New Document. Also chose the unit from the pop-up menu.
- Orientation: Preferred page orientation for the New Document: Landscape or Portrait.
- Artboards: This option adds artboard while creating the New Document. It can also be added later.
- Color Mode & Bit: Chose color mode for the New Document. Out of five color modes available, you will mostly use CMKY(for print purpose), RGB (for digital purpose) and Grayscale (for Black and White) (occasionally) in 8 bit.
- Resolution: It determines the quality of an image. For digital purpose, you should use 72 ppi (pixel-per-inch). For print purpose, you should use 300 ppi (industrial standard resolution).
- Background Contents: The default value for a New Document is White but you can chose a different color from the options.
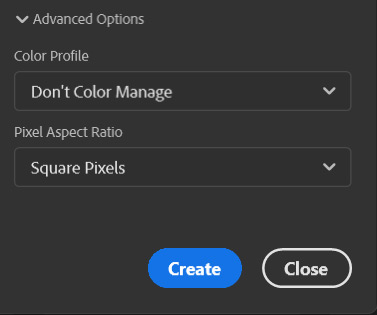
- To specify the extra options, click Advanced Options.
Color Profile: Chose color profile for your New Document from a wide variety of options.
Pixel Aspect Ration: The ratio of width to height of a single pixel. - Click ‘Create’ button after setting all options to create the New Document.
Related Topics:
How to verify the document size
If you have any doubt about the size of the document created. Then you can easily verify the document’s size by using ‘Image Size’ option under ‘Image’ menu in Photoshop.


In this case, you may notice a small deviation from the original size shown above. But it’s negligible and just round off done above by Photoshop.
Image Size option
Other than just verifying the size of the document, if needed, you can also change the dimensions along with the resolution.
Related Topics:
Adding Artboards in a Photoshop document
As we have created our document without Artboards, let’s assume now we need to add Artboards in our document afterwards.

To create Artboards, first, we have to simply chose Artboard Tool inside Move Tool in Photoshop.
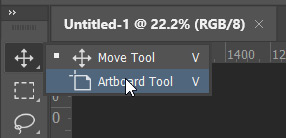
With Artboard Tool selected, we have to simply click and drag to create Artboard. But as we started off with a Normal layout, the previous size will lost. To avoid the loss of size you can create first artboard above your document covering the whole canvas.

Related Topics:
- Step by Step guide for Retro 3D Movie Effect in Photoshop
- 5 Types of Masking in Photoshop
- Photoshop Gold Text Effect
How to close document in Photoshop
To close an opened document, simply chose ‘Close’ option under ‘File’ menu or use shortcut Ctrl + W

Choosing Recent document size
If there’s no other document open in Photoshop then we will be back to the Home Screen of Photoshop. Now, if we open the New Document dialog box again.
This time click on Create New to create New Document:

This time in our Recent Tab in New Document Dialog box we will find our last created document’s dimensions for faster creation process.

Related Topics:
How to Save your settings as Preset
To save our settings as a Preset, we have click on the save preset icon at the right end of the Name column.

After that, you will need to give your Preset a name.

After saving, the Preset will appear in the Saved Tab in New Document dialog box.

Related Topics:
How to delete saved Preset
To delete a saved Preset, we have a Trash can icon over that Preset in Saved tab.

Clicking the icon will deleted the saved preset.
Related Topics:
Use the legacy New Document Dialog box
To use the legacy version of New Document Dialog box in Photoshop, we need to go the General Tab in Preferences in Photoshop.


Now, we will have Legacy New Document Dialog Box.

Related Topics:
When to create a New Document in Photoshop
You will need to create a New Document in Photoshop whenever you are working on a well-defined Graphic Project like creating Brochure, Business Card, Print projects etc.
In these situations, you will have to create a document first and then bring and use all ‘Elements of Design‘ to create your design.
When to avoid creating a New Document in Photoshop
If you are editing a Photograph or a Photographer and you don’t want to change the quality of the image. In that case, it is advisable to open the image directly in Photoshop without creating a new document first.
In this case, Photoshop will automatically use the details in the image to create the document.
Related Topics:
- Auto-Align layers in Photoshop
- Auto-Blend Layers in Photoshop
- Sky Replacement in Photoshop
- Define Brush Preset in Photoshop
- Define Pattern in Photoshop
- Define Custom Shape in Photoshop
- Purge in Photoshop
- Adobe PDF Presets in Photoshop
- Presets in Photoshop
- Remote Connections in Photoshop




The most detailed explanation available on internet. Thank you!
Superb Sir!
Helpful
Thank you!