In this Photoshop Lesson, we’ll learn about ‘Pen Tool in Photoshop‘, ‘How to use Pen Tool in Photoshop’, ‘Creating a brush stroke with Pen Tool’, ‘Creating a Text path by Pen Tool’ and ‘Making selection using Pen Tool’.
My name is Lalit Adhikari and we are at LTY. Let’s begin!
Table of Contents
Pen tool in Photoshop
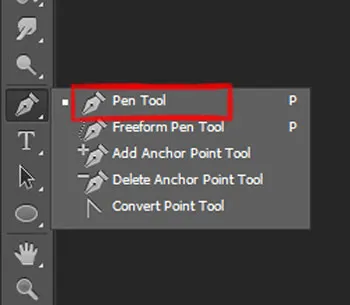
The pen tool is one of the most advanced and accurate way to make a Selection in Photoshop. If you need to cut subject out of the background then pen tool is one of the best option.
It may take a little bit longer to use the pen tool than some of the other selection techniques but when it comes to accuracy it is the best.
You can use the pen tool to make really amazing things like logos, custom shapes, and many other things.
You can create paths that are open or closed or can put text or pattern along the path to follow that path and most importantly you can make a selection out of that path.
The pen tool is a lot like a lasso and polygonal lasso tool but with better control and accuracy.
Shortcut to the pen tool is P or you can go to the toolbar and select the pen tool which looks like an old quill pen tip.
Related Topics:
- History Brush Tool in Photoshop
- Color Replacement Tool & Mixer Brush Tool
- Healing, Clone & Pattern Stamp Tools in Photoshop
How to Use Pen Tool in Photoshop
The first thing you can do with the pen tool is to create a straight path. While selecting the pen tool if you click anywhere in the canvas then it will be its first anchor point.
And if you click from one spot to another then it will create a straight line. If you keep on clicking randomly then it will make multiple straight lines which are called open path.
If you hover your cursor over your first anchor point then you will see an “O” like icon and if you click on that first anchor point you will get a closed path.
You can create exact straight lines in 0 degrees, 90 degrees, and 45 degrees, and for that, you need to press and hold shift key on the keyboard.
To create curve path first create an anchor point and then while creating the second anchor point just drag the mouse or stylus without releasing the click. You will see the curve forming and you can position the curve according to your need.
If you want to change the shape of the curve that you’ve just made then press the Ctrl key and you can shift or move the handles of anchor points.
If the changes are needed to make in only one part of the curve then you can do this by pressing Alt key and then moving the handles of the anchor point.
Note: To break the handle of the curve path press Alt while clicking the anchor point.
Related Topics:
- How to use Gradient Tool in Photoshop
- Burn, Dodge & Sponge Tool in Photoshop
- Blur, Sharpen & Smudge Tool in Photoshop
Creating a brush stroke with the pen tool
First, you need to create any kind of path with the pen tool. Then select the brush tool by pressing B on the keyboard or select from the toolbar.
Now, we need to set everything in brush tool according to our need for opacity, hardness, brush size and color of the brush stroke. After doing that select the pen tool, right click over the canvas and go to the option “Stroke Path”.
After selecting the option a dialogue box will open up where you will find the various option of “tool” like pencil, eraser, brush and so on. Click on the brush option and then hit ‘OK’.
You will get your desired brush stroke which will follow along with your stroke path that you’ve just created with your pen tool. If you want to delete the path then just right click on it and select the ‘delete path’ option.
Note: You can repeat this same procedure with other tools like eraser and pencil and it will act the same way as the brush tool.
Creating a text path
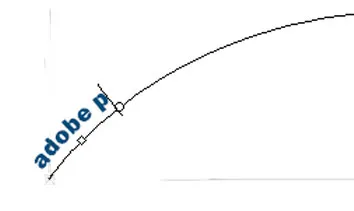
First, create the desired path with your pen tool and then select Type Tool by pressing T on the keyboard or by selecting Type tool from the toolbar.
If you put your cursor over the path you’ve just created then you will see that your text tool icon will change. And now, you can type anything that you want and you will see the text is following along with your path.
Another thing to notice here is that, if you select the pen tool again and change the shape of your existing path then the text path will also change so that it can follow along with the pen tool path and that is really useful in some situation.
Related Topics:
Making selection by pen tool
There are basically two ways to make a selection by pen tool:
- Make a closed path like I’ve explained above and after you’ve created a closed path press Ctrl + Enter and you will get the selection.
- And the Second method which is a bit better because you will have more control over it. So, after you make your closed path, Right Click and choose the option ‘Make Selection’. After doing that you will see a dialog box opening up which will have an option ‘Feather Radius’ if you have 0 pixels selected then selection will have a very harsh edge and if you increase the number of pixels then your selection will be much softer. So, you can have a selection which is much controlled according to your design.
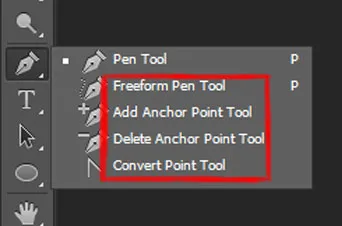
Freeform Pen tool
This is the second option in the fly-out menu of the pen tool. What this tool does is, if you draw anything with this tool it will convert it into a path. This tool is rarely used.
Add anchor point tool
If you want to add an anchor point to your path, then just click on the path where you want to add an anchor point in.
Delete anchor point tool
If you want to delete an anchor point from your path then this is the tool for it. Just click on the anchor point that you want to delete.
Convert Point tool
This is the last option in the fly-out menu of the pen tool. This tool converts a curve to a corner or a corner to a curve. In other words, it introduces handles, removes handles and it breaks handles.
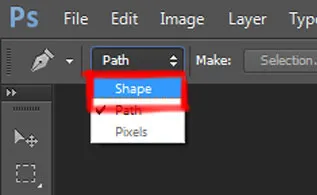
If we divert over attention towards the upper option panel then we can see the path’ icon which is a default option. While clicking and holding over it we will get another option called ‘shape’.
Now, ‘Shape’ is a path with fill. While selecting this if you try to make a path with pen tool then you will already come with the fill, this option is observable in the layers.
If you are following our Free Photoshop Lessons and Tutorial Guide, then next you should read about, ‘How to use Gradient tool in Photoshop‘.
Related Topics:
- Retouching – How To Do It Professionally
- Edit menu in Photoshop
- Image menu in Photoshop
- Select menu in photoshop
- Filter menu in Photoshop
- View menu in Photoshop
- Window menu in Photoshop
- Photoshop Channels
- Dual light effect
- Feather in Photoshop




Comments are closed.