The Paintbrush Tool and Blob Brush Tool are two of Adobe Illustrator’s most versatile yet misunderstood features. While many designers relegate these tools to basic illustration, professionals use them to create sophisticated vector artwork, seamless illustrations, and complex digital paintings.
This comprehensive guide covers everything from fundamental brush selection to advanced techniques for professional illustration, including keyboard shortcuts, brush customization, real-world applications, and the critical differences between vector brushes, raster brushes, and specialized brush types.
Whether you’re creating logos, character design, digital painting, or detailed vector illustrations, mastering these tools will dramatically expand your creative capabilities.
My name is Lalit Adhikari and we are at LTY. Let’s begin!
Table of Contents
Introduction: Why Brush Tools matter in Professional Illustration
The Underestimated Power of Vector Brushes
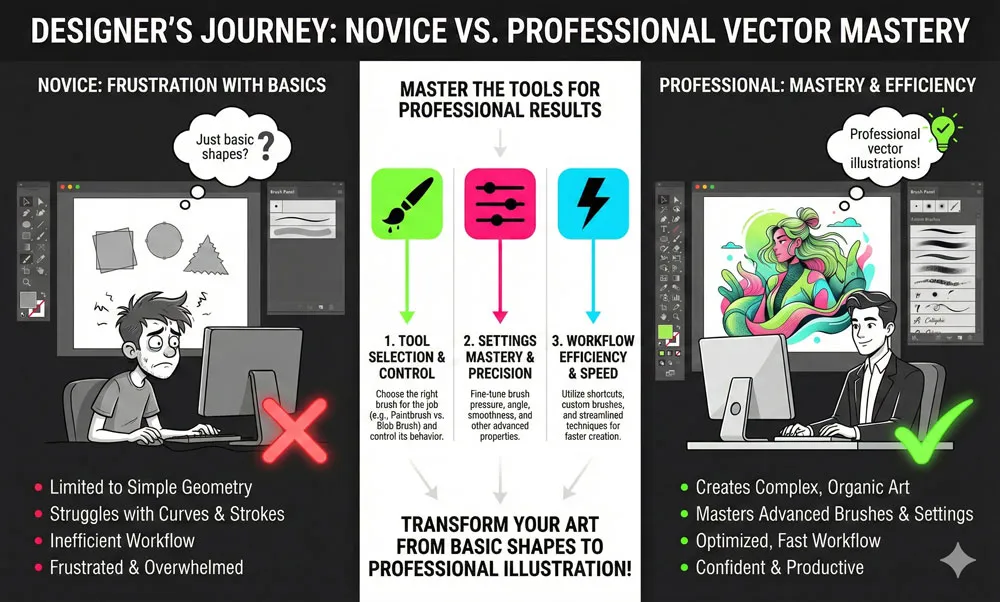
Most designers perceive the Paintbrush Tool as a simple drawing utility, but it’s actually a sophisticated instrument for professional illustration.
When combined with understanding of brush types, settings, and workflow optimization, these tools enable you to create artwork that competes with raster-based painting applications while maintaining full vector scalability.
The key difference between novice and professional use of these tools lies not in the tool itself, but in understanding the underlying technology and workflow optimization.
What Sets Professional Illustrators Apart
Professional illustrators understand three critical concepts:
- Tool Selection: Knowing when to use Paintbrush vs. Blob Brush vs. specialized brush types
- Settings Mastery: Understanding and adjusting Fidelity, Smoothness, Pressure, and Colorization settings
- Workflow Efficiency: Using keyboard shortcuts, custom brushes, and stacking techniques to work at professional speed
This guide provides all three.
Related Topics:
- How to use Eraser tool in illustrator
- How to use the Pen Tool in illustrator
- Perspective Tool in Illustrator
Paintbrush Tool
Let’s understand the paintbrush tool which is the foundation of vector illustration.
What Is the Paintbrush Tool and How Does It Differ From Other Drawing Tools?
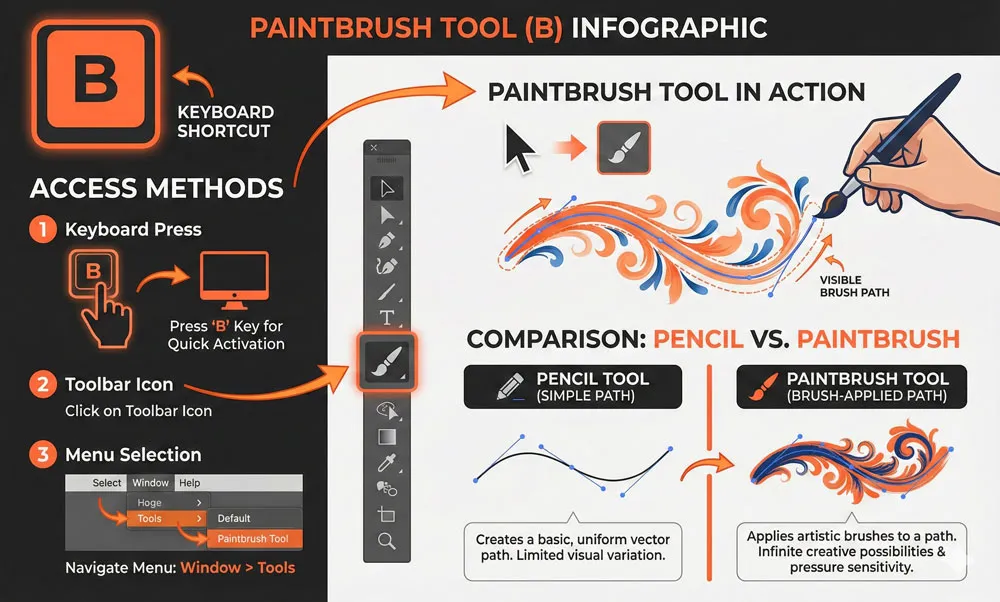
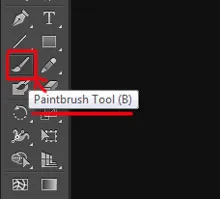
The Paintbrush Tool (Keyboard Shortcut: B) is Adobe Illustrator’s primary tool for creating artistic strokes with predefined brush shapes. Unlike the Pencil Tool which creates simple anchor points, the Paintbrush Tool applies vector-based art (brushes) to your drawn path, creating artistic effects while maintaining full vector editability.
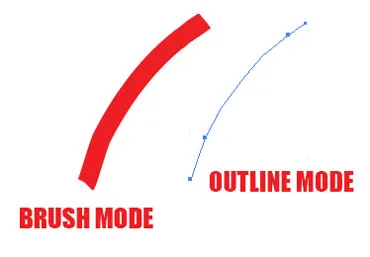
Key Distinction: When you draw with the Paintbrush Tool, you’re not creating a raster image. You’re applying vector artwork to a vector path, meaning your illustration remains scalable to any size without quality loss.
Accessing the Paintbrush Tool
Method 1 – Keyboard Shortcut: Press B to instantly activate the Paintbrush Tool
Method 2 – Toolbar: Click the Paintbrush Tool icon in the left toolbar. If not visible, click the three-dot menu and customize your toolbar.
Method 3 – Tools Menu: Navigate to Tools > Drawing Tools > Paintbrush (rarely necessary with keyboard shortcut available)
The Critical Difference: Paintbrush vs. Pencil Tool
| Feature | Paintbrush Tool | Pencil Tool |
|---|---|---|
| Output | Artistic brush strokes applied to path | Simple anchor-point path |
| Editability | Full brush control & variation | Limited to path editing |
| Vector Quality | Maintains vector scalability | Simple path, limited artistic potential |
| Use Case | Professional illustration, artistic effects | Technical drawing, precise paths |
| Complexity | Can use complex brushes | No brush application |
Related Topics:
- Selection Tools in illustrator
- Width Tool in illustrator
- Shape Builder, Live Paint Bucket tool in illustrator
Blob Brush Tool
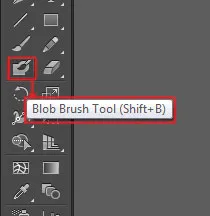
What Is the Blob Brush Tool?
The Blob Brush Tool (Keyboard Shortcut: Shift+B) is a specialized painting tool that creates filled shapes from your brush strokes. Unlike the Paintbrush Tool which creates strokes, the Blob Brush creates solid, filled shapes that automatically merge when they overlap, making it perfect for illustration, character design, and organic shape creation.
Critical Distinction: When you draw with the Blob Brush, Illustrator automatically creates a merged shape. If your stroke overlaps with existing Blob Brush shapes, they automatically combine into a single unified path—no need to manually unite them.
Accessing the Blob Brush Tool
Method 1 – Keyboard Shortcut: Press Shift+B (fastest method for professionals)
Method 2 – Toolbar: Hold down (or click and hold on newer versions) the Paintbrush Tool icon, then select Blob Brush from the dropdown menu
Method 3 – Customized Toolbar: If not visible, customize your toolbar to add it as a separate icon
Related Topics:
- Adobe Illustrator vs Photoshop for Beginners: Which Should You Learn First?
- How to Create a Logo in Adobe Illustrator: Complete Step-by-Step Tutorial for Beginners
- How to use Gradient Tool in Illustrator
Paintbrush Tool vs. Blob Brush Tool: Complete Comparison
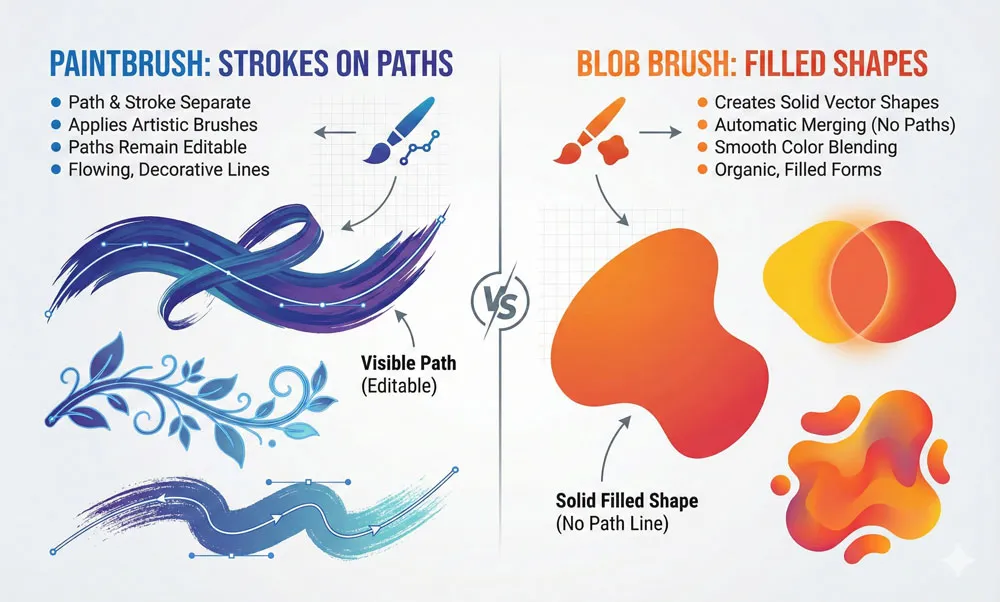
Understanding the practical differences between these tools is essential for workflow efficiency:
Paintbrush Tool Creates:
- Strokes following your exact drawing path
- Artistic effects applied to paths
- Lines and decorative elements
- Effects that can be removed without deleting the path
Blob Brush Tool Creates:
- Solid filled shapes
- Automatically merged overlapping shapes
- No visible “path” underneath—just solid color
- Perfect for organic, flowing illustrations
- Ideal for character design and illustration
Related Topics:
- How to use Mesh Tool in illustrator
- How to make a Semicircle in Illustrator
- How to design a Retro Flower Pattern
Critical Paintbrush Tool Settings – Professional Mastery
Accessing Paintbrush Tool Options
- Double-click the Paintbrush Tool (B) in the toolbar to open the options dialog
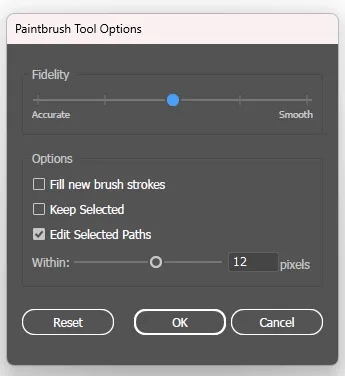
Key Settings You Must Understand
1. Fidelity (0.5 – 20 pixels)
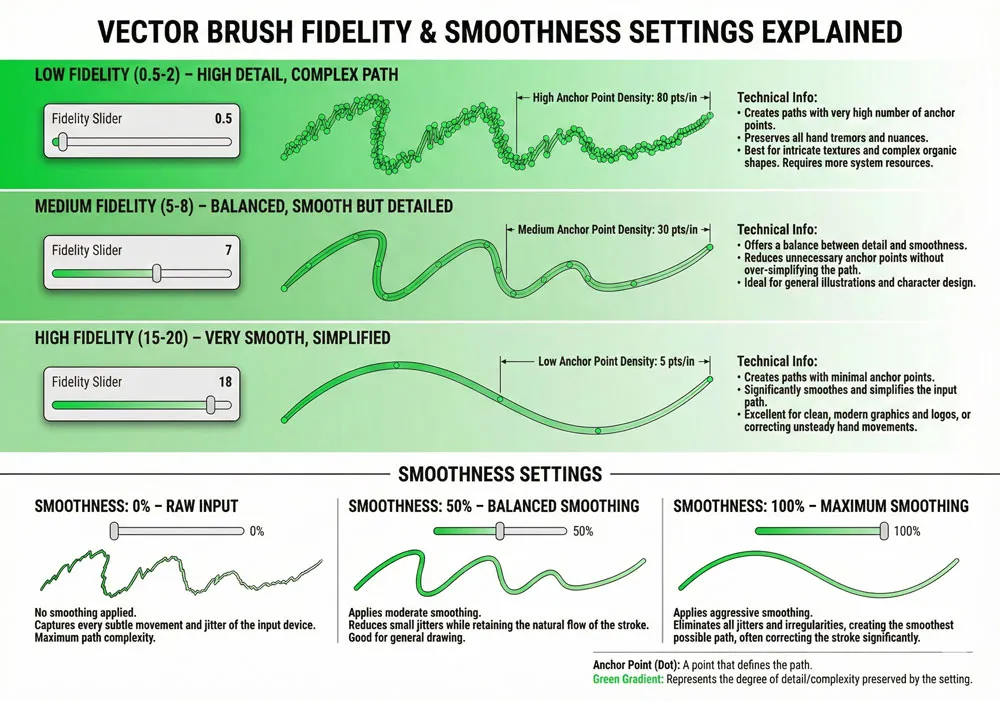
What it does: Controls how closely Illustrator follows your exact mouse/pen movement before creating a new anchor point.
Practical Application:
- Low Fidelity (0.5-2): Creates detailed, complex paths following every small movement. Use for precise, intricate work.
- Medium Fidelity (5-8): Balanced between detail and smoothness. Recommended for most illustration work.
- High Fidelity (15-20): Creates smooth, simplified paths with fewer anchor points. Use for flowing shapes and faster drawing.
Professional Tip: Adjust Fidelity based on your input device. Tablet users often benefit from higher fidelity (smoother) than mouse users.
2. Smoothness (0 – 100%)
What it does: Applies mathematical smoothing to your path to remove jitter and irregularities.
Practical Application:
- 0% Smoothness: No smoothing applied; path follows your exact movement including any hand tremors
- 50% Smoothness: Balanced approach, removes minor jitter while preserving intentional variation
- 100% Smoothness: Maximum smoothing; creates very smooth, flowing paths but may lose intentional detail
Professional Tip: Combine moderate Fidelity with moderate Smoothness (around 25-50%) for best results with both mouse and tablet.
3. Pressure and Stylus Options
For Tablet Users: If using a pressure-sensitive stylus (Wacom, iPad, etc.):
- Check the Pressure checkbox to enable pressure-sensitivity
- Adjust the pressure slider to control how dramatically pressure affects width
- This creates natural-looking variation mimicking real brush behaviour
Professional Tip: Pressure-sensitive drawing dramatically improves the professional appearance of illustration. If possible, invest in a graphics tablet.
4. Tilt and Rotation
Tilt Sensitivity: For compatible styluses, enables the brush to respond to pen angle
- Creates natural calligraphic effects
- Perfect for brush strokes that vary based on angle
Rotation: Controls whether the brush rotates based on drawing direction
Professional Application: Enable tilt for calligraphic and artistic brushes; disable for technical or uniform strokes.
5. Keep Selected
What it does: Leaves the path selected after you finish drawing
When to Use:
- Enable when you plan to immediately edit the path (adjust size, color, etc.)
- Disable when creating multiple strokes and you want them deselected
6. Fill New Brush Strokes
What it does: Automatically fills newly created brush strokes with your current fill color
When to Enable:
- When you want brush strokes to have colored fills
- For creating specific illustration effects
- Generally leave disabled for traditional brush strokes
7. Colorization Methods
When applying colored brushes, Illustrator offers colorization options:
- None: No color adjustment; uses brush’s original colors
- Tints: Adjusts brush color to variations of your selected stroke color (darkens with black, lightens with white)
- Tints and Shades: Similar to Tints but with more control over lightening and darkening
- Hue Shift: Shifts the entire color range of the brush to match your stroke color; preserves luminosity relationships
Related Topics:
- How to set Brush Pressure in Illustrator
- How to Create A Pressure Sensitive Brush in Illustrator
- How to Create Metallic effect in Illustrator
Blob Brush Tool Settings and Advanced Options
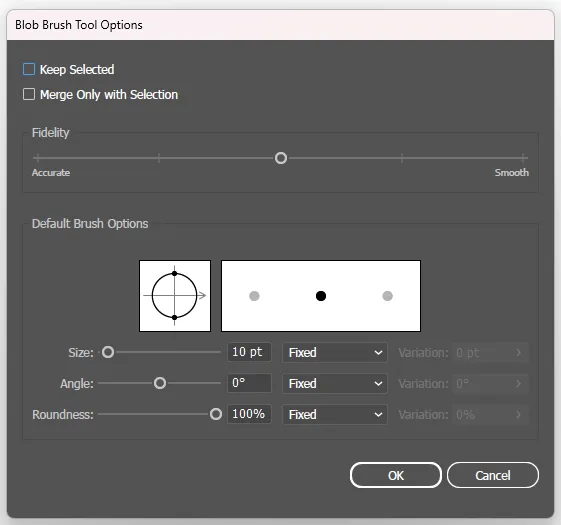
Accessing Blob Brush Tool Options
- Double-click the Blob Brush Tool (Shift+B) in the toolbar
Critical Blob Brush Settings
1. Fidelity (Same as Paintbrush)
What it does: Controls how closely Illustrator follows your exact mouse/pen movement before creating a new anchor point.
Practical Application:
- Low Fidelity (0.5-2): Creates detailed, complex paths following every small movement. Use for precise, intricate work.
- Medium Fidelity (5-8): Balanced between detail and smoothness. Recommended for most illustration work.
- High Fidelity (15-20): Creates smooth, simplified paths with fewer anchor points. Use for flowing shapes and faster drawing.
Professional Tip: Adjust Fidelity based on your input device. Tablet users often benefit from higher fidelity (smoother) than mouse users.
2. Smoothness (Same as Paintbrush)
What it does: Applies mathematical smoothing to your path to remove jitter and irregularities.
Practical Application:
- 0% Smoothness: No smoothing applied; path follows your exact movement including any hand tremors
- 50% Smoothness: Balanced approach, removes minor jitter while preserving intentional variation
- 100% Smoothness: Maximum smoothing; creates very smooth, flowing paths but may lose intentional detail
Professional Tip: Combine moderate Fidelity with moderate Smoothness (around 25-50%) for best results with both mouse and tablet.
3. Pressure (Stylus/Tablet Settings)
Control pressure sensitivity if using a pressure-sensitive input device.
4. Keep Selected
Critical for Blob Brush Workflow:
- Enable: New shapes remain selected, allowing immediate resizing or color adjustment
- Disable: Deselect each shape after creation, forcing you to manually select it later
Professional Recommendation: Enable “Keep Selected” to streamline Blob Brush workflow.
5. Merge Only With Selection
What it does: Controls automatic merging behaviour when creating overlapping shapes
When Checked: New Blob Brush strokes merge ONLY with previously selected shapes. Unselected shapes won’t merge, even if overlapping.
When Unchecked: Any overlapping Blob Brush shape automatically merges with existing shapes
Professional Workflow:
- For organized illustration: Check “Merge Only With Selection” to prevent accidental merges
- For quick, loose illustration: Leave unchecked for automatic merging
6. Adjust Brush Size
- Right Square Bracket ]: Increases brush size (1 pixel per keystroke)
- Left Square Bracket [: Decreases brush size (1 pixel per keystroke)
Professional Shortcut: Hold down the bracket keys for rapid adjustment without accessing the brush panel.
Related Topics:
- How to Create Flower using Gradient Mesh in Illustrator
- How to Recolor Artwork in illustrator
- How to Create Silver Metallic Effect in Illustrator
Selecting and Understanding Brush Types
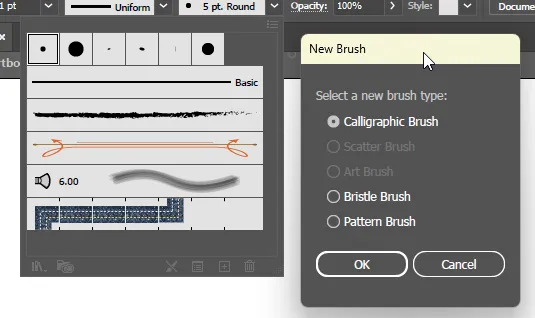
Adobe Illustrator includes five distinct brush types, each with unique characteristics:
Calligraphic Brushes
Characteristics:
- Simulates traditional pen strokes
- Variation based on angle and pressure
- Creates tapered, artistic strokes
Best For:
- Lettering and calligraphy
- Artistic flourishes
- Creating hand-drawn appearance
Key Settings:
- Angle and Roundness (controls brush shape)
- Pressure sensitivity
- Tilt adjustment
Professional Application: Ideal for creating elegant signatures, decorative text elements, and artistic headers.
Scatter Brushes
Characteristics:
- Scatters copies of artwork along the path
- Creates pattern effects
- Controlled spacing and rotation
Best For:
- Creating pattern paths
- Decorative elements (stars, sparkles, confetti)
- Textured effects
- Background pattern generation
Key Variables:
- Scatter amount (how far from path)
- Rotation variation
- Scaling variation
- Spacing between scatter elements
Professional Application: Perfect for creating decorative frames, particle effects, and textured backgrounds without manual placement.
Art Brushes
Characteristics:
- Stretches artwork along the drawn path
- Maintains artwork proportions
- Creates uniform applied effects
Best For:
- Applying decorative elements along paths
- Creating ornamental strokes
- Applying consistent artwork
Key Settings:
- Width scaling
- Colorization method
- Flipping options
Professional Application: Create decorative frame elements, ornamental dividers, and applied artistic effects with consistency.
Bristle Brushes
Characteristics:
- Simulates real-world bristle brush behavior
- Shows individual bristle variations
- Creates realistic painting effects
Best For:
- Oil painting simulation
- Realistic brush stroke appearance
- Natural texture creation
Bristle Types: Flat, round, fan, wide hedge, filbert, angular, and others
Professional Tip: Bristle Brushes create most realistic painting effects in Illustrator but require more processing power. Use strategically for maximum impact.
Pattern Brushes
Characteristics:
- Applies multiple patterns along a path
- Can define side, corner, and end patterns
- Creates complex, organized effects
Best For:
- Creating borders and frames
- Generating repetitive pattern elements
- Creating decorative paths
Variables Controlled:
- Pattern scaling along path
- Corner handling
- Ends decoration
- Outer/inner pattern variations
Professional Application: Create sophisticated borders, decorative frames, and organizational elements without manually repeating artwork.
Related Topics:
- Master Illustrator Type Tool: Complete Guide
- Master Adobe Illustrator Shape Tools: Complete Guide
- Master Adobe Illustrator’s Line, Arc, Spiral & Grid Tools: Complete Step-by-Step Tutorial for Designers
Professional Techniques – Brush Selection and Customization
Building Your Personal Brush Library
Step 1: Access the Brushes Panel

- Go to Window > Brushes or press F5 (keyboard shortcut)
- This displays all available brushes in Illustrator
Step 2: Understanding Default Brush Categories
- Look for organized folder groups in the Brushes Panel
- Default libraries include: Basic Shapes, Artistic, Decorative, Floral, Textures
Step 3: Loading Additional Brush Libraries
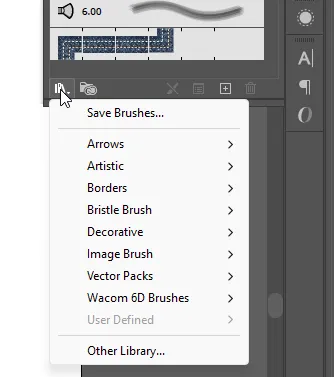
- In Brushes Panel, click the hamburger menu (three horizontal lines)
- Select Open Brush Library → Choose desired category
- Recommended libraries: Artistic, Decorative, Textured, Watercolor
Step 4: Creating Custom Brushes
For full details, you can read:
The process varies by brush type:
Creating Calligraphic Brushes:
- Click the new brush button in Brushes Panel
- Select “New Calligraphic Brush”
- Adjust Angle, Roundness, Diameter
- Set pressure/tilt sensitivity if desired
- Name and save
Creating Pattern Brushes:
- Create artwork pieces for pattern (side pattern, corner, end)
- Select artwork
- Click new brush → Select “New Pattern Brush”
- Define which artwork uses which position
- Configure spacing and scaling
Professional Tip: Create brushes that match your signature style. Custom brush libraries dramatically increase workflow speed and consistency.
Related Topics:
- What Is Adobe Illustrator? Beginner’s Guide & Photoshop Comparison
- Graphic Design Fundamentals: Complete Guide for Beginners
- Basics of Design
Keyboard Shortcuts – Professional Workflow Optimization
Essential Brush Tool Shortcuts
| Action | Windows | Mac | Purpose |
|---|---|---|---|
| Paintbrush Tool | B | B | Activate Paintbrush (fastest access) |
| Blob Brush Tool | Shift+B | Shift+B | Activate Blob Brush |
| Increase Brush Size | ] | ] | Quick size adjustment without panel |
| Decrease Brush Size | [ | [ | Quick size adjustment without panel |
| Hold Bracket | Hold [ or ] | Hold [ or ] | Continuous size adjustment |
| Brush Panel | F5 | F5 | Open/close brush panel |
| Stroke Panel | Ctrl+Alt+S | Cmd+Option+S | Access stroke options |
| Double-click Tool | Double-click B | Double-click B | Open tool options dialog |
| Increase Hardness | Shift+] | Shift+] | Increase brush hardness |
| Decrease Hardness | Shift+[ | Shift+[ | Decrease brush hardness |
| Rotate Brush | Left/Right Arrow | Left/Right Arrow | Adjust brush angle (with stylus) |
Professional Tip: Memorize at least the primary shortcuts (B, Shift+B, [, ]) to dramatically increase your workflow speed.
Related Topics:
Real-World Applications – Professional Projects
Application 1: Character Design & Illustration
Workflow:
- Start with sketched outline using Paintbrush Tool with calligraphic brush
- Use Blob Brush Tool to fill shapes with solid colors
- Layer colors using “Merge Only With Selection” to maintain control
- Add highlights with white using Scatter Brush for light sparkles
- Detail work with small, precise Paintbrush strokes
Advantages: Fully scalable vector artwork suitable for any size, from business cards to billboards
Application 2: Logo Design with Artistic Elements
Workflow:
- Create base logo shape with Blob Brush Tool
- Add decorative elements with Art Brushes
- Create custom brushes for signature style elements
- Use Calligraphic Brush for text or artistic flourishes
- Maintain full editability throughout
Key Benefit: Client can request color changes instantly; all artwork remains vector-based
Application 3: Pattern and Textile Design
Workflow:
- Design pattern motif
- Create Pattern Brush from motif
- Draw path with Pattern Brush applied
- Instantly create repeating pattern effects
- Scale and adjust without quality loss
Professional Application: Perfect for creating designs for textile printing, packaging, or digital patterns
Application 4: Digital Painting & Fine Art
Workflow:
- Use Bristle Brushes for realistic painting effects
- Layer colors with transparency
- Combine multiple brush types for mixed media appearance
- Use Blob Brush for bold color fields
- Detail with Paintbrush Tool and specialized brushes
Advantage: Maintains vector scalability while achieving realistic painting appearance
Related Topics:
Advanced Techniques for Professional Results
Technique 1: Pressure-Sensitive Illustration Mastery
For Tablet Users (Wacom, iPad, etc.):
Setup:
- Enable Pressure in both Paintbrush and Blob Brush options
- Draw a test line applying varying pressure
- Adjust pressure sensitivity setting until variation matches your preference
- Use light pressure for fine details, heavy pressure for bold strokes
Professional Result: Natural-looking variation that mimics traditional media
Technique 2: Layering Transparency with Brushes
Creating Artistic Effects:
- Draw first brush stroke with color A
- Set opacity to 50%
- Draw overlapping stroke with color B at 50% opacity
- Colors blend naturally where they overlap
- Continue layering for rich, complex colors
Professional Application: Create depth and sophisticated color mixing impossible with solid colors
Technique 3: Merging and Unmerging Shapes (Blob Brush)
Selective Merging:
- Create base shape with Blob Brush
- Uncheck “Keep Selected”
- Create adjacent shape—automatically merges if overlapping
- Check “Merge Only With Selection”
- Create non-overlapping shapes that remain separate
Advanced Control: Maintain organization while utilizing automatic merging when beneficial
Technique 4: Custom Brush Creation for Signature Style
Process:
- Design small artwork element (max 500px)
- Create as pattern or shape
- Convert to brush (specific process depends on brush type)
- Test on various path types
- Save as personal brush library
Professional Benefit: Instantly identifiable style elements that distinguish your work
Related Topics:
Common Mistakes and Professional Solutions
Mistake 1: Not Adjusting Fidelity for Device Type
Problem: Laptop trackpad creates jittery strokes; tablet oversimplifies strokes
Solution: Increase Fidelity for trackpad (smoother paths with fewer anchor points), decrease for tablet (more responsive to pen movement)
Mistake 2: Using Same Fidelity for All Work
Problem: Technical drawings require different settings than artistic illustration
Solution: Create tool presets for different work types; switch between settings based on project needs
Mistake 3: Ignoring Pressure Settings on Tablet
Problem: No variation in stroke width despite having pressure-sensitive device
Solution: Enable Pressure in tool options and adjust sensitivity to match your drawing style
Mistake 4: Not Using Keyboard Shortcuts
Problem: Constantly switching between toolbar and drawing, reducing efficiency
Solution: Memorize primary shortcuts (B, Shift+B, [, ]) for professional speed
Mistake 5: Creating Unnecessarily Complex Paths
Problem: Path with thousands of anchor points causes performance issues
Solution: Increase Fidelity and Smoothness settings to create simpler paths with same visual result
Related Topics:
Workflow Optimization for Professional Speed
Setup Tips for Maximum Efficiency
Tip 1: Customize Your Toolbar
- Place Paintbrush and Blob Brush where easily visible
- Add Pencil Tool for comparative use
- Remove rarely-used tools to reduce clutter
Tip 2: Create Tool Presets
- Save different tool configurations (detailed work, rough sketching, etc.)
- Switch between presets based on current task
- Dramatic speed increase for recurring workflows
Tip 3: Organize Brush Libraries
- Create custom folder in Brushes Panel
- Drag frequently-used brushes into this folder
- Reduce time spent searching for brushes
Tip 4: Use Brush Presets
- Save favorite brush with specific settings
- Instantly apply complex brush configurations
- Maintain consistency across projects
Tip 5: Establish Quick Access System
- Keep Brushes Panel (F5) visible
- Keep Stroke Panel open for quick adjustments
- Position Color Panel for easy color selection
Related Topics:
- 10 reasons Why you are not becoming a good artist
- Creativity is a Journey not Destination
- Breaking Down Creative Barricades
Comparative Guide – When to Use which Tool
Decision Matrix: Paintbrush vs. Blob Brush vs. Pencil
| Situation | Best Tool | Why |
|---|---|---|
| Creating artistic strokes | Paintbrush | Applies decorative brushes; creates artistic effects |
| Filling areas with color | Blob Brush | Creates solid shapes; automatic merging |
| Precise technical drawing | Pencil | Simple paths; minimal artistic processing |
| Character design outline | Paintbrush + Calligraphic | Creates artistic sketch-like quality |
| Character color filling | Blob Brush | Quick, efficient shape creation |
| Decorative borders | Art Brush | Repeats artwork along path consistently |
| Sparkle/star effects | Scatter Brush | Automatically distributes artwork |
| Custom patterns | Pattern Brush | Repeating pattern effects |
| Natural media simulation | Bristle Brush | Realistic painting effects |
Related Topics:
Conclusion: Mastering Professional Vector Illustration
The Paintbrush Tool and Blob Brush Tool are not simple drawing utilities—they’re the foundation of professional vector illustration in Adobe Illustrator. The difference between novice and professional results isn’t the tool, but the understanding of:
- Tool Selection: Knowing which tool for each specific task
- Settings Mastery: Understanding and adjusting Fidelity, Smoothness, Pressure, and specialized options
- Workflow Optimization: Using keyboard shortcuts and custom brushes for professional speed
- Real-World Application: Knowing when and how to combine tools for professional results
- Advanced Techniques: Layering, merging, transparency, and custom brush creation
Key Takeaways:
- Paintbrush Tool (B) applies brushes to paths; perfect for artistic strokes and decorative effects
- Blob Brush Tool (Shift+B) creates filled shapes that automatically merge; ideal for illustration and character design
- Fidelity and Smoothness dramatically affect path quality; adjust based on your drawing device and desired result
- Keyboard shortcuts (B, Shift+B, [, ]) are essential for professional workflow speed
- Brush type selection dramatically impacts results; choose appropriate brush for each task
- Custom brushes create signature style and increase consistency across projects
- Pressure sensitivity (for tablet users) dramatically improves results; enable and configure appropriately
Invest time in mastering these tools. The payoff is professional-quality vector illustration that maintains full scalability, editability, and artistic impact—a combination impossible to achieve with raster-based alternatives.
Start with basic brush selection and Fidelity settings. Progress to pressure sensitivity and custom brushes. Advanced users combine multiple brush types and layering techniques to create sophisticated artwork. Your proficiency with these tools directly correlates to your professional illustration quality and workflow speed.
Related Topics:
About the Author
Lalit M. S. Adhikari is a Digital Nomad and Educator since 2009 in design education, graphic design and animation. He’s taught 500+ students and created 200+ educational articles on design topics. His teaching approach emphasizes clarity, practical application and helping learners.
Learn more about Lalit Adhikari.
This guide is regularly updated with the latest information about Adobe tools and design best practices. Last Updated: Mar 2026
Related Topics:
- Royalty Free Images
- Royalty Free Raw Images
- Brush Tool in Photoshop
- Pen Tool in Photoshop
- What is Digital Painting
- History Brush Tool in Photoshop
- Color Replacement Tool & Mixer Brush Tool
- Healing, Clone & Pattern Stamp Tools in Photoshop
- How to use Gradient Tool in Photoshop
- Burn, Dodge & Sponge Tool in Photoshop










It will be really helpful for my illustrations. Thanks!
Helpful, especially the control of anchor points in the stroke of brush tool. Thank you.