In this Illustrator Tutorial, I will show, ‘How to Create Flower using Gradient Mesh in Illustrator’.
Table of Contents
Introduction
I’ll start with the shape of the petals and then using the Gradient Mesh, I’ll add the mesh points and color it. Then I’ll compose the flower with the stamens in the center.
For stamens, I’ll use a custom Scatter Brush, along with the Transform effect and the Gradient Mesh of course.
After that I’ll continue to add details on the petals with the help of the Blend Tool, Pucker & Bloat and Transform effects.
Minor Changes in Preferences
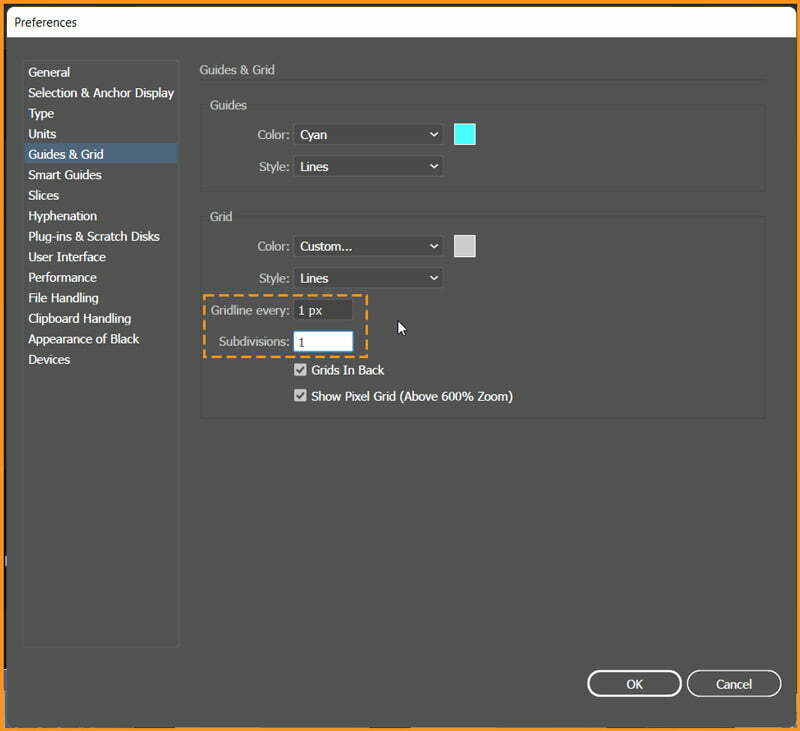
To create the flowers, I’ll need a grid every 1 px, so go to Edit > Preferences > Guides & Grid and enter 1 in the Gridline every box and 1 in the Subdivisions box.
I know Grids seem complex but try not to get discouraged by all that grid—it will make your work easier and keep in mind that you can easily enable or disable it using the keyboard shortcut CTRL + "
Related Topics:
- How to Recolor Artwork in illustrator
- How to Create Silver Metallic Effect in Illustrator
- What is Adobe Illustrator
Create New Document
Create a New Document with Width and Height of 850 px, Color Mode set as RGB and Raster Effects as Screen (72 ppi).

Creating Flower Petal
Step 1
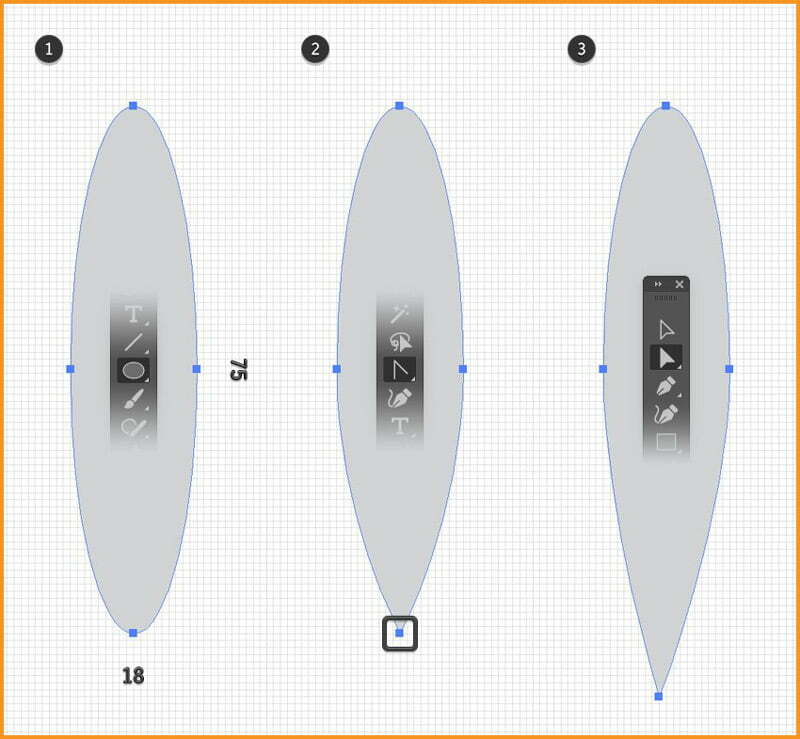
A Flower design starts with a petal. Chose the Ellipse Tool and draw an 18 x 75 px ellipse. Pick Anchor Point Tool inside Pen tool and click the bottom anchor point to turn it into a sharp point.
Now, with the help of Direct Selection Tool, select only the anchor point at the bottom and move it about 9 px down and 1 px to the left.
Step 2
I’ll start with the shape obtained in the previous step to create different petals. So, before I continue, I’ll make a copy CTRL + C and then CTRL + V and keep it for the second petal.
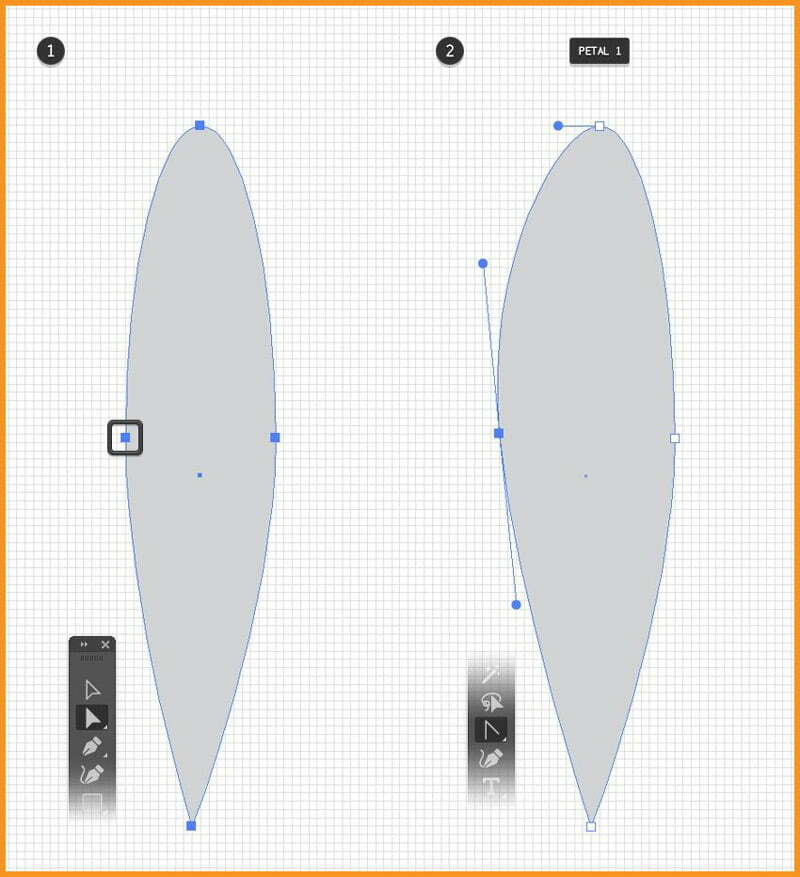
Now, select Direct Selection Tool to select only the anchor point on the left and move it a little to the left.
Also move the handles as shown in image below. I can make extra adjustments if I want but the petal is pretty much ready. I will name this shape “petal 1”.
Step 3
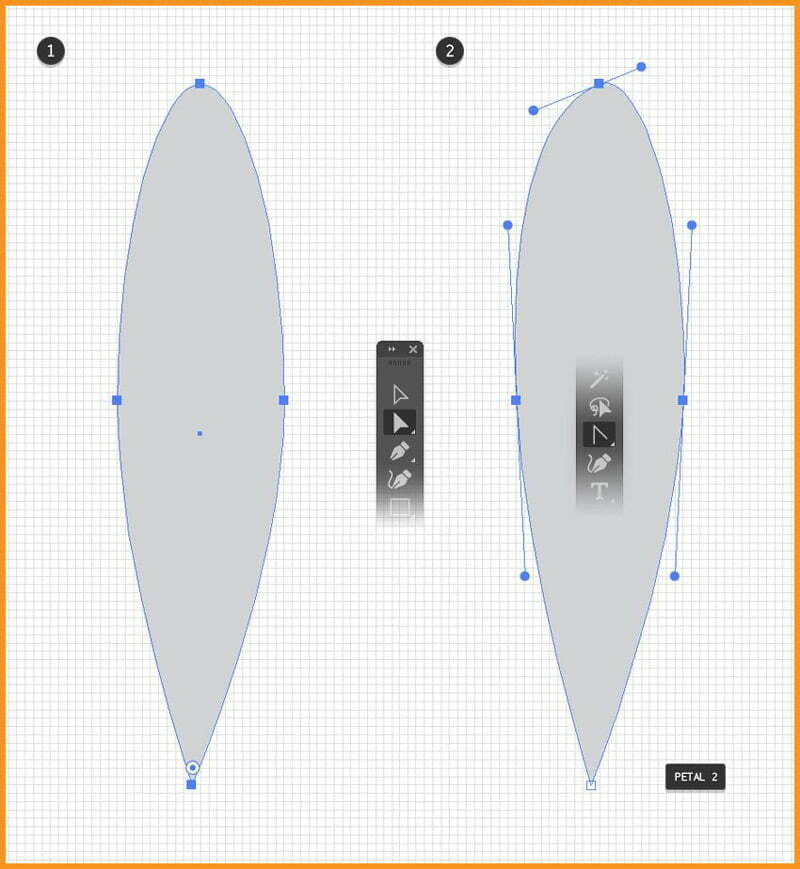
Now I will select the copy that I created earlier and modify it to create the second petal. Select the Anchor Point Tool, click the left and right points and then drag the handles as shown in the following image.
Move the handles of the top point as shown below and use the Direct Selection Tool to adjust just the left handle as shown. I will name the shape “petal 2”.
You can create only one petal but for variety I decided to go with two.
Step 4
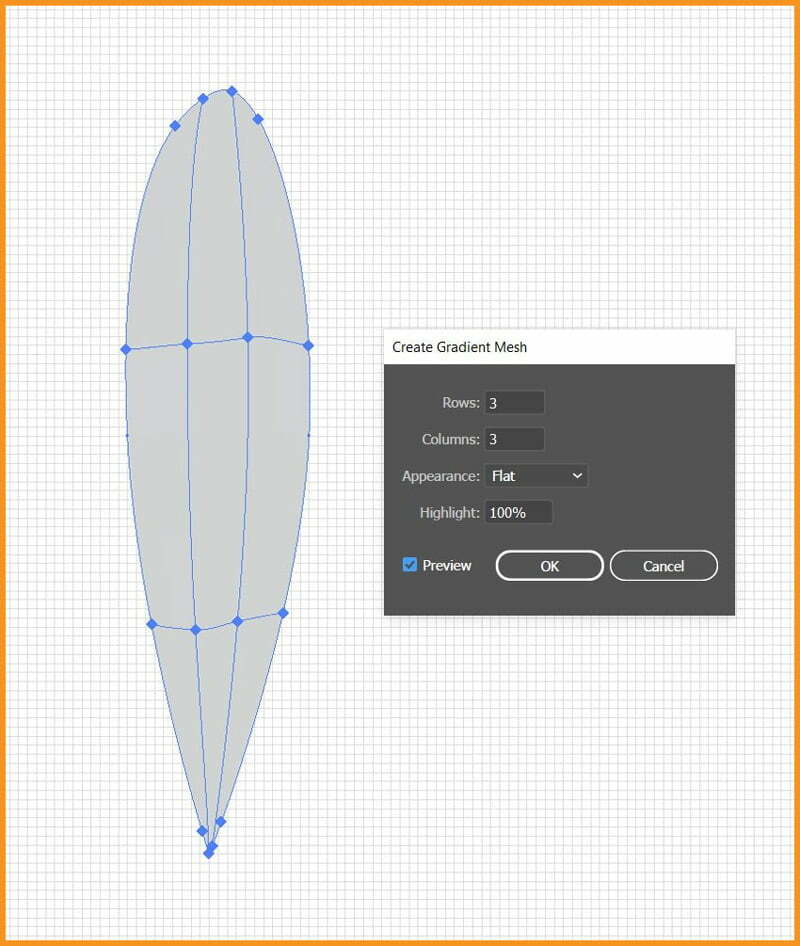
Now I’ve the two flower petals. I’ll select “petal 2” and then go to Object > Create Gradient Mesh with 3 Rows and 3 Columns and click OK. The petal looks like the one below at this point.
Step 5
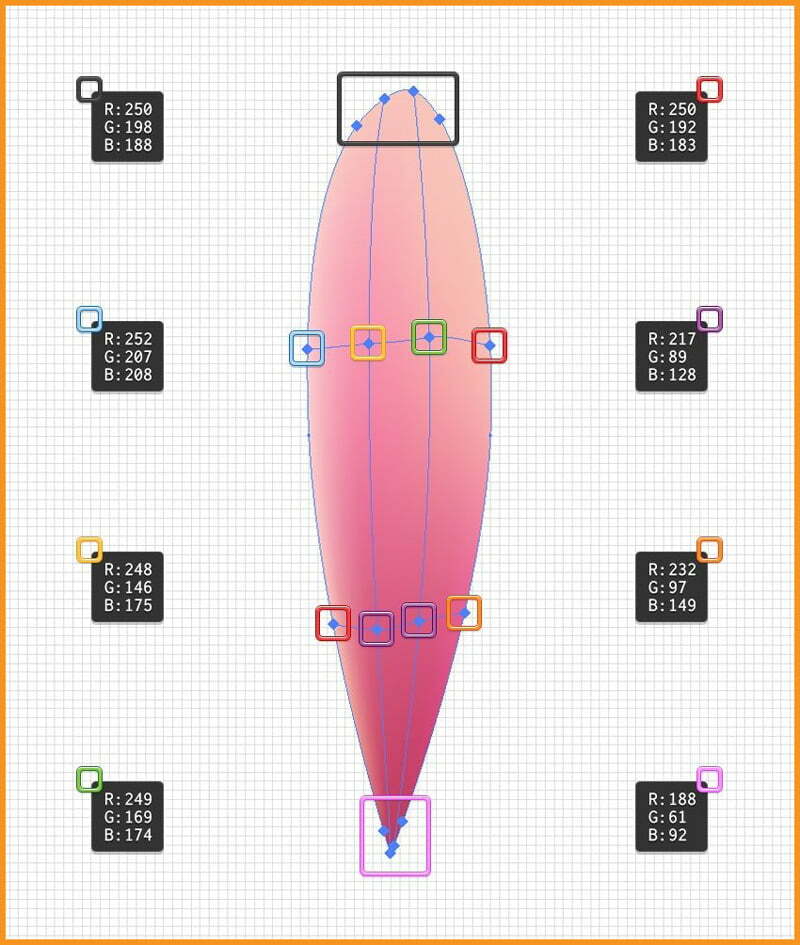
By using the Direct Selection Tool, I can select each mesh point and color it. In this case, I’m using shades of pink.
Follow the color codes shown in image belwo to replace the gray fill of each point with the colors indicated and we can hold down the SHIFT key to easily select multiple points.
The petal should look like as shown in the next image.
Step 6
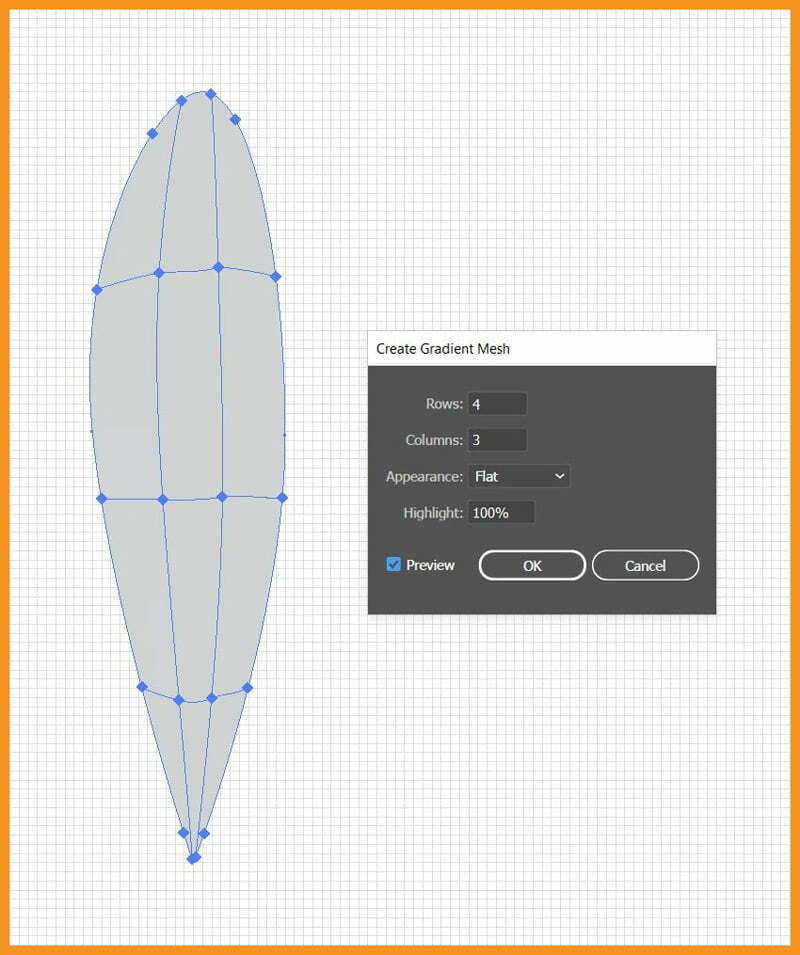
I will turn back to “petal 1” and go to Object > Create Gradient Mesh with 4 Rows and 3 Columns and click OK
Step 7
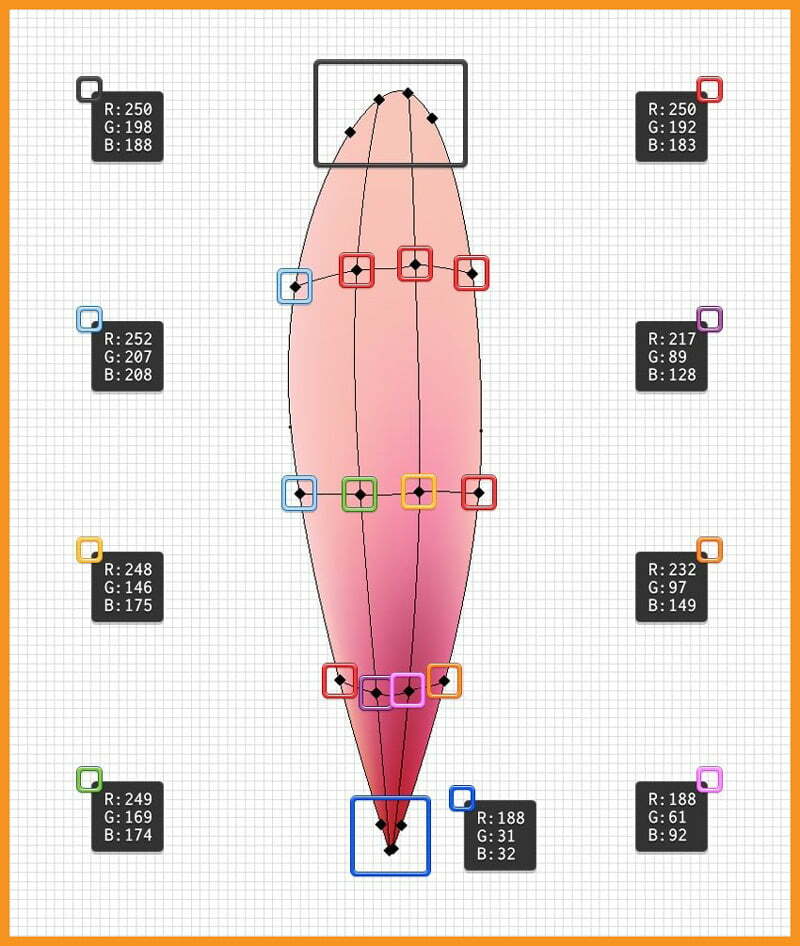
As I had already shown above, I will color the petal using shades of pink again.
Step 8
Now as I’ve created Flower Petals, I can disable the Grid using shortcut CTRL + " and also disable the Snap to Grid using shortcut SHIFT + CTRL + "
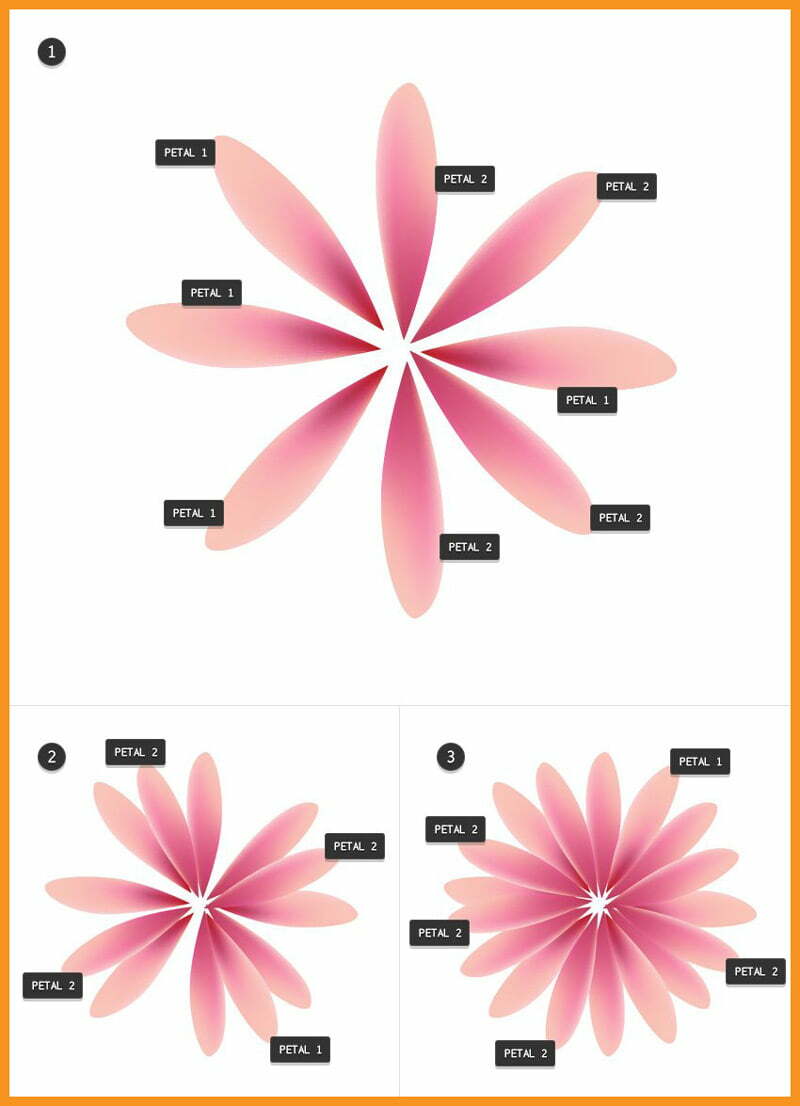
Now I’ll duplicate both “petal 1” and “petal 2” and then rotate and arrange them as shown below to create the flower.
Related Topics:
- Line Segment, Arc, Spiral, Rectangular & Polar Grid Tool
- Rectangle, Rounded Rectangle, Ellipse, Polygon, Star & Flare Tool
- Type Tool in illustrator
Creating Center of Flower
Step 1
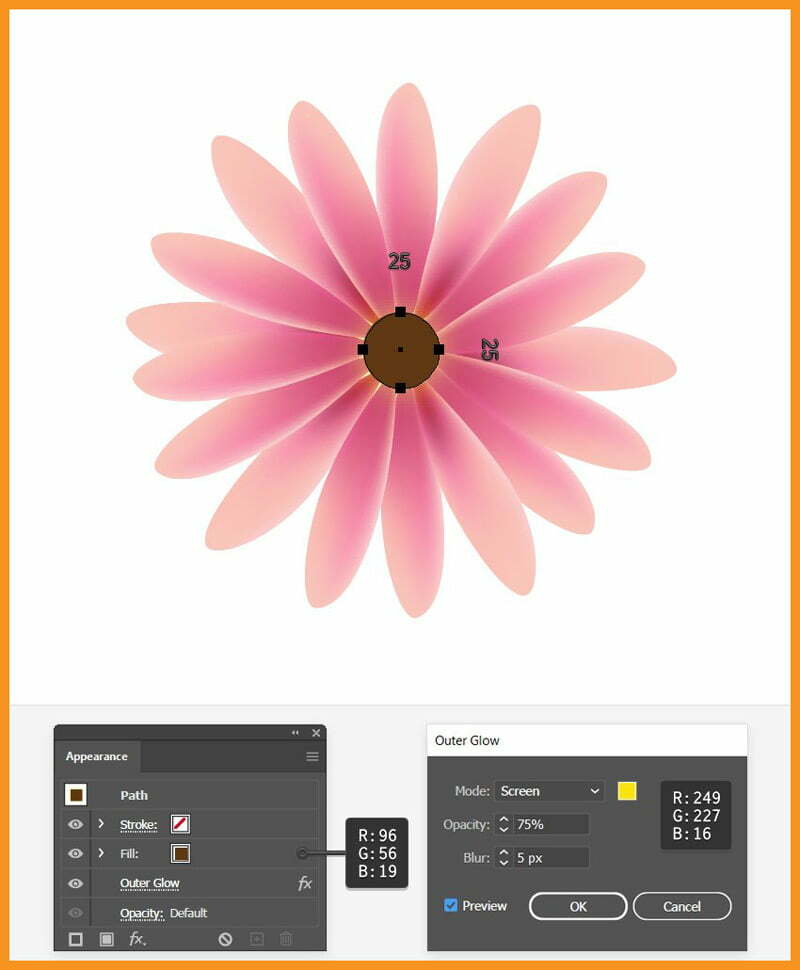
Select the Ellipse Tool, draw a (25 x 25) px circle and select R=96, G=56 and B=19 as the fill color.
With the circle still selected, go to Effect > Stylize > Outer Glow effect using settings shown below.
Step 2
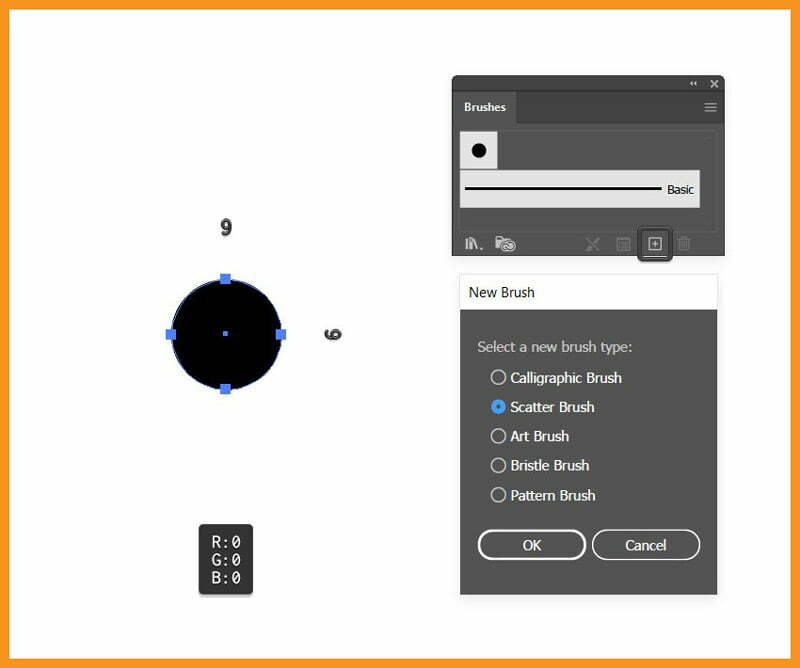
Select Ellipse Tool, draw a small circle and with a black fill. Drag this circle to the Brushes panel and choose Scatter Brush. Leave the settings as it is and click OK
Step 3
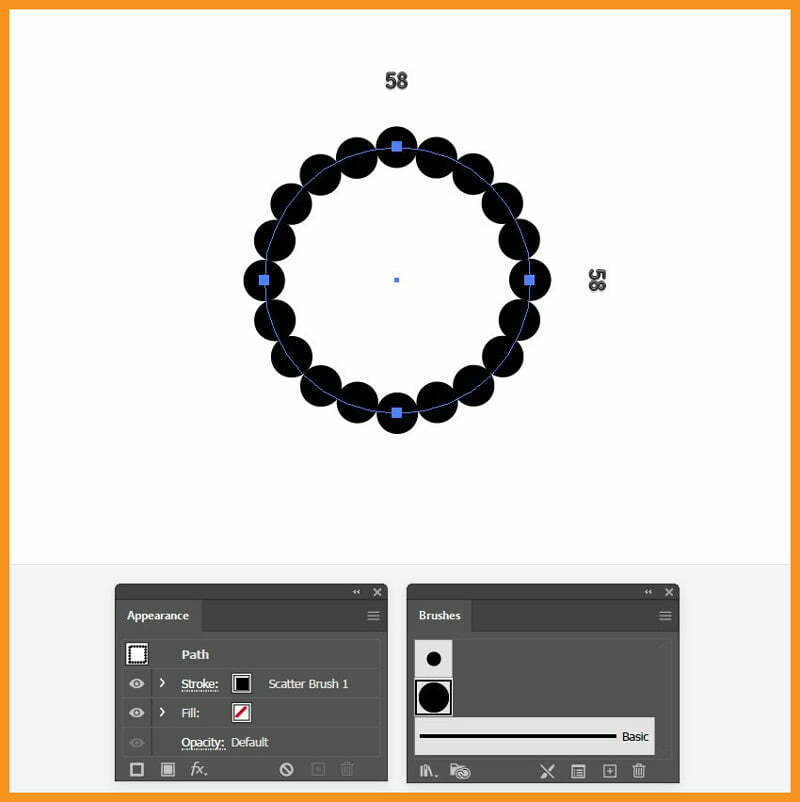
Create a new circle with values shown below and give it a 1 pt black Stroke Weight. Also Stroke the circle with the Scatter Brush saved in the previous step.
Step 4
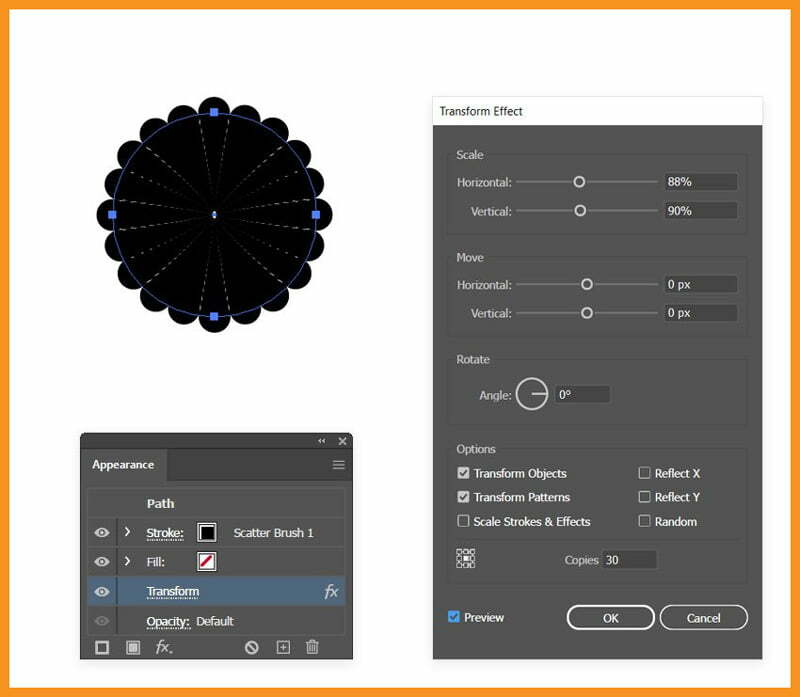
Select circle, go to Effect > Distort & Transform > Transform and apply the settings shown below.
Step 5
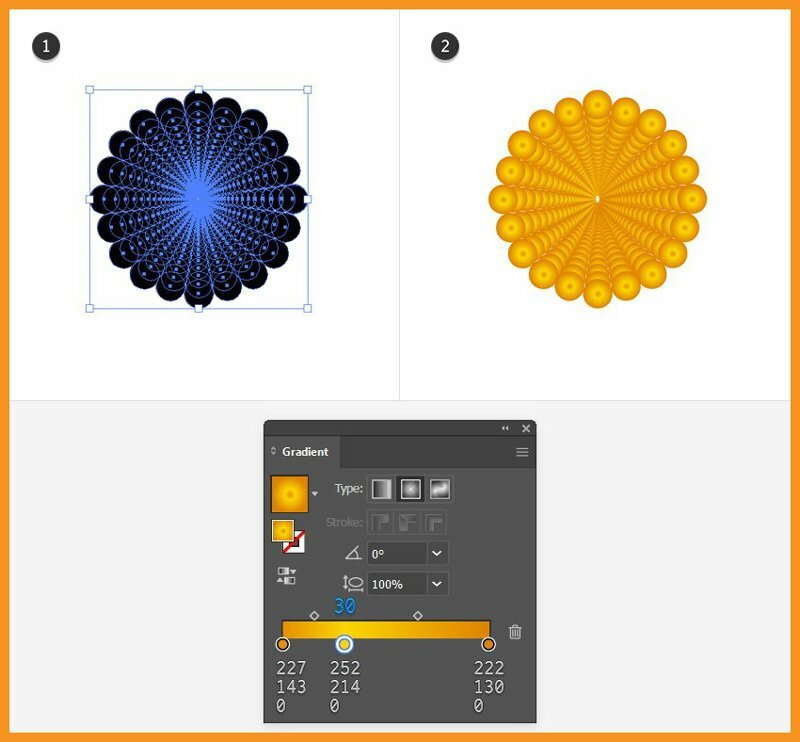
With the circle still selected, go to the Object > Expand Appearance in order to expand the brush stroke and the effect applied. Fill the resulting group with the radial gradient indicated.
Step 6
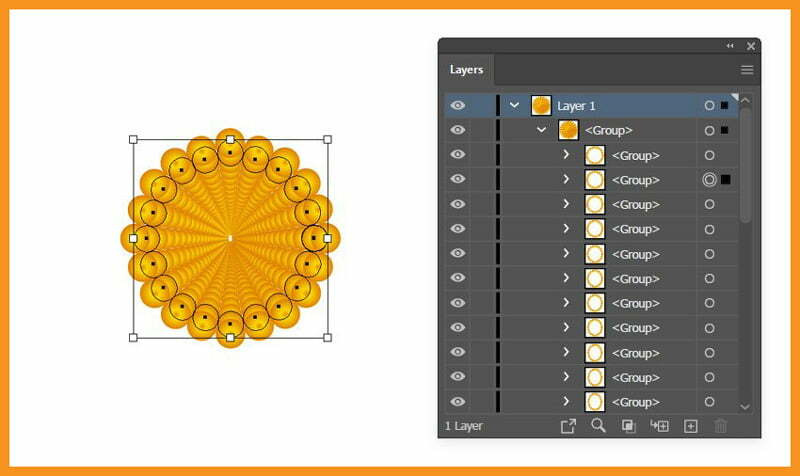
Go to the Layers panel, locate the group and open it. You will see that it’s composed of many other groups of circles arranged in order, from the outside to the center (small circles).
Step 7
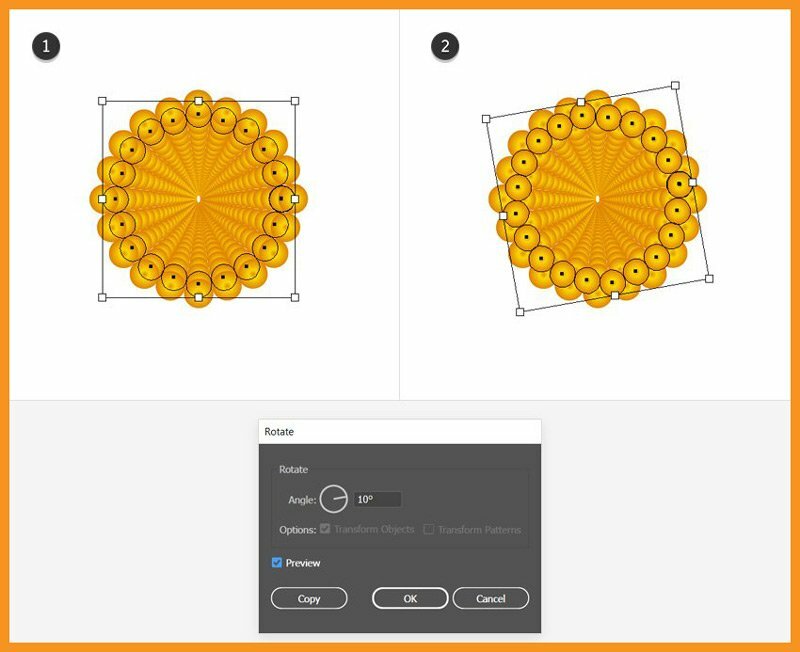
Now, I’ll rearrange all these groups. The first group of circles (from the outside) remains as it is. Select the second group from the Layers panel and then go to Object > Transform > Rotate, set the Angle to 10 degrees and click OK.
Then go to Object > Arrange > Bring to Front or use shortcut SHIFT + CTRL + ]
Step 8
Now, I’ll select the third group of circles from the Layers panel and go to Object > Arrange > Bring to Front or shortcut SHIFT + CTRL + ]
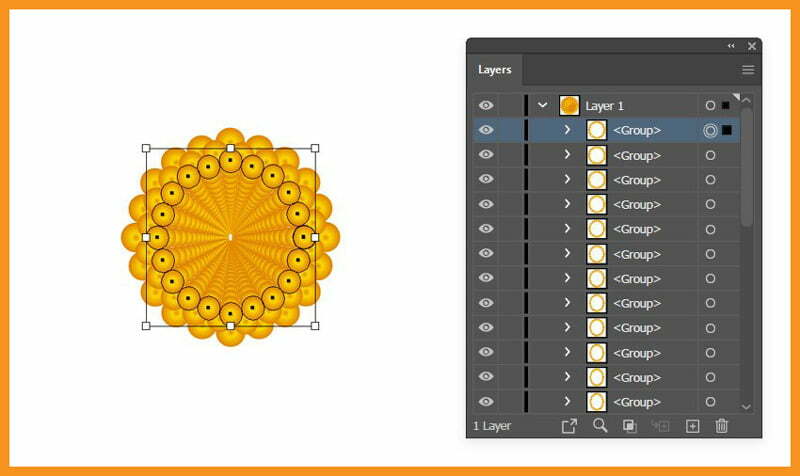
Step 9
Now I’ll select the fourth group of circles and then Rotate 10 degrees and Bring it to Front as I did with the second group. The fifth group again, I’ll just have to Bring it to Front. Repeat this pattern for even and odd groups!
The point is to bring each group in front of the previous one (invert the existing order) and also rotate every second group in order to get the specific look.
Continue with the remaining groups and the center of your flower should look like the next image.
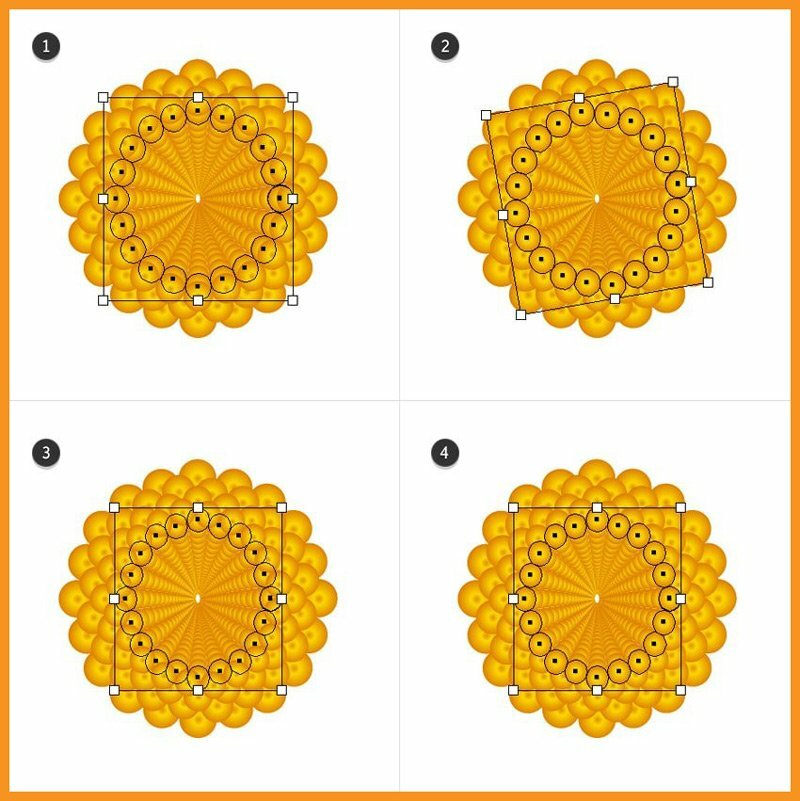
Step 10
Move the entire group to the center of the flower and scale it to about the size of the brown circle.
Step 11
Use the Ellipse Tool to draw a circle above the stamens. Mine was about 25 x 25 px. Select black as the fill color and then go to Object > Create Gradient Mesh, choose 2 Rows and 2 Columns and hit OK
Using the Direct Selection Tool, select only the mesh point from the center and replace the black fill color with white. Set this circle to Blending Mode Overlay and 40–50% Opacity.
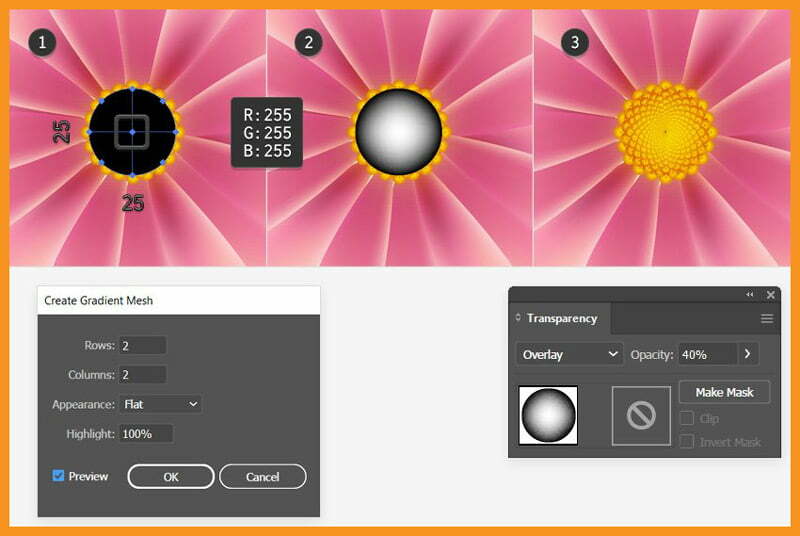
Related Topics:
- Paintbrush & Blob brush Tool in illustrator
- How to use Eraser tool in illustrator
- How to use the Pen Tool in illustrator
Adding Details to Flower
Step 1
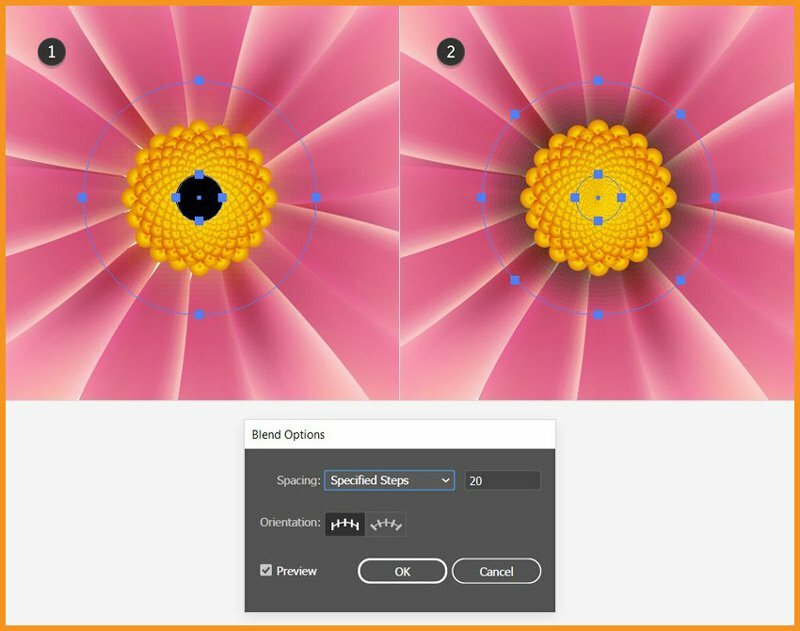
Let’s add details to the flower design. Draw two circles with the Ellipse Tool with the dimensions 45 x 45 px and 9 x 9 px. Fill both circles with black, but set the bigger circle to 0% Opacity.
With both of them selected, go to Object > Blend > Blend Options and choose 20 Specified Steps and then hit OK
Go back to Object > Blend > Make or use shortcut ALT CTRL B
Move the resulting blend group behind the stamens but in front of the petals.

Step 2
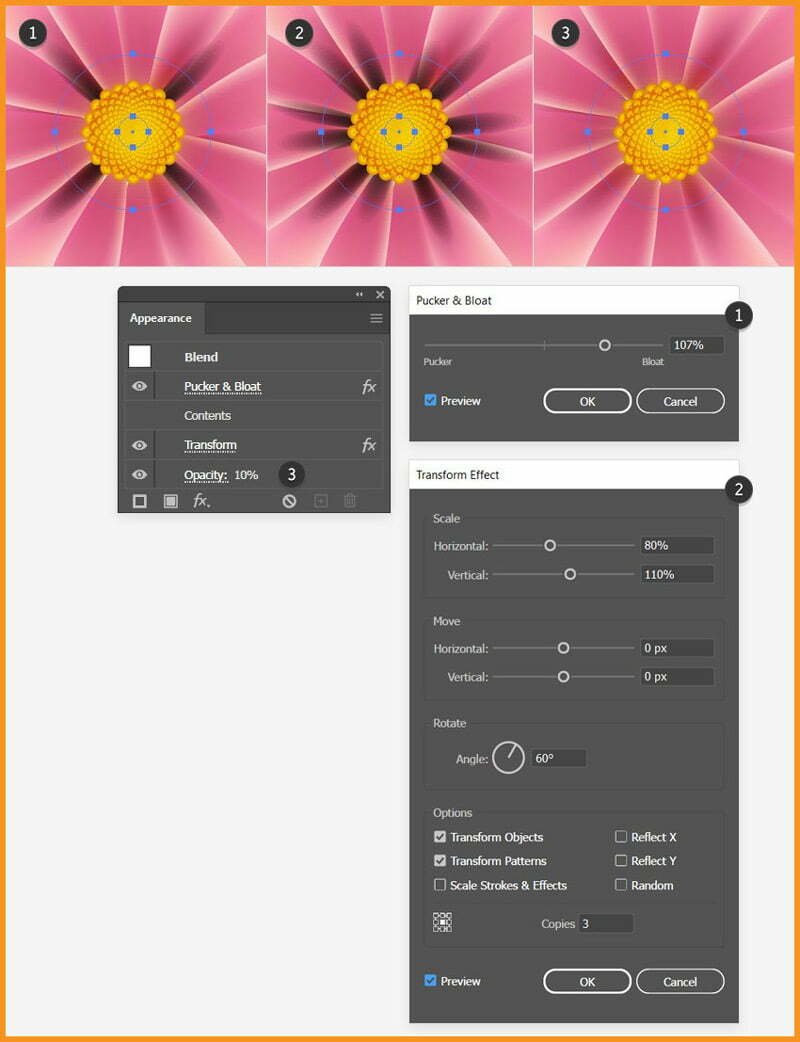
Select the same blend group, go to Effect > Distort & Transform > Pucker & Bloat as shown below.
Don’t release the group yet and go back to Effect > Distort & Transform > Transform as shown below.
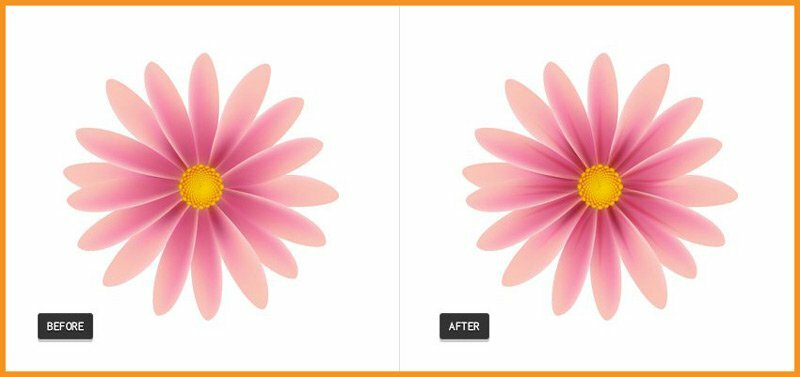
Finally, lower the Opacity of the blend group to 10–20%.
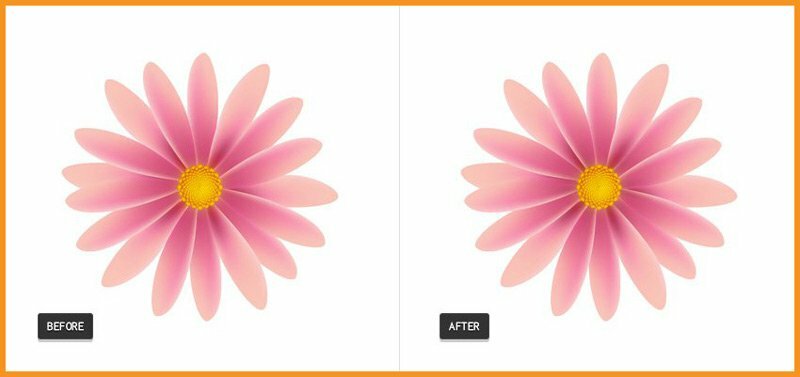
Before and After
Step 3
Draw two more circles with the dimensions 45 x 45 px and 9 x 9 px. Fill both circles with black. Select the bigger circle and go to Object > Path > Add Anchor Points to add four extra points on the path (more points mean more spikes in the next step).
Also, set the bigger circle to 0% Opacity. Blend them using 20 Specified Steps and move the resulting blend group behind the stamens.
Step 4
With the blend group from the previous step selected, apply the Pucker & Bloat effect and then the Transform effect. Set the group to Blending Mode Overlay and 40–50% Opacity.
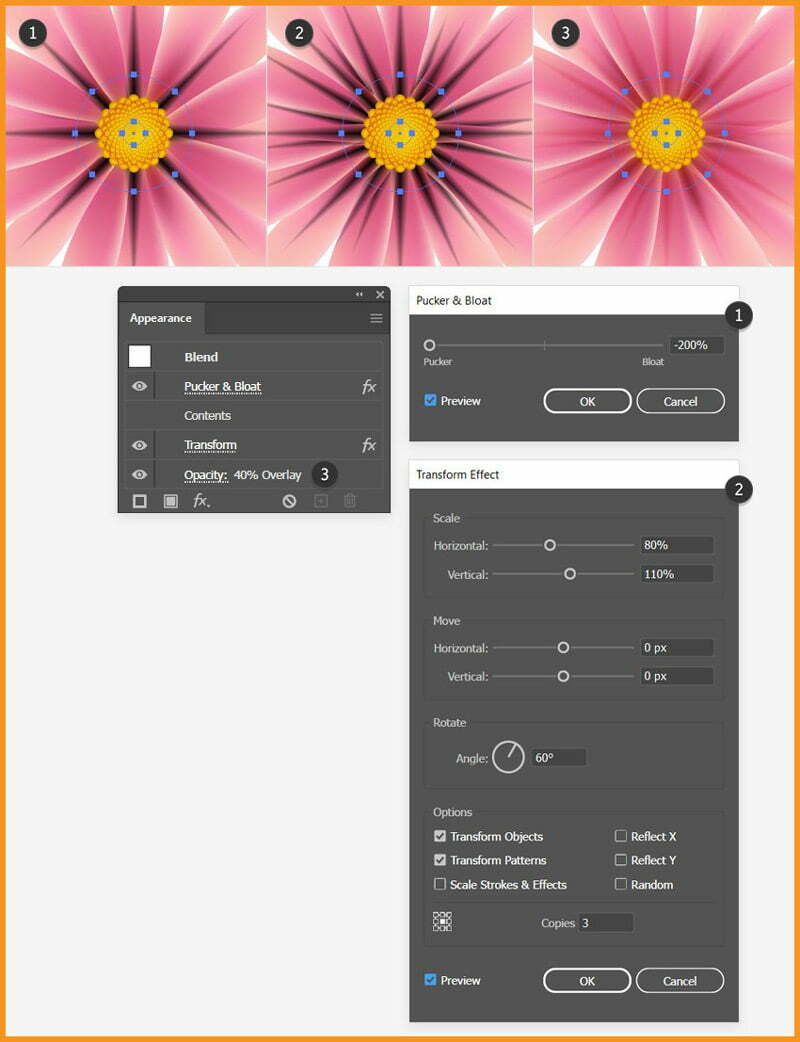
Before and After
Related Topics:
Adding Shadow behind the flower
Step 1
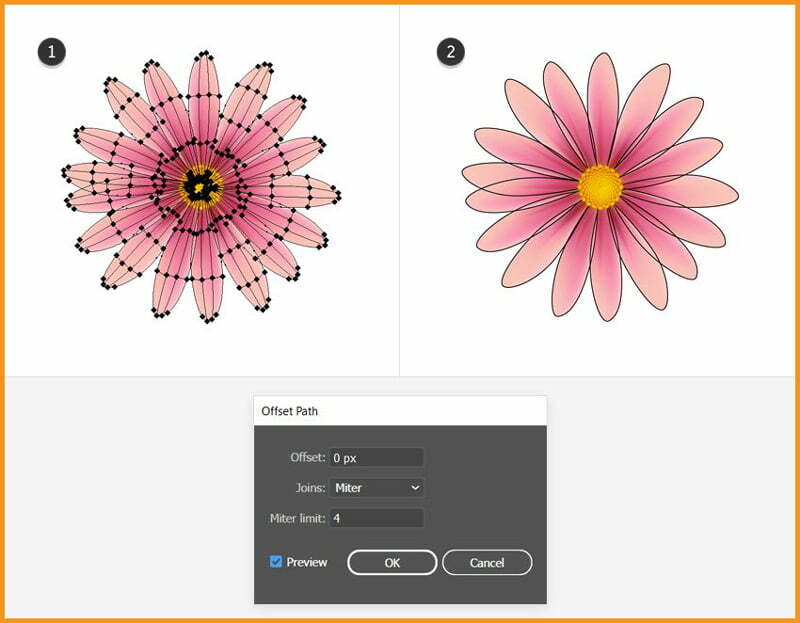
Select all petals, go to Object > Path > Offset Path and apply a 0 px Offset. As a result, I’ll get the shapes of the petals but without the mesh points and lines.
Step 2
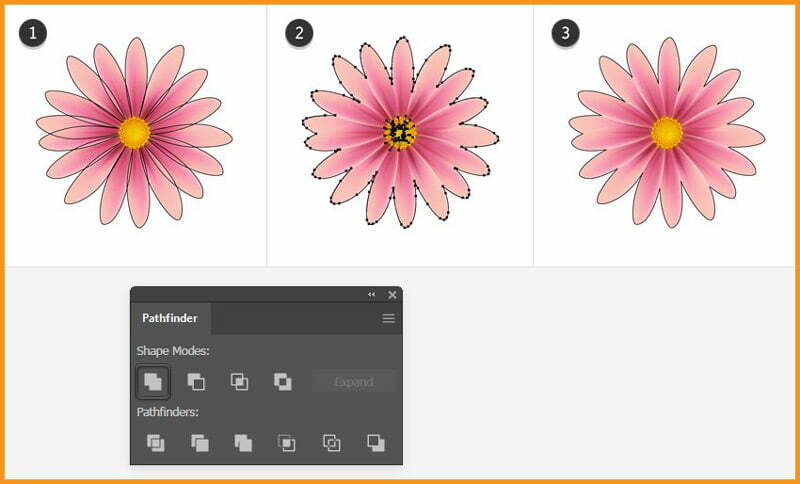
I’ll select all petal shapes obtained in the previous step and click Add in the Pathfinder panel.
After that, I’ll get a compound path. Now, go to Object > Compound Path > Release and delete the small shapes in the center. I’ll only need the outline and I will name it “flower-shape”.
Step 3
Before we continue, make a copy of the “flower-shape” because we’ll need it later for a mask.
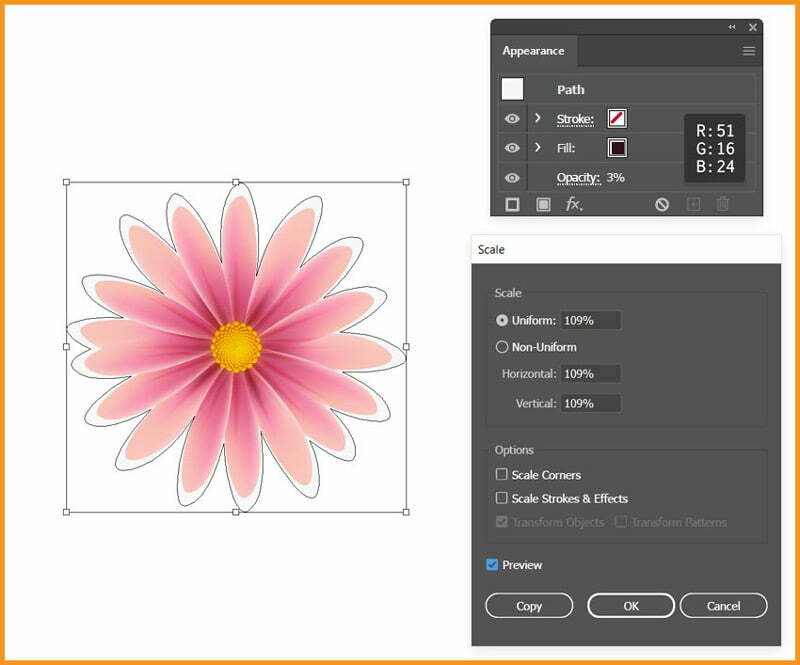
Now, with the original shape selected, go to Object > Transform > Scale, type 109% in the Scale field and click OK
Next, with the Ellipse Tool, draw a circle about the size of the stamens. Fill both shapes with the color shown but set the “flower-shape” to 3% Opacity.
Step 4
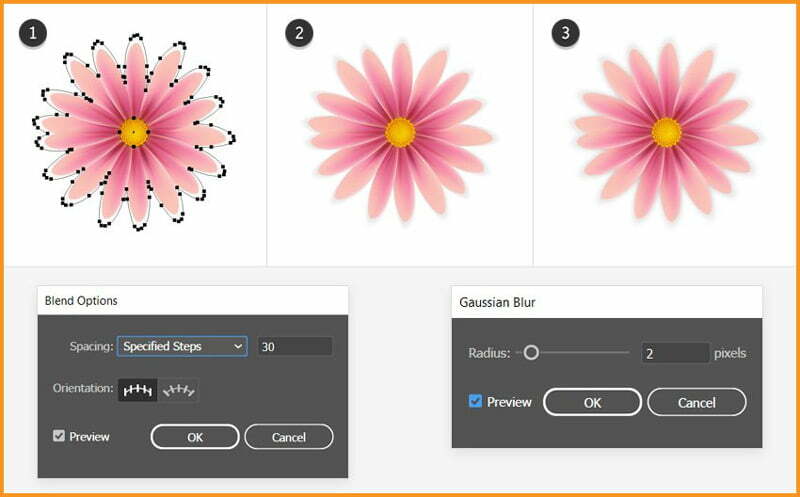
Select the “flower-shape” and the circle. Go to Object > Blend > Blend Options and choose 30 Specified Steps and click OK
Go back to Object > Blend > Make or use shortcut ALT + CTRL + B
Send the resulting blend group behind everything by going to Object > Arrange > Send to Back or use shortcut SHIFT + CTRL + [
At this point, I thought that the shadow was too sharp, so I also applied a 2 px Gaussian Blur by going to Effect > Blur > Gaussian Blur
Related Topics:
- Shape Builder, Live Paint Bucket tool in illustrator
- How to use Gradient Tool in Illustrator
- How to use Mesh Tool in illustrator
Adding Shadow between Petals
Step 1
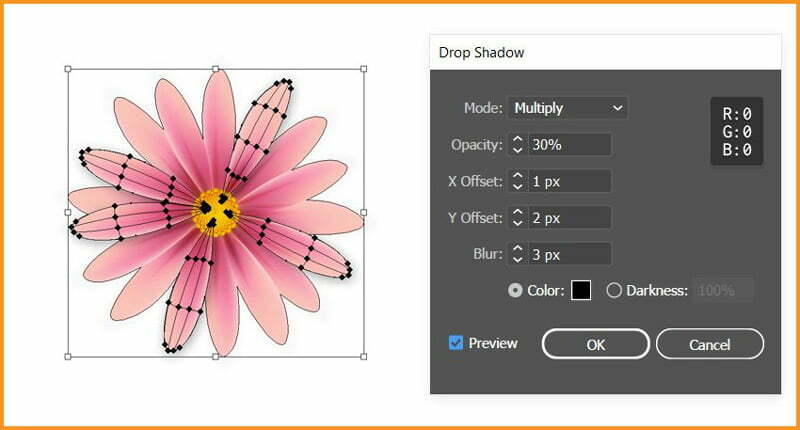
You don’t need to add shadows to all the petals but only for those on top.
Select each petal and then go to Effect > Stylize and apply the Drop Shadow effect as shown below.
Step 2
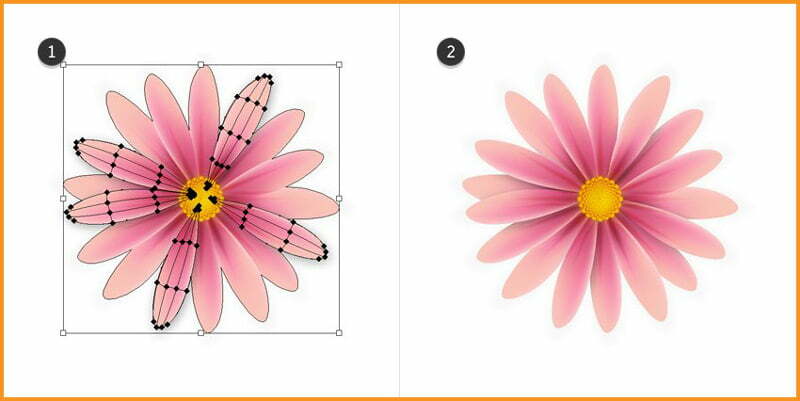
We only want the shadows between the petals where they overlap and not on the outside, because there we have the flower’s shadow. To fix this, we will use a mask.
Take the copy of the “flower-shape” that I mentioned earlier and move it in front of the petals with the help of the Layers panel.
Now, select this shape and change fill to none and stroke to none and also select the group of petals and go to Object > Clipping Mask > Make or use shortcut CTRL + 7
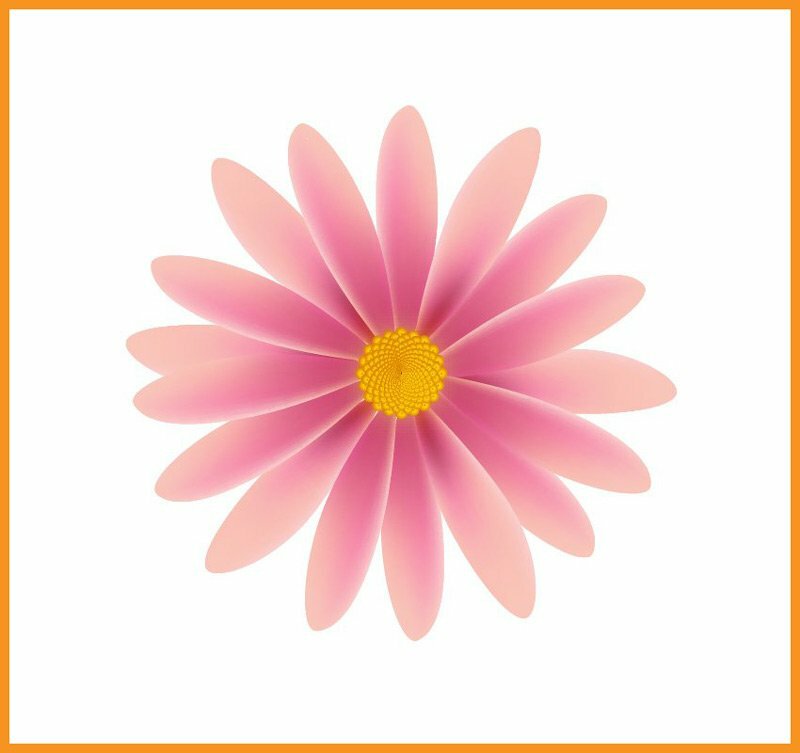
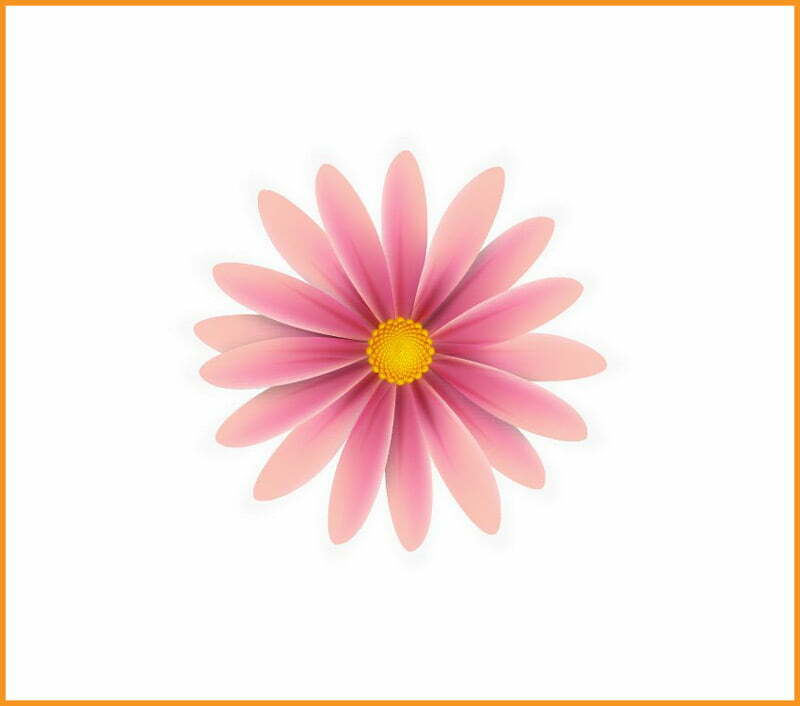
Final Result
Related Topics:
- How to make a Semicircle in Illustrator
- How to design a Retro Flower Pattern
- How to set Brush Pressure in Illustrator
- How to Create A Pressure Sensitive Brush in Illustrator
- How to Create Metallic effect in Illustrator
- List of websites for Royalty Free images
- List of websites for Royalty Free Raw images


