To create multicolour objects in illustrator, we can either use Gradient Tool or Mesh tool in illustrator. In this blog, we will get in details of ‘How to use Mesh Tool in illustrator’.
My name is Lalit Adhikari and we are at LTY. Let’s begin!
Table of Contents
Introduction
There’s no doubt that Minimalistic designs are the current trends. But they can’t be used for all purposes. For Example: An illustration or Game Design etc.
With the increase in high-resolution/ retina display screens, it helps to know how to create a more photorealistic look when you need to. Prepping your graphics in vector format can improve your overall workflow by making it easy to export your graphics in any size.
How to use Mesh Tool
Mesh tool, as the name suggests, creates a mesh in the object with multiple anchor points, where each anchor point can have a different color with it’s spread as per location and angle of other anchor points.
The vector on which we use Mesh Tool is called Mesh Object.
Mesh Object
The vector object created after creating Mesh using Mesh tool is called Mesh Object. It is a multi colored object in which colors can flow in different directions as well as transition smoothly from one point to another.
When we create a mesh object, multiple lines called mesh lines crisscross the object in both axis-x and axis-y. Hence providing a way to easily manipulate color transitions on the object.
By moving and editing points on the mesh lines, we can change the intensity of a color shift or change the extent of a colored area on the object.
At the intersection of two mesh lines, we have a special kind of anchor point called a mesh point.
Mesh points appear as diamonds and have all of the same properties as anchor points but with the added capability of accepting color.
We can add and delete mesh points, edit mesh points or change the color associated with the mesh point.
Anchor points also appear in the mesh (differentiated by their square rather than diamond shape) and can be added, deleted, edited and moved as with any other anchor point in illustrator.
Anchor points can be placed on any mesh line and we can click an anchor point and drag its direction lines to modify it.
The closed area between any four Mesh points is called the Mesh Patch. We can also change the color of the mesh patch using the same techniques as changing colors on a Mesh Point.
The image below shows a Mesh Object in illustrator.
In the image above A, B, C and D represents following:
- A: Mesh line
- B: Mesh patch
- C: Mesh point
- D: Anchor point
Related Topics:
- How to make a Semicircle in Illustrator
- How to design a Retro Flower Pattern
- How to set Brush Pressure in Illustrator
Create Mesh Object
We can create mesh objects from vector objects, with the exception of compound paths and text. We cannot create mesh objects from images.
To improve performance and redraw speed, it is recommended, to keep the size of Mesh Objects to a minimum. Complex Mesh Objects can greatly reduce performance.
Therefore, it is better to create a few small, simple mesh objects than to create a single, complex mesh object.
When we use Mesh Objects for printing, spot colors are preserved for EPS, PDF, and PostScript output.
Mesh Object with an irregular pattern of Mesh Points
- Select Mesh tool and select a fill color for the mesh points.
- Then we will click where we want to position the first mesh point. The object will be converted to a Mesh Object with the minimum number of mesh lines.
- We will continue to click to add additional Mesh Points. Shift-click to add a mesh point without changing to the current fill color.
Mesh Object with a regular pattern of Mesh Points
- Select the object and choose Object > Create Gradient Mesh.
- Set the number of rows and columns and select the direction of the highlight from the Appearance menu.
- Flat: Applies the object’s original color evenly across the surface, resulting in no highlight.
- To Center: Creates a highlight in the center of the object.
- To Edge: Creates a highlight on the edges of the object.
- Enter a percentage of white highlight to apply to the mesh object. A value of 100% applies maximum white highlight to the object; a value of 0% applies no white highlight to the object.
Convert a Gradient-filled Object to Mesh Object
- Select the object and choose Object > Expand.
- Select Gradient Mesh, and click OK. The selected object is converted to a mesh object that takes the shape of the gradient, either circular (radial) or rectangular (linear).
Related Topics:
- How to Create A Pressure Sensitive Brush in Illustrator
- How to Create Metallic effect in Illustrator
- How to Create Flower using Gradient Mesh in Illustrator
Edit Mesh Object
We can edit a Mesh Object by adding, deleting and moving Mesh Points, changing the color of Mesh Points and Mesh Patches and converting the Mesh Object back to Regular Object.
To edit a Mesh Object, we can do any of the following:
- To add a Mesh Point, select the Mesh Tool and select a Fill color for the new Mesh Points. Then click anywhere in the Mesh Object.
- To delete a Mesh Point, Alt-click (Windows) or Option-click (Mac OS) on the Mesh Point with the Mesh Tool.
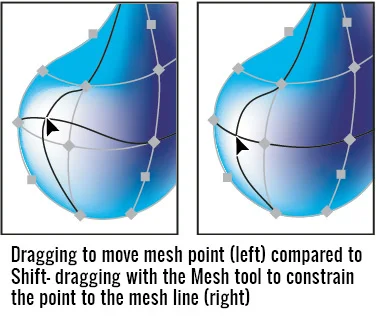
- To move a Mesh Point, drag it with the Mesh tool or Direct Selection tool. Shift-drag a Mesh Point with the Mesh tool to keep the Mesh Point on a Mesh Line. This is a convenient way to move a Mesh Point along a curved Mesh Line without distorting the Mesh Line.
- To change the color of a Mesh Point or Patch, Select the Mesh Object and then drag a color from the Color Panel or Swatches Panel onto the Point or Patch. Or deselect all Objects and select a Fill color. Then select the Mesh Object and use the Eyedropper tool to apply the Fill color to Mesh Points or Patches.
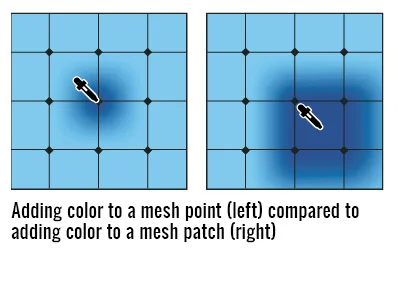
Let’s start creating few Mesh Objects using Mesh Tool.
Related Topics:
- How to Recolor Artwork in illustrator
- How to Create Silver Metallic Effect in Illustrator
- What is Adobe Illustrator
3d Effect in Circle

To create this 3d effect, follow the following steps:
- Create a circle using Ellipse tool and Shift.
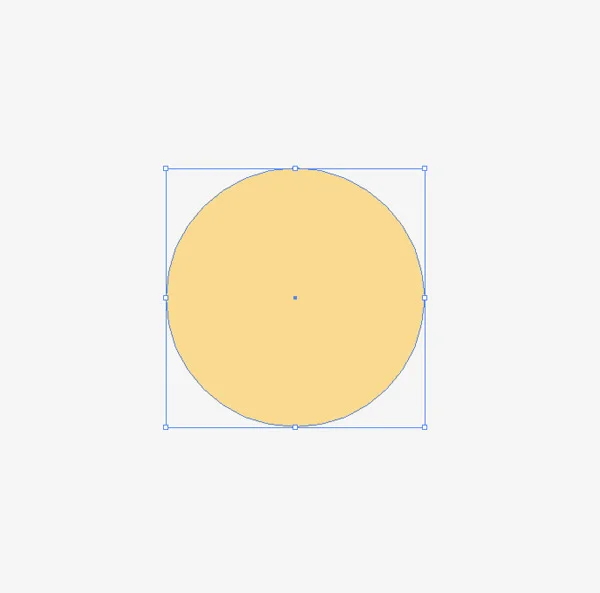
- Choose Mesh Tool and click on the center of the object to start creating grid. Practice with some simple shapes as you may not be able to create the gird below in one go.
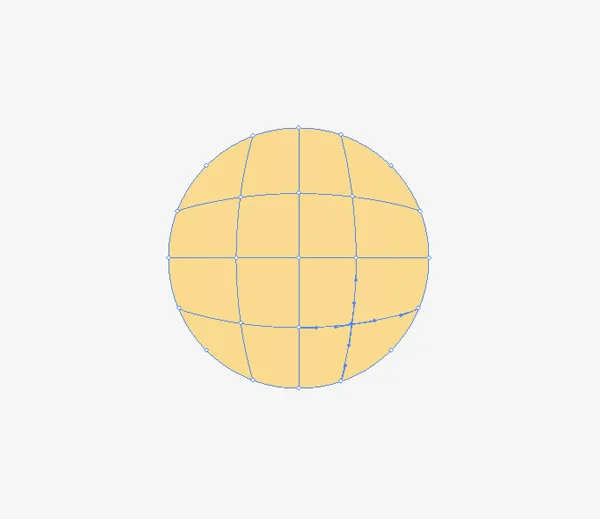
Points to remember:
- It’s a good trick to always start from the center.
- Try to create a symmetrical grid.
Now we need to fill colors in anchor points.
- Select the anchor points on the upper left side of the circle using lasso tool.
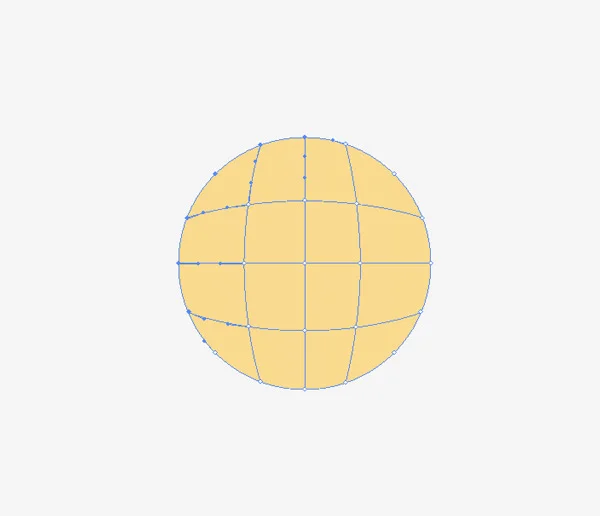
- Now go to Color Panel and chose a darker shade of the base color.
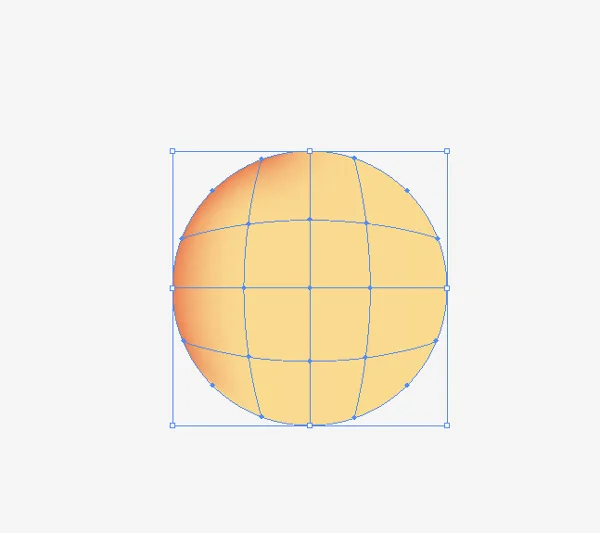
- Now, we need to repeat the process on the oppsite side. Select anchor points at the bottom right side of the circle. Fill a lighter color in the anchor points.
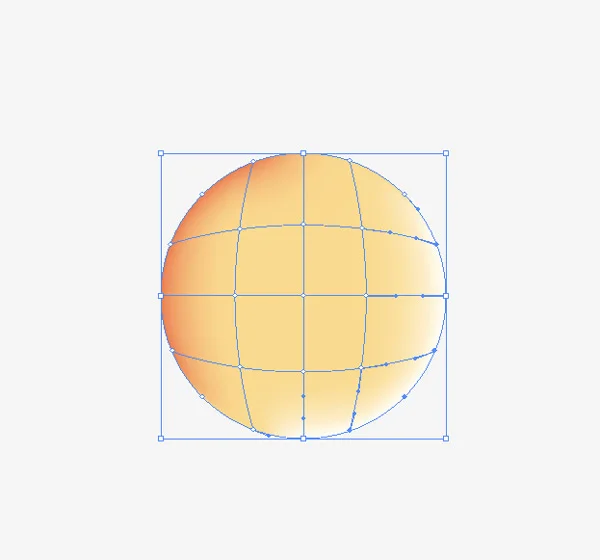
The final result:

If your result doesn’t match, keep on pracitising and you will understand the dynamics of the tool.
What is the purpose of Mesh tool in illustrator
Mesh Tool lets us make our vector illustrations look more 3d or photorealistic, in a matter of seconds. A vectorized image is created by adding a ’mesh’ over a closed shape, called Mesh Object, intersecting the lines of the mesh at points, called Mesh Points, on the shape where different colors can be applied.
About the Author
Lalit M. S. Adhikari is a Digital Nomad and Educator since 2009 in design education, graphic design and animation. He’s taught 500+ students and created 200+ educational articles on design topics. His teaching approach emphasizes clarity, practical application and helping learners.
Learn more about Lalit Adhikari.
This guide is regularly updated with the latest information about Adobe tools and design best practices. Last Updated: May 2026
Related Topics:
- Line Segment, Arc, Spiral, Rectangular & Polar Grid Tool
- Rectangle, Rounded Rectangle, Ellipse, Polygon, Star & Flare Tool
- Type Tool in illustrator
- Paintbrush & Blob brush Tool in illustrator
- How to use Eraser tool in illustrator
- How to use the Pen Tool in illustrator
- Perspective Tool in Illustrator
- Selection Tools in illustrator
- Width Tool in illustrator
- Shape Builder, Live Paint Bucket tool in illustrator


