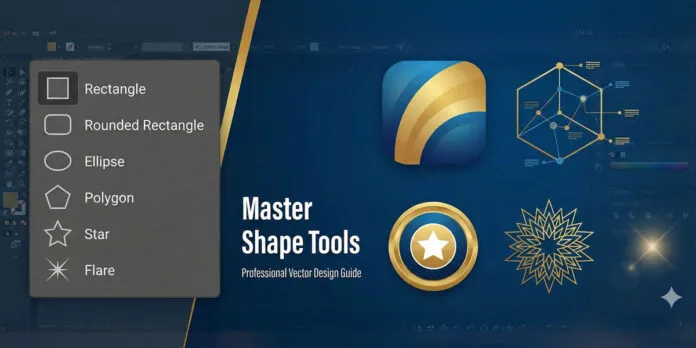
Adobe Illustrator’s shape tools are the foundation of vector design. Whether you’re creating logos, illustrations, infographics or UI designs, mastering these six essential shape tools—Rectangle, Rounded Rectangle, Ellipse, Polygon, Star and Flare—will exponentially increase your design capabilities and workflow efficiency.
This comprehensive guide will teach you not just how to use these tools, but the pro techniques that separate beginners from experienced designers.
My name is Lalit Adhikari and we are at LTY. Let’s begin!
Table of Contents
The Rectangle tool – Creating Perfect Squares and Rectangles
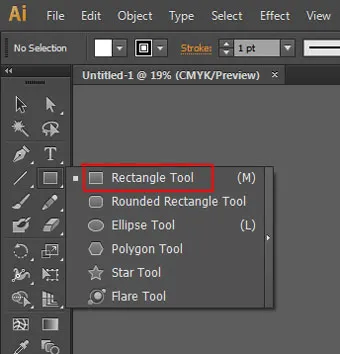
To use this tool, first, select it from the toolbar and just click and drag out.
What Is The Rectangle Tool and Where To Find It
The Rectangle Tool is your starting point in Illustrator’s shape arsenal. Located in the main toolbar, you can access it by clicking the rectangle icon or pressing M on your keyboard.
This tool creates rectangular and square shapes that are perfect for building everything from basic layouts to complex vector designs.
The beauty of the Rectangle Tool lies in its simplicity combined with its power. While it appears basic on the surface, it offers multiple ways to create shapes and numerous customization options once created.
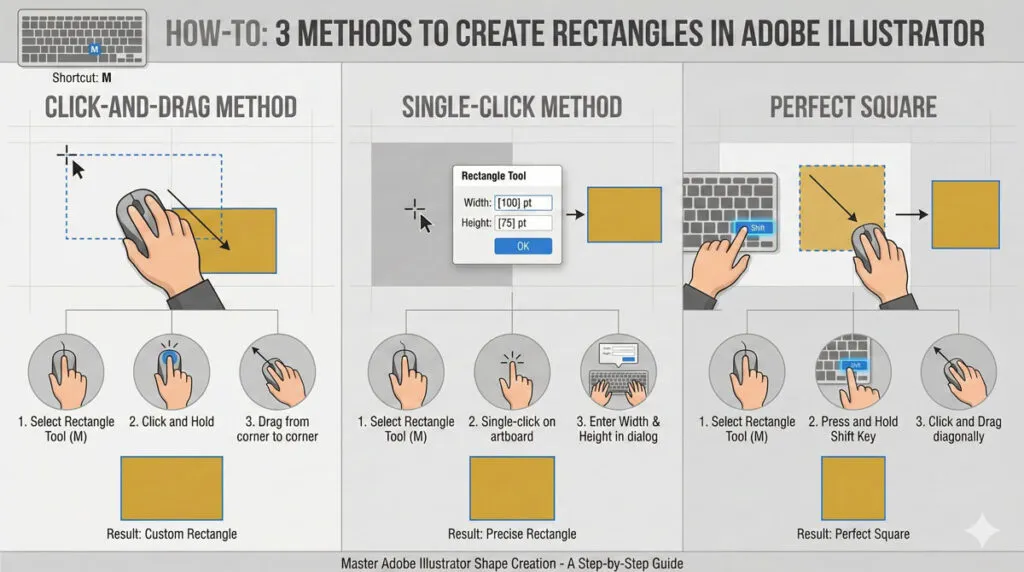
Creating Rectangles: Click-and-Drag Method
The most intuitive way to create a rectangle is the click-and-drag method:
- Select the Rectangle Tool (M)
- Click any point on your artboard
- Hold down the mouse button and drag to the desired size
- Release the mouse to finalize the shape
As you drag, Illustrator displays a preview outline showing your rectangle’s size and proportions in real-time. This method gives you visual control over your shape’s dimensions.
Creating Precision Rectangles: Single-Click Method
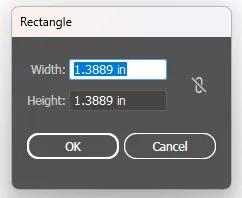
For situations where you need exact dimensions, use the single-click method:
- Select the Rectangle Tool (M)
- Click once on the artboard (don’t drag)
- A “Rectangle” dialog box appears
- Enter the exact Width and Height values
- Click OK
This method is essential for technical drawings, precise layouts, and situations where you need consistent sizing across multiple shapes.
Drawing Perfect Squares
A perfect square has equal width and height. To create a square while using the click-and-drag method:
- Select the Rectangle Tool (M)
- Hold down Shift before you start dragging
- Keep Shift pressed while you drag to create the square
- Release the mouse to finalize
The Shift key constrains the proportions to 1:1, ensuring a perfect square every time. This is more efficient than using the single-click method and then entering equal dimensions.
Pro Technique: Drawing From The Center Point
Instead of drawing rectangles from corner to corner (the default), experienced designers often draw from the center point outward. This gives you more intuitive control over placement.
To draw a rectangle from its center:
- Hold Shift + Alt (Windows) or Shift + Option (Mac) before you start dragging
- Position your cursor where you want the center of the rectangle
- Drag outward to your desired size
- Release the mouse
Combining Shift + Alt with the drag creates a perfect square from the center point. This technique saves time when you need multiple shapes centered on specific points.
Creating Rounded Rectangles with the Rectangle Tool
Once you’ve created a rectangle, you can add rounded corners using several methods:
Method 1: Using Corner Widgets
- Create your rectangle
- Look for the small circle handles in the corners
- Click and drag any corner circle inward to round that corner
- Hold Shift while dragging to round all corners proportionally
Method 2: Using Direct Selection Tool
- Create your rectangle
- Press A to activate the Direct Selection Tool
- Click on any corner point
- Drag the corner widget that appears
Method 3: Using The Rounded Rectangle Tool
- Delete your rectangle and start fresh
- Select the Rounded Rectangle Tool (next to Rectangle Tool)
- Click and drag to create a rounded rectangle
- While dragging, use arrow keys to adjust corner radius
Editing and Transforming Rectangles
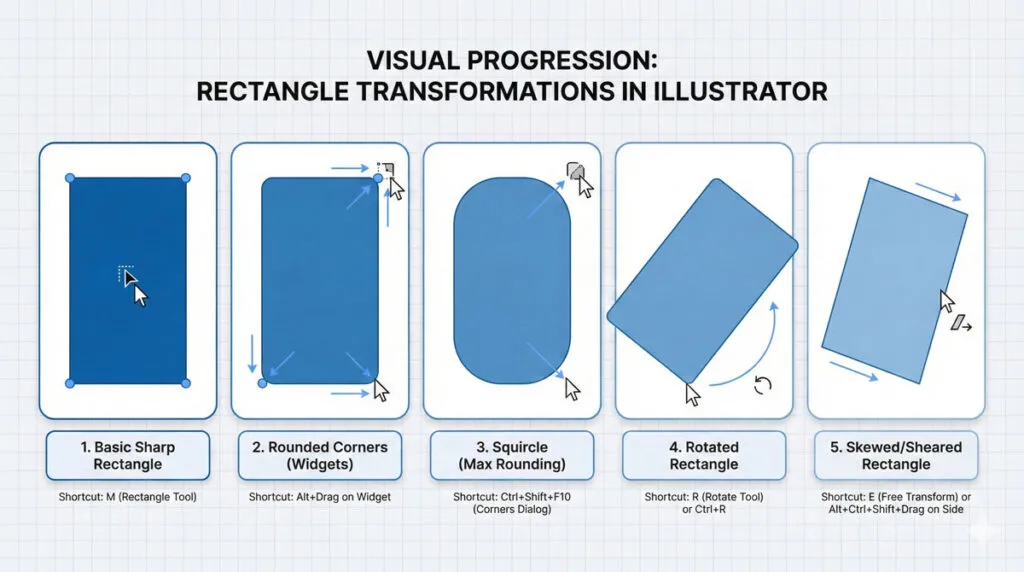
After creating a rectangle, you can modify it in numerous ways:
- Changing Size: Select the rectangle and drag the corner or edge handles using the Selection Tool (V)
- Rotating: Double-click the rectangle with the Selection Tool, then drag any corner handle to rotate
- Skewing: Hold Shift + Ctrl (Windows) or Shift + Command (Mac) and drag an edge handle to skew the shape
- Changing Fill and Stroke: Select the rectangle and use the Color Panels or Swatches to apply fills and strokes
Related Topics:
- Master Adobe Illustrator’s Line, Arc, Spiral & Grid Tools: Complete Step-by-Step Tutorial for Designers
- Master Illustrator Type Tool: Complete Guide
- Master Paintbrush and Blob Brush Tool in Illustrator: Complete Guide
Rounded Rectangle Tool – Designing with Style
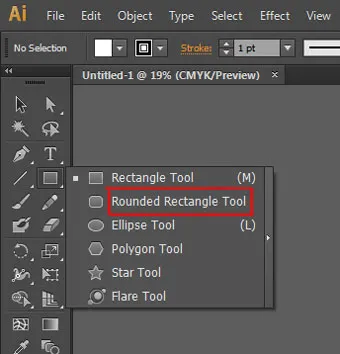
This is the second tool in the fly-out menu of the shape tool in Adobe Illustrator. This tool is kind of same as rectangle tool but the only difference here is, they are rounded in corners.
Understanding The Rounded Rectangle Tool
The Rounded Rectangle Tool is the Rectangle Tool’s sophisticated cousin. It creates rectangles with perfectly curved corners from the start, eliminating the need to add rounding afterward.
This tool is essential for modern UI design, app interfaces and contemporary graphic design where rounded corners are standard.
Press U or find it by right-clicking the Rectangle Tool and selecting from the dropdown menu.
Creating Rounded Rectangles: Three Approaches
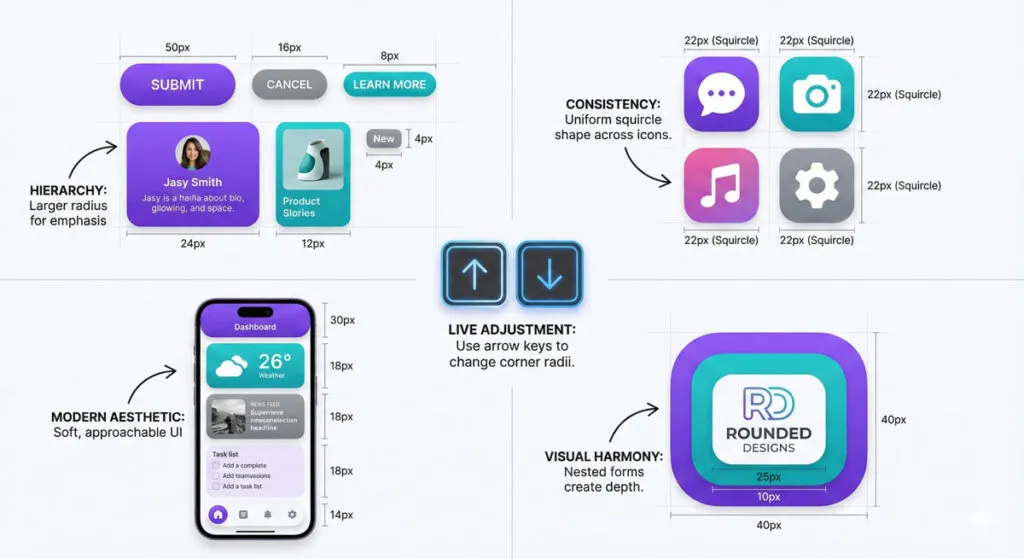
Approach 1: Drag and Adjust Live
- Select the Rounded Rectangle Tool
- Click and drag to create your shape
- While still dragging (before releasing the mouse), press arrow keys to adjust corner radius
- Left/Right arrows: Toggle between fully rounded and squared corners
- Up/Down arrows: Make fine adjustments to the curve radius
- Release the mouse to finalize
Approach 2: Precision Settings via Single-Click
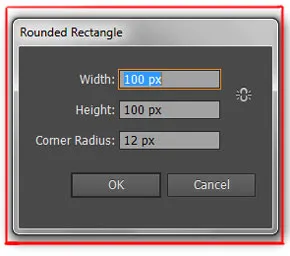
- Select the Rounded Rectangle Tool
- Click once on the artboard
- Enter Width, Height and Corner Radius values
- Click OK
Approach 3: Convert From Regular Rectangle
If you already created a regular rectangle and want to round it:
- Select the rectangle
- Switch to the Rounded Rectangle Tool
- Use corner widgets to adjust rounding as needed
Advanced Rounding Techniques
Rounding Individual Corners
- Select your rounded rectangle
- Press A for Direct Selection Tool
- Click on a specific corner point
- Drag the corner widget that appears to round just that corner
- Hold Shift while dragging to affect all corners equally
Creating “Squircles” (Square-Circle Hybrids)
Modern design often uses squircles—shapes that blend square geometry with circular softness. To create this effect:
- Create a rounded rectangle
- Adjust the corner radius to approximately 25-35% of the shape’s smaller dimension
- This creates the fashionable squircle look popular in contemporary app design
Rounded Rectangles in Professional Design
Rounded rectangles appear everywhere in professional design:
- UI/UX Design: Buttons, cards, containers in app and web interfaces
- Logo Design: Modern logo badges and frames
- Infographics: Data visualization containers with a contemporary feel
- Packaging: Digital and print product design mockups
- Print Design: Modern brochures and marketing materials
Understanding how to create and control rounded rectangles is fundamental to creating contemporary professional designs.
Related Topics:
- How to use Eraser tool in illustrator
- How to use the Pen Tool in illustrator
- Perspective Tool in Illustrator
Ellipse Tool – Circles and Ovals Explained
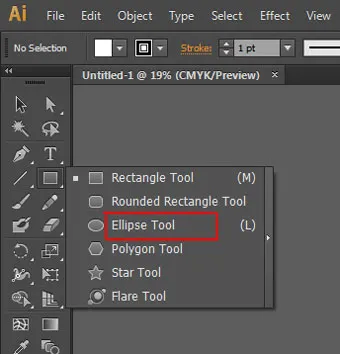
This tool is the third option in the fly-out menu of shape tools in Adobe Illustrator. This tool is used in making circular shapes like ovals and circles.
Introduction to the Ellipse Tool
The Ellipse Tool creates circles and ellipses (ovals). Available as L keyboard shortcut or by right-clicking the Rectangle Tool, this tool is essential for creating round elements in designs: badges, frames, icons and any circular or oval shape.
An ellipse is defined by two radii: the major radius (longer) and minor radius (shorter). When both radii are equal, you get a perfect circle.
Creating Perfect Circles
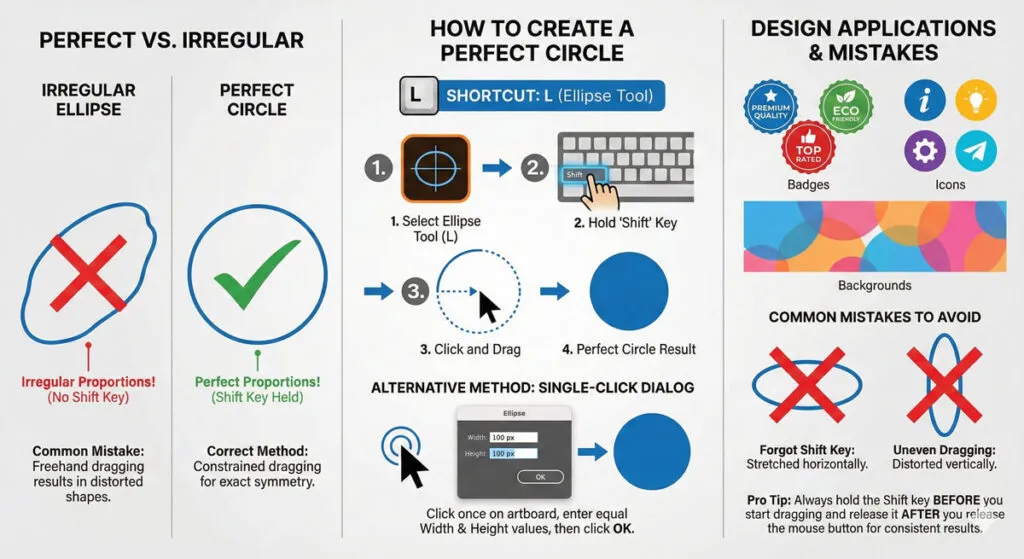
For a perfect circle with equal width and height:
- Select the Ellipse Tool (L)
- Hold Shift before you start dragging
- Click and drag while holding Shift
- Release the mouse
The Shift key constrains the proportions to 1:1, creating a perfect circle. This is one of the most-used techniques in Illustrator design.
Creating Ellipses (Oval Shapes)
For oval/ellipse shapes with different width and height:
- Select the Ellipse Tool (L)
- Click and drag without holding any modifier keys
- Drag to your desired proportions
- Release the mouse
The resulting shape will be an ellipse with the major (longer) and minor (shorter) radii you defined through dragging.
Drawing Ellipses from the Center Point
Like rectangles, you can draw ellipses from their center point:
- Hold Shift + Alt (Windows) or Shift + Option (Mac)
- Position your cursor at the center point
- Drag outward to the desired size
- Release the mouse
For a perfect circle from the center, use Shift + Alt + drag (drawing from center while constraining to a circle).
Precise Sizing with the Single-Click Method
When you need exact dimensions:
- Select the Ellipse Tool (L)
- Click once on the artboard
- In the dialog, enter Width and Height
- For a circle, enter identical values
- Click OK
Constraining Angle while Drawing Ellipses
To create ellipses at specific angles (multiples of 45 degrees):
- Select the Ellipse Tool (L)
- Start dragging to create your ellipse
- While dragging, move closer to the ellipse edge and hold Shift
- You’ll see angle indicators: 0°, 45°, 90°, 135°, etc.
- Align to your desired angle and release
This technique is useful when you need ellipses aligned to specific visual angles for design composition.
Ellipse Tool uses in Professional Design
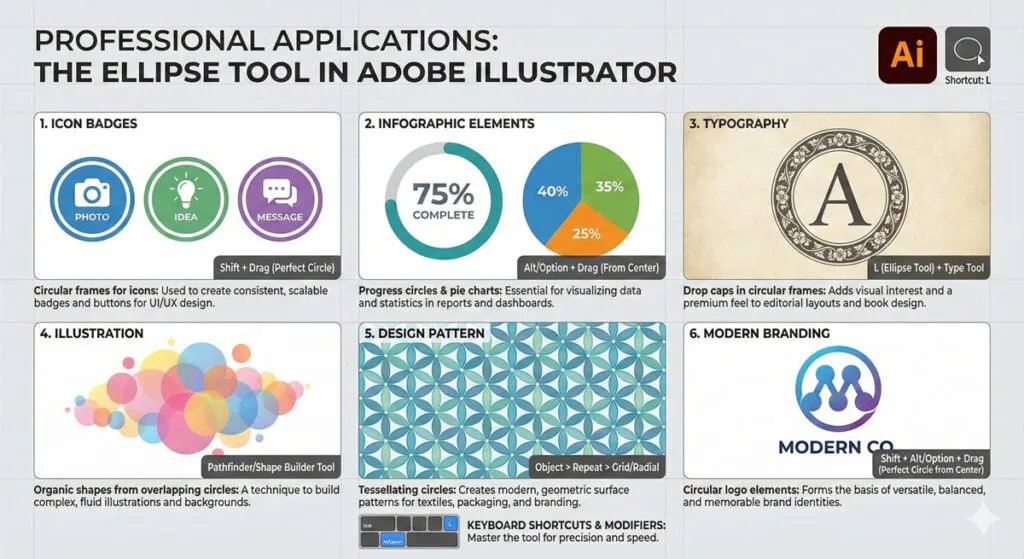
- Icon Design: Circular icon backgrounds and elements
- Badge Design: Round badges, seals, and certification marks
- Infographics: Circular progress indicators, pie chart segments
- Typography: Drop caps and decorative circular elements
- Illustration: Creating organic shapes by combining multiple ellipses
Related Topics:
- Selection Tools in illustrator
- Width Tool in illustrator
- Shape Builder, Live Paint Bucket tool in illustrator
Polygon Tool – Creating Multi-Sided Shapes
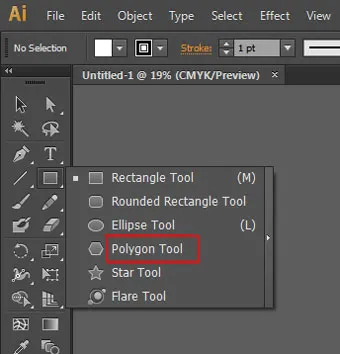
This tool is the fourth option in the fly-out menu of shape tools in Adobe Illustrator. This tool also works the same as other shape tools in Adobe Illustrator.
Understanding Polygons In Vector Design
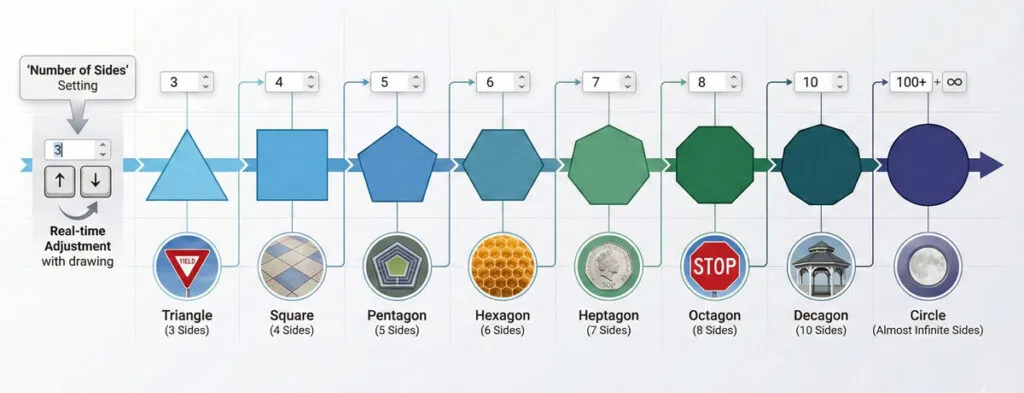
A polygon is a closed shape with any number of equal sides. The Polygon Tool allows you to create triangles (3 sides), squares (4 sides), pentagons (5 sides), hexagons (6 sides) and beyond, up to infinite sides.
Find the Polygon Tool by right-clicking the Rectangle Tool and selecting from the dropdown menu, or use keyboard shortcut: None (you must access it via the tool menu).
Creating Polygons: Click-And-Drag Method
- Select the Polygon Tool
- Click and drag on the artboard to create the polygon
- While dragging, you’ll see the polygon taking shape
- Release the mouse when satisfied with the size
The number of sides is determined by the tool’s current settings (default is usually 3 sides for a triangle).
Setting the Number of Sides
To change the number of sides before creating a polygon:
- Select the Polygon Tool
- Look for the Number of Sides option in the Tool Options (usually below the artboard)
- Enter the desired number (3-100+)
- Create your polygon with the new settings
Common Polygons:
- 3 sides = Triangle
- 4 sides = Diamond/Square
- 5 sides = Pentagon
- 6 sides = Hexagon
- 8 sides = Octagon
Precision Polygon Creation: Single-Click Method
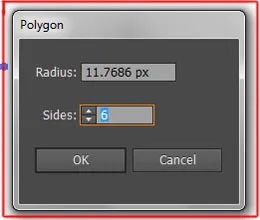
For exact sizing:
- Select the Polygon Tool
- Click once on the artboard
- Set the Number of Sides
- Enter the Radius (distance from center to outer point)
- Click OK
Adjusting Polygon Sides while Drawing
Here’s a pro technique few designers know about:
- Select the Polygon Tool with your desired starting number of sides
- Begin dragging to create your polygon
- While still dragging (before release):
- Up Arrow: Adds more sides
- Down Arrow: Removes sides
- Release the mouse with your final shape
This real-time adjustment saves time when you’re experimenting with different polygon variations.
Creating Perfect Shapes: Shift Constraint
To create perfectly symmetrical polygons:
- Hold Shift while dragging with the Polygon Tool
- This constrains the polygon to rotate at fixed angles (multiples of 45 degrees)
- Perfect for creating perfectly aligned multi-sided shapes
Professional Applications for Polygons
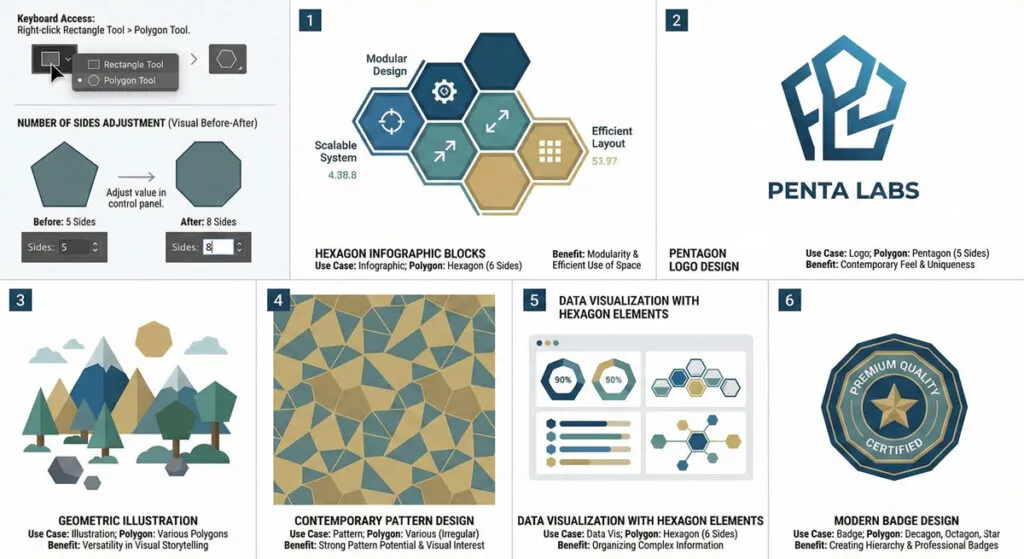
- Logo Design: Pentagon logos, hexagon badges, geometric marks
- Infographics: Hexagon information blocks (very popular)
- Icon Design: Multi-sided geometric icons
- Pattern Design: Honeycomb patterns, geometric tessellations
- Geometric Illustration: Contemporary vector art using polygons
Related Topics:
- Adobe Illustrator vs Photoshop for Beginners: Which Should You Learn First?
- How to Create a Logo in Adobe Illustrator: Complete Step-by-Step Tutorial for Beginners
- How to use Gradient Tool in Illustrator
Star Tool – Creating pointed Shapes
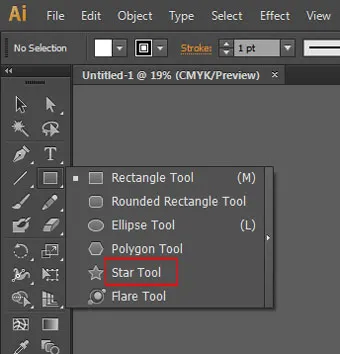
Star tool is the fifth option in the fly-out menu of the shape tool in Adobe Illustrator. If you click and drag this tool you will get a star shape with five points.
Understanding The Star Tool
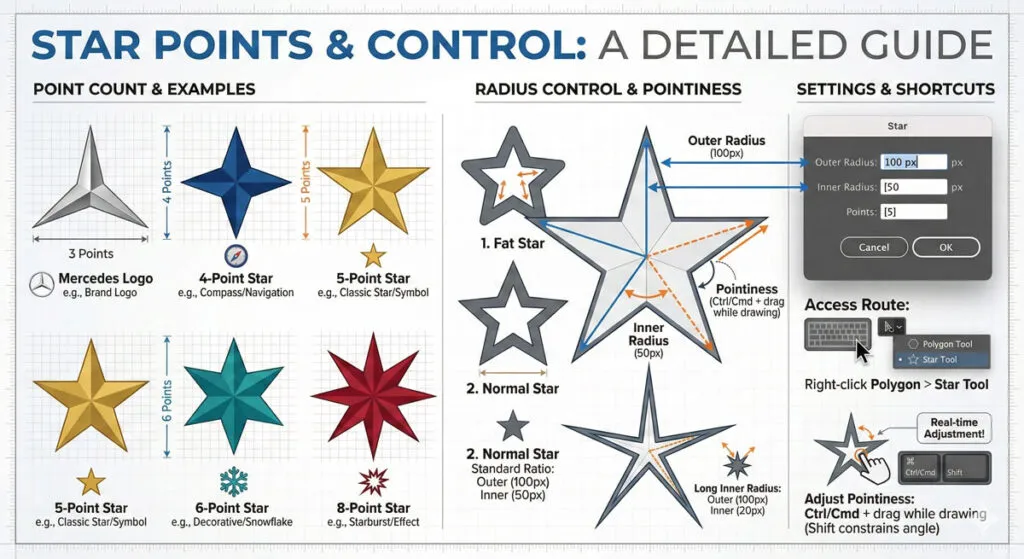
The Star Tool creates pointed star shapes with customizable points and radius variations. It’s one of the most versatile tools for creating decorative elements, ratings icons, and geometric designs.
Access the Star Tool by right-clicking the Polygon Tool in the toolbar, or find it in the tools menu. No default keyboard shortcut.
Creating Stars: Click-And-Drag Method
- Select the Star Tool
- Click and drag on the artboard to create a star
- Release the mouse when satisfied
The default star typically has 5 points, but this is customizable.
Controlling Star Points
Before creating a star, set the number of points:
- Select the Star Tool
- Find “Number of Points” in Tool Options
- Enter the desired number (3-100+)
- Create your star
Common Star Variations:
- 3 points = Decorative star (like Mercedes logo)
- 4 points = Simple star
- 5 points = Classic star (most common)
- 6 points = Decorative star
- 8 points = Geometric star
Understanding Inner and Outer Radius
Stars have two radii that determine their appearance:
- Outer Radius: Distance from the center to the star’s outer points (the tips)
- Inner Radius: Distance from the center to the valleys between points
The relationship between these radii determines how “pointy” the star appears:
- Large difference: Very pointy stars (thin points)
- Small difference: Fat, chunky stars (thick points)
- No difference: Geometric shape between star and polygon
Adjusting Star Pointiness while Drawing
Here’s the advanced technique:
- Select the Star Tool
- Begin dragging to create your star
- While dragging (before release):
- Ctrl/Cmd + drag: Hold Ctrl or Cmd and drag to adjust pointiness
- Drag right to make points sharper (increase outer radius)
- Drag left to make points fatter (decrease outer radius)
- Release the mouse
Alternatively, you can hold Shift before dragging the inner radius point to keep it in place while adjusting:
- Drag to create initial star
- Hold Shift and adjust the inner radius without changing outer radius
- This creates custom star proportions
Precision Star Settings: Single-Click Method
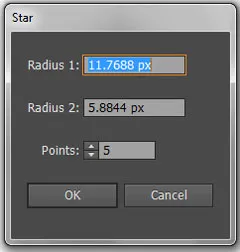
For exact specifications:
- Select the Star Tool
- Click once on the artboard
- Set:
- Number of Points
- Outer Radius (distance to outer points)
- Inner Radius (distance to inner valleys)
- Corner Type (Sharp or Round)
- Click OK
Creating Different Star Styles
Sharp Points Star:
- Standard settings with maximum radius difference
- Used in: Classic badges, military insignia
Fat Stars:
- Reduce inner radius to 30-40% of outer radius
- Used in: Decorative elements, children’s designs
Rounded Point Stars:
- Use “Round” corner type in settings
- Drag the corner widget to adjust roundness
- Used in: Modern, friendly designs
Almost-Polygons:
- Set inner radius very close to outer radius
- Creates star shapes that look almost like polygons
- Used in: Contemporary geometric design
Professional Star Applications
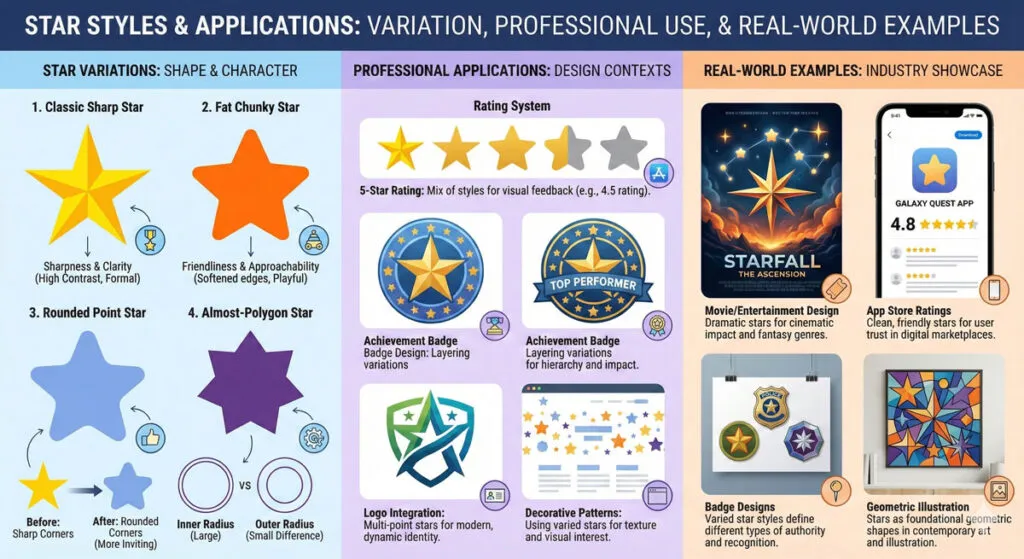
- Rating Icons: 5-star rating systems
- Badges: Achievement badges, certification marks
- Decorative Elements: Visual embellishments in designs
- Logo Design: Star-based logos and brand marks
- Infographics: Highlighting important information
Related Topics:
- How to use Mesh Tool in illustrator
- How to make a Semicircle in Illustrator
- How to design a Retro Flower Pattern
Flare Tool – Creating Light Effects
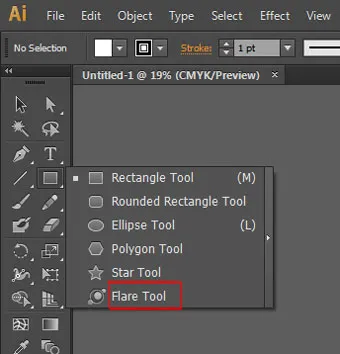
It is the last and most ignored option in the list of shape tool in the Adobe Illustrator. The flare tool has special properties and transparencies that make it interact with whatever is beneath it. It can also give a lens flare effect from a camera.
What Is The Flare Tool?
The Flare Tool creates realistic lens flare effects—the light artifacts that appear when bright light reflects through a camera lens. This specialized tool adds professional photographic effects to vector designs, particularly useful for creating light, glow and shine effects.
Find the Flare Tool in the tools menu or by right-clicking the Star Tool.
Creating Basic Flares
- Select the Flare Tool
- On your artboard, click where you want the center (brightest point) of the flare
- Drag outward to set the size and direction of the flare
- Release the mouse to finalize
The flare effect immediately appears with light rays and glow elements radiating from the center point.
Understanding Flare Components
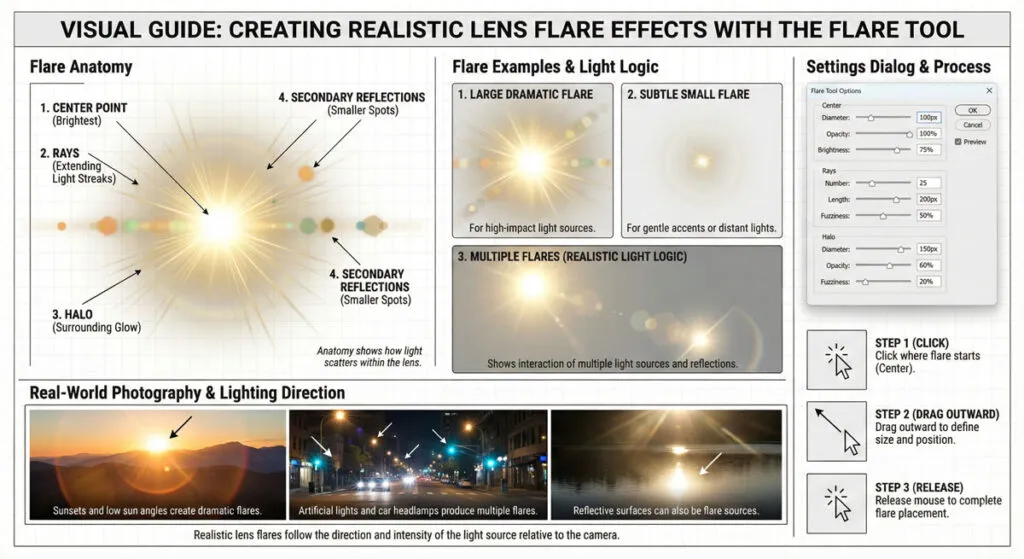
A complete flare consists of:
- Center Point: The brightest area where light concentrates
- Rays: Linear light streaks extending from the center
- Halo: Circular glow around the center
- Secondary Reflections: Smaller light spots creating the photographic effect
Each component can be adjusted for customization.
Customizing Flare Effects
After creating a flare, access the Flare Tool Options for customization:
- Double-click the Flare Tool in the toolbar
- Adjust:
- Center: Size and opacity of the central bright point
- Rays: Number and length of light rays
- Halo: Size and opacity of surrounding glow
- Opacity: Overall transparency of the entire effect
Positioning and Editing Flares
To reposition a flare:
- Select the flare (it appears as a placed object)
- Use the Selection Tool to move it
- You can move the center point specifically for adjusted positioning
To modify the flare after creation:
- With the flare selected, double-click it
- Use the Flare Tool to adjust size and direction
- Flares are editable and can be changed anytime
Realistic Flare Design Principles
Following Light Logic:
- Place flares where light would logically come from (typically upper left in design)
- Rays should point away from the light source naturally
- Multiple flares should share similar angles and direction
Subtle Effectiveness:
- Overuse of flares appears amateur and dated
- Use flares sparingly for maximum impact
- Combine with appropriate lighting in illustration or photography
Color Coordination:
- Flare colors should complement the overall color scheme
- White/light yellow = classic natural light
- Cool colors (blues, cyans) = cool light effects
- Warm colors (oranges, yellows) = warm light
Professional Flare Applications
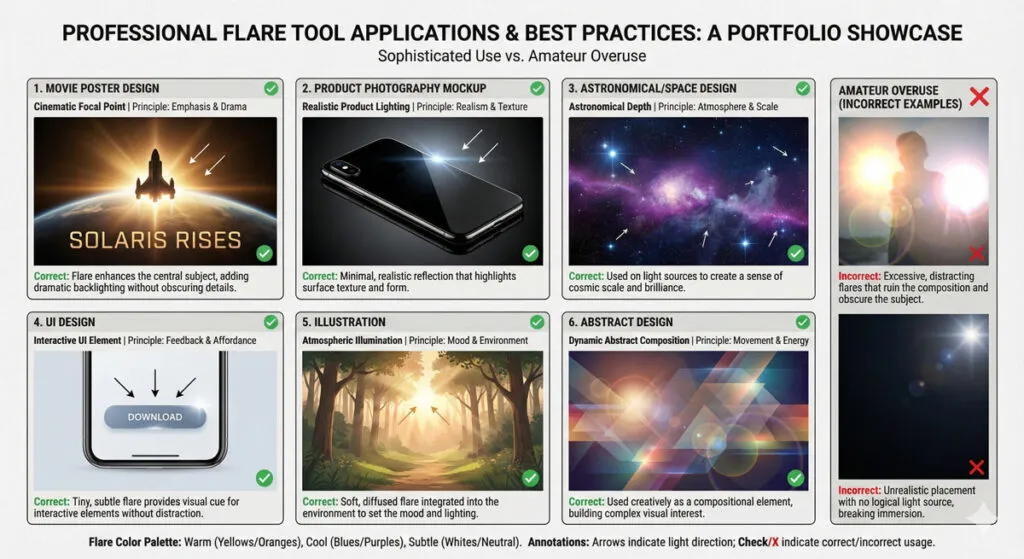
- Photography Realism: Adding light effects to vector-based photo illustrations
- Movie Posters: Creating dramatic light effects in entertainment design
- Product Design: Highlighting reflections on shiny surfaces
- Interface Design: Subtle light effects on buttons or interactive elements
- Astronomical Design: Creating star and celestial effects
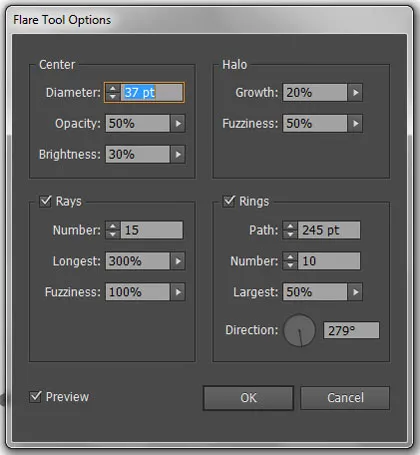
- Center: The First section is pretty self-explanatory. There you can change the diameter, opacity, and brightness.
- Rays: This section is like a checkbox with various options where you can turn it on and off. There you can adjust the number, length (Longest) and Fuzziness of the rays.
- Halo: The Halo refers to as the glare around the center. In this section, there are two options for growth and fuzziness.
- Rings: This is another checkbox option available in this dialogue box that you can turn on and off. Here you can set the number of rings, the size and the direction in which they fall.
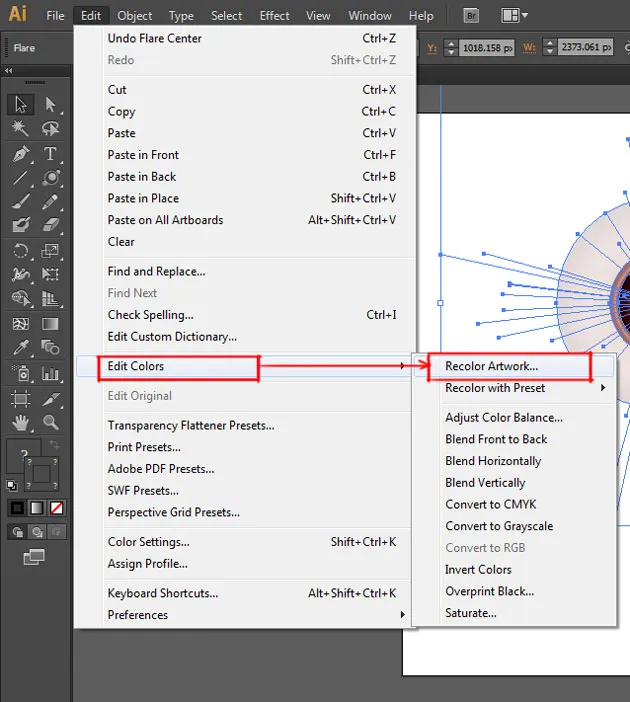
Since there are a lot of transparent components in a flare tool; it reacts to whatever that is underneath it. Although you can’t really change the color of the individual part, but you can edit the color using recolor artwork.
To do this select the flare, hide the edges by pressing Ctrl + H. Then go up to edit menu in menu bar and select ‘Edit Colors’ > Recolor Artwork or you can click on the above color wheel shown in the menu bar (See the picture for further reference).

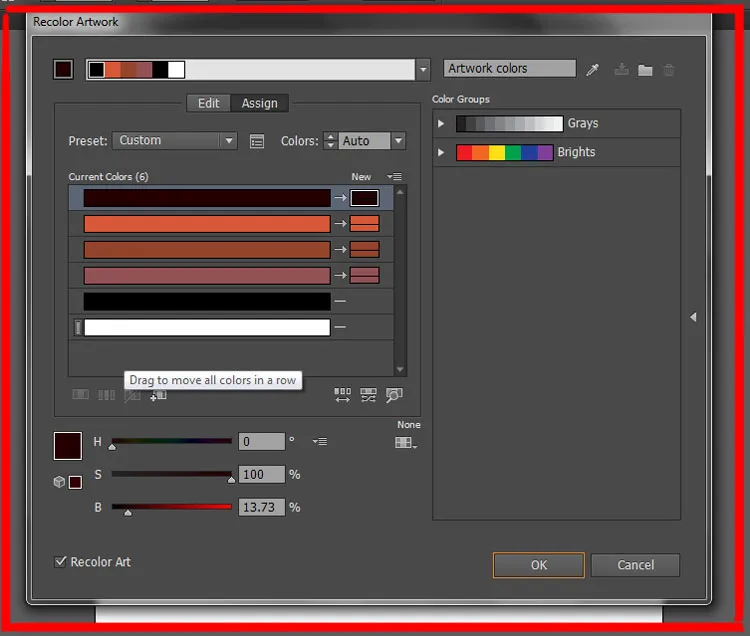
As you click on that option a dialogue box will open up and from there you can substitute the colors that are in the flare for the once that are in the color group.
Related Topics:
- How to set Brush Pressure in Illustrator
- How to Create A Pressure Sensitive Brush in Illustrator
- How to Create Metallic effect in Illustrator
Keyboard Shortcuts and Efficiency Tips
Complete Keyboard Shortcut Reference
| Tool | Windows/Mac | Result |
|---|---|---|
| Rectangle | M | Rectangle/Square Tool |
| Rounded Rectangle | U | Rounded Rectangle Tool |
| Ellipse | L | Circle/Ellipse Tool |
| Polygon | (Menu) | Multi-sided shape tool |
| Star | (Menu) | Pointed star tool |
| Flare | (Menu) | Lens flare effect |
| Shift + M | Hold Shift | Shape Builder variant |
Essential Modifier Keys
| Key Combination | Result |
|---|---|
| Shift + Drag | Constrain to perfect square/circle |
| Alt/Option + Drag | Draw from center point |
| Shift + Alt + Drag | Perfect square/circle from center |
| Ctrl/Cmd + Drag | Adjust polygon/star pointiness |
| Up Arrow | Add sides/points (while drawing) |
| Down Arrow | Remove sides/points (while drawing) |
| Left/Right Arrow | Toggle rounded corners on/off |
| Up/Down Arrow (RoundRect) | Adjust corner radius (while drawing) |
Workflow Efficiency Tips
- Pre-configure Tool Settings: Before creating multiple shapes, set your preferred default sides, radius, or points in Tool Options
- Use Single-Click Method for Precision: When creating multiple identical shapes, single-click each time to enter exact dimensions
- Keyboard Shortcut Mastery: Learn and use M, L, and U shortcuts religiously to avoid menu navigation
- Combine Tools for Complex Shapes: Create basic shapes then use the Shape Builder tool to combine them into complex designs
- Live Adjustment During Creation: Master real-time adjustments (arrow keys, Shift constraint) while dragging to minimize post-creation editing
Related Topics:
- How to Create Flower using Gradient Mesh in Illustrator
- How to Recolor Artwork in illustrator
- How to Create Silver Metallic Effect in Illustrator
Real-World Design Projects using Shape Tools
Project 1: Creating A Modern App Icon
Steps:
- Create a rounded rectangle using U (base frame)
- Create a circle using L with Shift held
- Add inner icons using combination of rectangles and circles
- Use Shape Builder tool to combine elements
- Apply gradients and shadows for depth
Tools Used: Rounded Rectangle, Ellipse, Rectangle, Shape Builder
Project 2: Designing An Infographic Header
Steps:
- Create a hexagon using Polygon Tool (6 sides)
- Duplicate and arrange hexagons in honeycomb pattern
- Add numbers/text within each hexagon
- Create connecting lines using Pen Tool
- Apply color themes and spacing
Tools Used: Polygon Tool, Duplication, Alignment
Project 3: Building a Geometric Logo
Steps:
- Create multiple polygons (4, 5, 6 sides)
- Arrange them to create optical illusion
- Overlap and use Shape Builder to create negative space
- Apply gradient fills for depth
- Fine-tune alignment and spacing
Tools Used: All shape tools, Shape Builder, Color
Project 4: Creating a Badge Design
Steps:
- Create outer circle using Ellipse Tool with Shift
- Create inner circle (smaller)
- Add star points using Star Tool
- Add text around the circle using Type on Path
- Apply metallic effects with gradients
Tools Used: Ellipse, Star, Type on Path
Related Topics:
Common Shape Tool Mistakes and Solutions
Mistake 1: Imperfect Circles And Squares
Problem: Shapes look irregular or proportionally wrong
Solution:
- Always use Shift while dragging to constrain proportions
- Or use single-click method with identical width/height values
- Never eyeball shapes that need to be perfect
Mistake 2: Ungrouped or Hard-to-Edit Shapes
Problem: Can’t adjust corners or edit shapes after creation
Solution:
- Remember shapes are fully editable vectors
- Use Direct Selection Tool (A) to edit individual points
- Double-click shapes to re-enter creation mode
- Use Object > Path > Convert to Outline if you need maximum flexibility
Mistake 3: Inconsistent Polygon/Star Styling
Problem: Multiple stars with different pointiness or side counts
Solution:
- Set tool options BEFORE creating multiple shapes
- Use Copy & Paste to duplicate shapes (maintains exact properties)
- Use Transform & Arrange options for consistency
Mistake 4: Accidentally Creating Wrong Shape
Problem: Rectangle Tool creates squares unexpectedly
Solution:
- Be intentional about Shift key usage
- Check Tool Options for default behavior
- Use single-click method when you need absolute control
Mistake 5: Flare Effects Looking Artificial
Problem: Flares don’t match the design style
Solution:
- Adjust opacity and color to match light source
- Follow natural light angles and direction
- Use sparingly for professional appearance
- Match flare style to design aesthetic
Related Topics:
Advanced Techniques for Professional Designers
Technique 1: Creating Custom Corner Radius with Rounded Rectangles
Instead of using all rounded corners, create visual interest with mixed rounding:
- Create a rounded rectangle
- Switch to Direct Selection (A)
- Click individual corners to adjust their radius
- Create asymmetrical but intentional designs
Technique 2: Stacking Shapes for Complexity
Layer multiple basic shapes to create intricate designs:
- Create multiple circles overlapping
- Use Shape Builder (Shift + M) to merge/subtract
- Create unique composite shapes impossible with single tools
Technique 3: Converting Shapes to Brush Strokes
Transform simple shapes into decorative strokes:
- Create basic shapes (circle, star, polygon)
- Object > Path > Outline Stroke
- Use these as pattern elements in custom brushes
Technique 4: Creating Responsive Icon Systems
Design icons using shapes for better scalability:
- Build icons with rectangles, circles, and lines
- All elements scale proportionally
- Icons maintain crisp appearance at any size
- Easier to create icon families with variations
Technique 5: Mixing Shapes with the Shaper Tool
Modern workflow combining multiple tools:
- Create basic shapes with traditional tools
- Use Shaper tool (Shift + N) to modify and combine
- Intelligently merge shapes into refined designs
- Balance precision of shape tools with flexibility of shaper
Related Topics:
Conclusion: Mastering Shape Tools for Creative Excellence
The six shape tools in Adobe Illustrator—Rectangle, Rounded Rectangle, Ellipse, Polygon, Star, and Flare—are the building blocks of vector design. While they appear simple, they contain depths of functionality that professional designers leverage daily.
Key Takeaways:
- Master keyboard shortcuts for efficiency (M, L, U)
- Use modifier keys strategically (Shift, Alt, Ctrl)
- Understand constraints and precision methods
- Combine tools creatively for complex designs
- Practice real-world projects to build confidence
- Learn professional applications to understand context
Whether you’re designing user interfaces, logos, infographics, or illustrations, these shape tools will be your constant companions. The time invested in mastering them will pay dividends throughout your design career, enabling you to work faster, more precisely, and with greater creative confidence.
Start with simple shapes today. Build complex compositions tomorrow. Master these tools, and you’ve unlocked one of the most essential foundations of professional vector design.
Related Topics:
About the Author
Lalit M. S. Adhikari is a Digital Nomad and Educator since 2009 in design education, graphic design and animation. He’s taught 500+ students and created 200+ educational articles on design topics. His teaching approach emphasizes clarity, practical application and helping learners.
Learn more about Lalit Adhikari.
Last Updated: December 2025
This guide is regularly updated with the latest information about Adobe tools and design best practices. Last Updated: Mar 2026
Related Topics:
- Graphic Design Fundamentals: Complete Guide for Beginners
- Color Profile
- Color Mode
- Bit Depth
- Principles of Design







Thanks for this informative content on this topic! Helpfull!
Nice info!
Shapes are the basic of designing and similarly these shape tools are basic of illustrator. Thanks for such detailed explanation.
Thumbs Up!
Informative & Helpful!
Thank you
Thank you
Thanks
naturally like your website, I will surely come back again.
Nice.
Helpful content! Thank you and keep creating!