When beginners start with Adobe Illustrator, they are immediately pointed toward the Pen Tool or the Rectangle Tool. While those are foundational, there exists a specialized group of tools nestled quietly in the toolbar that creates the geometric skeleton of professional design: The Line Tool Group.
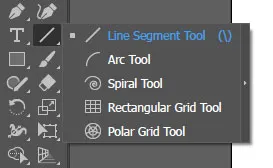
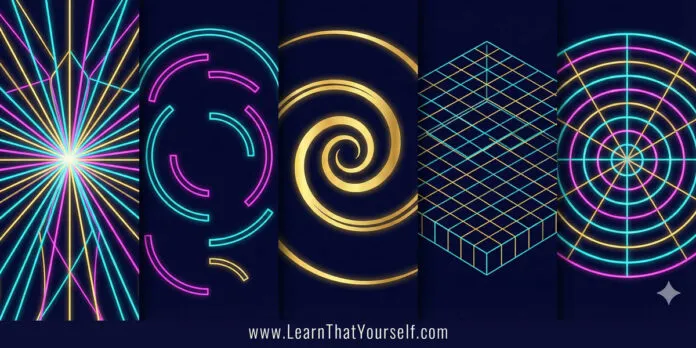
This group consists of five distinct tools:
- Line Segment Tool
- Arc Tool
- Spiral Tool
- Rectangular Grid Tool
- Polar Grid Tool
Why do these matter? Because modern design—especially logo design and data visualization—relies heavily on geometric precision. These tools allow you to generate complex geometric structures, Golden Ratio spirals and isometric grids in seconds, tasks that would take hours with the Pen Tool.
In this comprehensive guide, we aren’t just going to tell you what these tools do. We are going to deconstruct every single dialogue box setting, reveal the hidden keyboard shortcuts that work while you are drawing and build practical examples to prove their worth.
These are the basic set of tools to create design in illustrator. They are easy to use and come quite handy at times of small changes and proportion management.
My name is Lalit Adhikari and we are at LTY. Let’s begin!
Table of Contents
Introduction: Why These Tools Matter
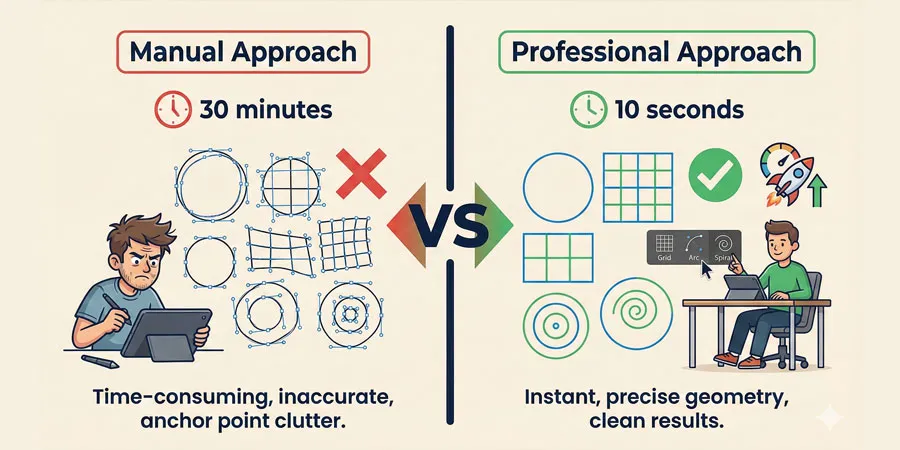
When designers start learning Adobe Illustrator, they typically focus on three tools: the Rectangle Tool, the Ellipse Tool and the Pen Tool. While those are absolutely essential, there exists an entire family of specialized tools that remains hidden in most beginner tutorials: The Line and Grid Tools.
These five tools—Line Segment Tool, Arc Tool, Spiral Tool, Rectangular Grid Tool and Polar Grid Tool—are the secret weapons of professional designers. They allow you to:
- Create perfect geometric shapes without manual precision
- Generate complex grids for UI layout and isometric designs
- Build logos with natural-looking spirals (like nature’s Golden Ratio)
- Design professional infographics with concentric circles and radial patterns
- Save hours of manual drawing work
The difference between an amateur and professional designer often comes down to knowing which tool to use for the job. An amateur might spend 30 minutes drawing circles with the Ellipse Tool and manually aligning them. A professional draws a Polar Grid in 10 seconds.
In this comprehensive guide, I’m not just going to tell you what these tools do. I’m going to deconstruct every setting, reveal hidden keyboard shortcuts that work while you’re drawing and walk through practical design projects that prove why these tools matter.
By the end of this tutorial, you’ll have the skills to:
- Draw precise geometric structures in seconds
- Understand every dialog box setting and what it controls
- Use live keyboard shortcuts to modify shapes while drawing
- Combine multiple tools to create professional logos and graphics
- Troubleshoot common issues that frustrate beginners
Related Topics:
- Master Adobe Illustrator Shape Tools: Complete Guide
- Master Illustrator Type Tool: Complete Guide
- Master Paintbrush and Blob Brush Tool in Illustrator: Complete Guide
The Line Segment Tool – Foundation of Precision Drawing
Before we learn more about Line Segment Tool, I would like clear few Mathematical concepts about a Line and a Line segment. It’ll help in our understanding of how to use Line Segment Tool.
- Line – A line, in Mathematics is like a ray with one start point and has no end point.
- Line Segment – A Line Segment. in Mathematics, stands for a Line with two end points.
What It Is (And What It Isn’t)
The Line Segment Tool (\ on your keyboard) draws open paths—straight lines with two endpoints. This is fundamentally different from the Rectangle Tool, which creates closed paths (shapes with an inside and outside).
Key Distinction:
- Closed Path (Rectangle Tool): A shape that encloses area. You can fill it with color. It has thickness.
- Open Path (Line Segment Tool): A line connecting two points. It has only stroke (outline), no fill, unless you explicitly add one.
This distinction is critical. Many beginners are frustrated because they draw a line and it “disappears.” In reality, the line is there—it just has no visible stroke weight.
The Foundation of Open Paths
The Line Segment Tool (\) is the simplest tool in the bunch, yet it is often misunderstood. Unlike the Rectangle tool which creates a closed path (a shape with an inside and outside), the Line Segment tool creates an open path (a stroke with two endpoints).
How to Access the Tool
Method 1: Keyboard Shortcut
Press the backslash key () on your keyboard. This is the fastest way.
Method 2: From the Toolbar
Look for the toolbox on the left side of your screen. The Line Segment Tool is grouped with the Arc, Spiral and Grid tools. Click and hold on any of these tools to reveal the others.
Set the Stroke

Before you use the line segment tool, first set the stroke.
So, in the Option Bar (in CS6) or Properties Panel (in CC), change Line Segment Tool settings by various options like stoke color, stroke width, width profile, brush definition, opacity and style. Currently, we only need to put Stroke Weight to 1 pt.
Two Ways to Draw Lines
Method 1: Drag and Draw (Intuitive)
- Select the Line Segment Tool (\).
- Click on the artboard and drag to create a line.
- Release the mouse to finish.
To use the line segment tool just click and drag. As we know, a Line Segment has two end points which means there will be one start point, the point from where we’ll start and end point where we’ll end our Line Segment. So, we are going to draw a line from one point to another. With this tool, you can draw a line at any angle and in any direction you want.
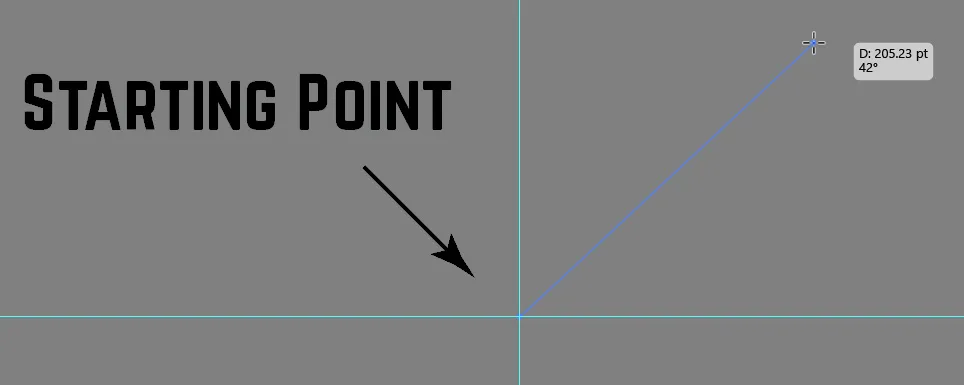
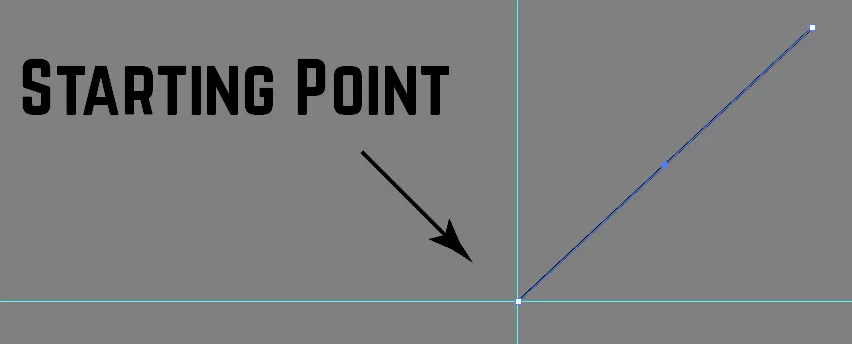
If you hold Shift key while drawing a line segment, it will create a straight Line Segment and it will also lock the line’s rotational movement to a 45-degree rotation mode.

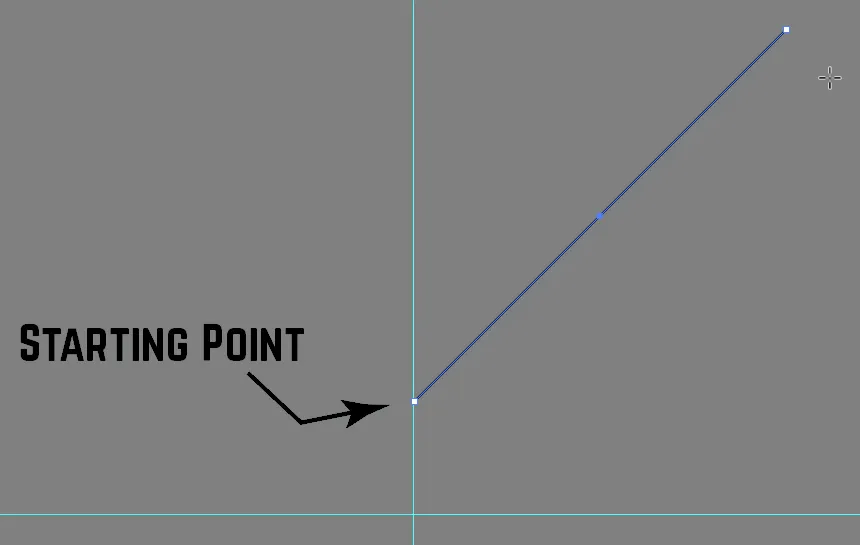
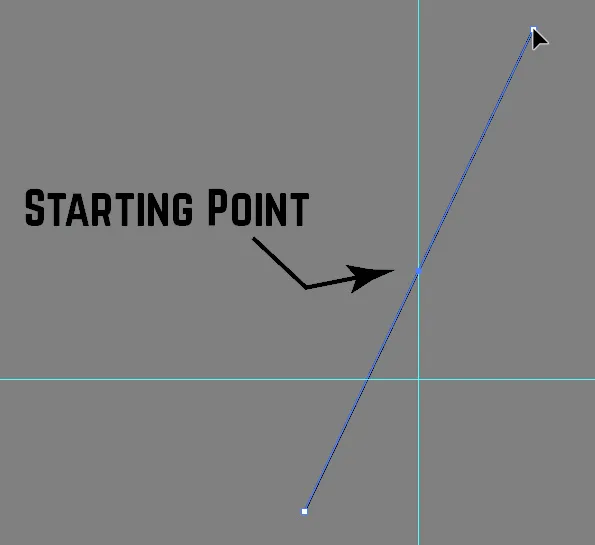
If you hold the Alt key, it will scale in and out of the center.
Method 2: Precision Click (Exact Measurements)
- Select the Line Segment Tool.
- Click once on the artboard (don’t drag).
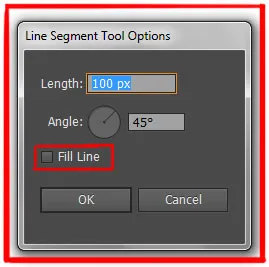
- A dialog box appears with input fields for exact length and angle.
- Enter your desired measurements and click OK.
The Precision Dialog Box Explained
When you click once (instead of dragging), you get this dialog:
Length Field:
- Enter the exact length of your line in your document’s units (pixels, millimeters, inches, etc.)
- Example: If you want a line exactly 200px long, type 200.
Angle Field:
- The line’s orientation in degrees.
- 0° = horizontal line pointing right
- 90° = vertical line pointing up
- 45° = diagonal line
- -45° = diagonal line in opposite direction
Fill Line (Checkbox):
- Usually unchecked. If checked, applies your current fill color to the line (rarely used).
- Leave this unchecked in 99% of cases.
Hidden Keyboard Shortcuts (The Game-Changer)
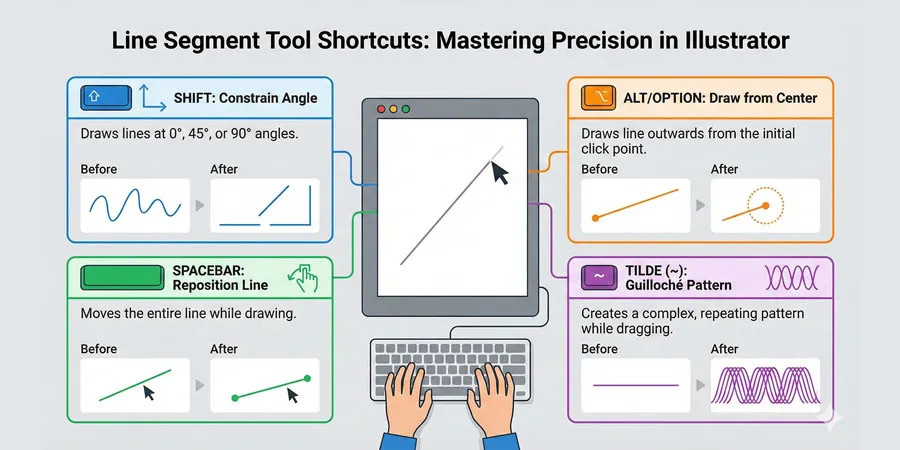
Here’s where most tutorials fail: they don’t explain the shortcuts that work while you’re drawing. These shortcuts transform the Line Tool from basic to professional.
While dragging your line (before releasing the mouse)
| Keyboard Key | Effect | Use Case |
|---|---|---|
| Shift | Constrains line to 45° or 90° angles | Perfect vertical/horizontal lines |
| Alt (Win) / Option (Mac) | Draws from the center point outward | Symmetrical construction |
| Up/Down Arrows | (Does nothing for Line Segment—listed for completeness) | N/A |
| Spacebar | Allows you to reposition the line while drawing | Moving the starting point |
| ~ (Tilde Key) | Creates multiple copies following your mouse path | Guilloché patterns & decorative lines |
Advanced Technique: The Tilde Wave
- Select the Line Segment Tool.
- Click and drag to start your line.
- While the mouse button is still held down, press and hold the Tilde (~) key.
- Move your mouse across the artboard.
- Release the mouse button.
The result: Illustrator automatically copies your line multiple times along your path, creating an elegant wave or decorative pattern. This is incredibly useful for security backgrounds, certificate borders, or artistic designs.
Creating a Perfect Sunburst Effect
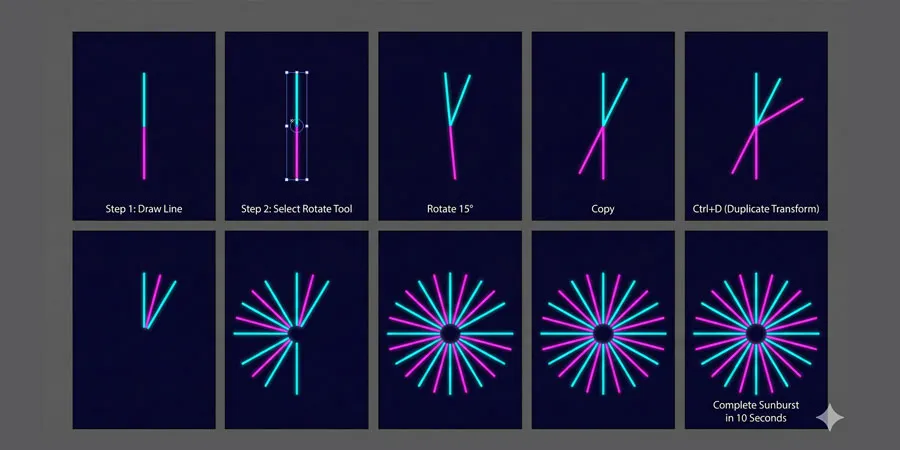
Let’s build a professional sunburst graphic using the Line Segment Tool and the Rotate Tool. This is a common design element in logos and infographics.
Project: Vintage Sun Background
Step 1: Draw the Base Line
- Select the Line Segment Tool (\).
- Set your stroke color to black (press X if you’re not sure, then adjust in the Color panel).
- Set stroke weight to 2pt (Control Bar at top or Stroke panel on right).
- Click once on the artboard at your preferred location.
- In the dialog, enter:
- Length: 300 (300 pixels)
- Angle: 90 (vertical line)
- Click OK. You now have one vertical line.
Step 2: Duplicate and Rotate
- Select the line with the Selection Tool (V).
- Select the Rotate Tool (R).
- Hold Alt/Option and click at the very bottom of the line. This sets your rotation axis (the point around which the line rotates).
- A dialog box appears. Enter 15 in the Angle field. Click Copy (not OK).
- A rotated copy is created 15 degrees clockwise.
Step 3: Use Transform Again (The Magic Shortcut)
- Press Ctrl + D (Windows) / Cmd + D (Mac). This repeats the last transform.
- Press it again. And again. And again.
- Each time, another line is created, rotated 15 degrees from the previous.
- After 24 presses, you’ll have a complete 360° sunburst (360 ÷ 15 = 24 rays).
Result: A perfect, professionally-aligned sunburst without manually positioning each line.
Pro Tip: Instead of pressing 24 times, you can:
- After the first copy, select both the original and the copy.
- Press Ctrl + D multiple times. This time, both objects will duplicate and rotate together, doubling your speed.
Related Topics:
- How to Create Silver Metallic Effect in Illustrator
- How to Recolor Artwork in illustrator
- How to Create Flower using Gradient Mesh in Illustrator
The Arc Tool – Mastering Organic Curves
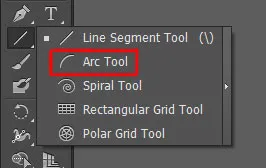
Mathematically, an arc is a quarter of an ellipse or one-fourth of an ellipse.
Arc Tool is the second option in the fly-out menu of the Line Segment Tool in Adobe Illustrator and the way it works is pretty straight forward.
What It Is
The Arc Tool draws curved lines without the complexity of the Pen Tool’s Bezier handles. It’s perfect for drawing eyebrows, leaves, swoop shapes, and architectural arches.
Key Advantage: No manual curve adjustment. Illustrator handles the mathematics.
How to Access It
Press \ and hold to reveal the tool group, then select the Arc Tool. Or click and hold the Line Segment Tool icon in the toolbar.
The #1 Beginner Problem: “It’s Curving the Wrong Way”
This is the most common frustration with the Arc Tool. You drag out an arc expecting it to curve upward, but it curves downward instead.
The Solution: The F Key
While you’re dragging your arc (before releasing the mouse), press the F key. This instantly flips the arc direction.
You can keep pressing F to toggle back and forth until you get the direction you want, then release the mouse.
The Dialog Box Explained (Precision Method)
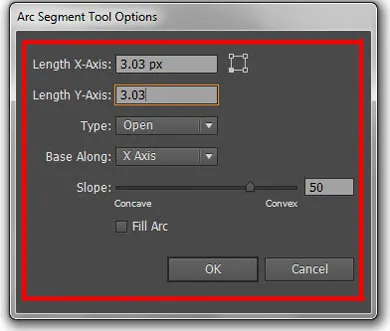
Click once on the artboard to open the Arc Tool Options dialog:
Length X-Axis (Width):
- How wide your arc will be (horizontal measurement).
Length Y-Axis (Height):
- How tall your arc will be (vertical measurement).
Type Dropdown (Critical):
- Open: Creates a curved line (like a smile).
- Closed: Creates a wedge shape (like a pie slice).
Base Along Dropdown:
- X-axis: The arc is measured from left to right.
- Y-axis: The arc is measured from top to bottom.
Slope Slider (0-100, or negative values):
- 0 = completely straight line.
- 50 = standard convex curve (like a U-shape).
- -50 = concave curve (like an upside-down U).
- Values can go beyond ±100 for extreme curves.
Complete Keyboard Shortcuts for Arc Tool
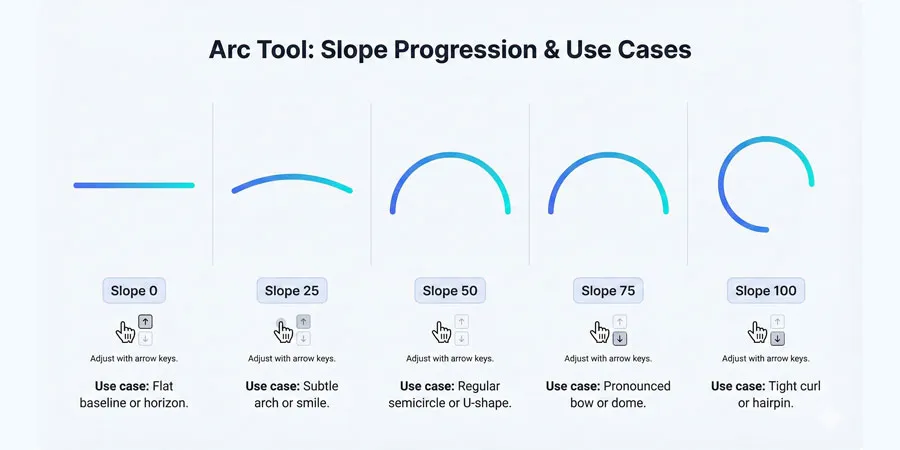
| Keyboard Key | Effect | Timing |
|---|---|---|
| F | Flips the arc (concave ↔ convex) | While dragging |
| C | Toggles between Open (line) and Closed (wedge shape) | While dragging |
| Up Arrow | Increases the curve’s bend intensity | While dragging |
| Down Arrow | Decreases the curve’s bend intensity | While dragging |
| X | Swaps X and Y dimensions | While dragging |
| Alt/Option | Draws from center point outward | While dragging |
Creating a Minimalist Leaf Logo
Let’s design a modern, single-line leaf using only the Arc Tool.
Project: Abstract Leaf Icon
Step 1: Create the First Arc
- Select the Arc Tool.
- Drag on the artboard to create an arc bowing upward (like a U-shape).
- If it curves downward, press F while dragging to flip it.
- Release the mouse. Set stroke to 3pt, dark green color.
Step 2: Create the Mirror Image
- Select the arc with the Selection Tool (V).
- Go to Object > Transform > Reflect from the menu.
- Choose Vertical Axis and click Copy.
- Now you have two arcs that mirror each other horizontally.
Step 3: Align Them Perfectly
- Move the new arc so its endpoints touch the original arc’s endpoints.
- Use View > Guides > Show Guides (or press Ctrl+; / Cmd+;) to enable snapping.
- When the points touch, they’ll snap into alignment.
Step 4: Join the Arcs
- Select both arcs (Ctrl/Cmd + A or click-drag to select both).
- Press Ctrl + J (Windows) / Cmd + J (Mac) to join them into a single path.
Step 5: Complete the Leaf
- Go to Object > Path > Offset Path.
- Enter a value like 20 to create an inner line parallel to the outer edge.
- Select both paths and use the Shape Builder Tool to merge them.
- Fill with a gradient from dark to light green.
Result: A professional-looking minimalist leaf logo.
Related Topics:
- How to Create Metallic effect in Illustrator
- How to Create A Pressure Sensitive Brush in Illustrator
- How to set Brush Pressure in Illustrator
The Spiral Tool – Creating Organic Geometry
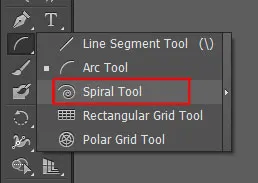
The spiral tool has some similarities to the arc tool. It does come out in an arc but it wraps around itself essentially. And Like the arc tool, you can also flip the spiral but pressing ‘R’ on your keyboard.
What It Is
The Spiral Tool creates an Archimedean spiral—a geometric shape that naturally occurs in nature (seashells, galaxies, hurricanes). It’s used extensively in artistic design and data visualization.
How to Access It
Press (\) to reveal the Line Tool group and select Spiral Tool. Keyboard shortcut is available but less memorable than the others.
How to use Spiral Tool
The spiral tool in Adobe Illustrator create spiral based on three measurements:
- The Radius
- Decay
- Number of Segments
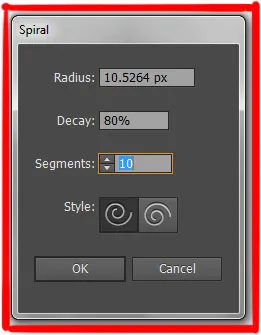
Understanding Decay (The Most Confusing Setting)
Decay is the percentage by which each successive loop of the spiral decreases relative to the previous loop.
Visual Breakdown:
- High Decay (80-95%): Loose spiral. The lines are very close together, like a tightly coiled rope.
- Low Decay (5-30%): Tight spiral. Each loop shrinks rapidly toward the centre, like a swirl.
- Golden Ratio Decay (approximately 81.8%): The spiral closely matches the Golden Spiral found in nature.
Example:
If you set Decay to 80%:
- The first loop is 100% of the radius.
- The second loop is 80% of the first.
- The third loop is 64% of the first (80% of 80%).
- And so on…
Live Keyboard Shortcuts for Spiral Tool
| Keyboard Key | Effect | Timing |
|---|---|---|
| Up Arrow | Adds segments (expands spiral outward) | While dragging |
| Down Arrow | Removes segments (shrinks spiral) | While dragging |
| Ctrl/Cmd + Drag | Adjusts Decay live while dragging | While dragging |
| Shift | Constrains rotation to 45° increments | While dragging |
| Alt/Option | Draws from center point outward | While dragging |
If you hold down the Up arrow while drawing the spiral in your canvas, it will increase the line segments of the line segments which will create the more spiral effect.
If you hold the Down arrow while drawing the spiral it will reduce the line segments.
Another point to keep in mind is that, if you hold the Ctrl Key on your keyboard then you can stretch out your spiral like pulling it out from itself or if you drag inwards you will get more like a concentric circle effect.
The spiral tool is basically used for making floral intricate designs.
The Most Useful Trick: Live Decay Adjustment
While dragging to create a spiral:
- Hold Ctrl (Windows) / Cmd (Mac).
- Move your mouse left to decrease Decay (tighter spiral).
- Move your mouse right to increase Decay (looser spiral).
This is far more intuitive than typing numbers into a dialog box.
The Dialog Box Settings (Precision Method)
Click once on the artboard:
Radius:
- The distance from the center to the outermost point of the spiral.
Decay:
- (As explained above) The percentage each loop shrinks.
Segments:
- The number of quarter-turns in the spiral.
- 4 segments = 1 complete rotation.
- 8 segments = 2 complete rotations.
- 12 segments = 3 complete rotations.
Style:
- Clockwise: Spirals rotate to the right.
- Counter-Clockwise: Spirals rotate to the left.
Creating an Abstract Shell Logo
Let’s design a modern sea-shell icon using the Spiral Tool and variable-width strokes.
Project: Geometric Shell Icon
Step 1: Create the Base Spiral
- Select the Spiral Tool.
- Click once on your artboard.
- Set Decay to 85% (natural-looking spiral).
- Set Segments to 8 (2 full rotations).
- Set Style to Clockwise.
- Click OK.
Step 2: Style the Spiral
- Set Stroke to 3pt, black and Fill to None.
- Your spiral is now visible with a uniform stroke.
Step 3: Apply Variable Width (The Calligraphic Effect)
- Select the spiral.
- Press Shift + W to activate the Width Tool (or go to Tools > Modify Paths > Width Tool).
- Hover over the outermost point of the spiral (the line itself, not the endpoints).
- Click and drag outward to make the line thicker at the outer edge.
- Hover over the innermost point and drag inward to make it thinner.
Result: The spiral now has a calligraphic, hand-drawn appearance—thick on the outside, thin on the inside.
Step 4: Convert to Shape (Optional)
- To export this as a solid shape (not just strokes), select it and go to Object > Expand Appearance.
- This converts the stroke with variable width into a solid shape.
Step 5: Colour and Finish
- Fill with a gradient from light teal (outside) to dark teal (inside).
- Add a subtle shadow using Effect > Stylize > Drop Shadow.
Result: A professional shell logo that looks hand-crafted but was created in seconds using geometry.
Related Topics:
- How to design a Retro Flower Pattern
- How to make a Semicircle in Illustrator
- How to use Mesh Tool in illustrator
Rectangular Grid Tool – Modular Design Systems
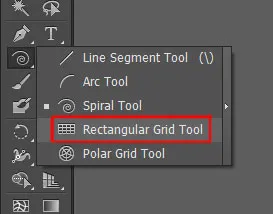
Rectangular Grid Tool is used for ‘Gridding’ purpose. To get the idea or proportions of a design. Although some designers also use it to create ‘Tables’ or ‘Grid for division of Content’.
What It Is
The Rectangular Grid Tool generates a rectangular lattice of horizontal and vertical lines. It’s essential for:
- UI/UX design layouts
- Isometric perspective designs
- Calendar and schedule graphics
- Graph backgrounds
- Architectural floor plans
Critical Concept: It’s a Group of Lines, Not a Table
When you draw a Rectangular Grid, Illustrator creates:
- One rectangle (the outer border)
- Multiple horizontal lines
- Multiple vertical lines
- All grouped together
You can ungroup them (Ctrl + Shift + G / Cmd + Shift + G) and edit individual lines. This flexibility is what makes the tool so powerful.
How to Access It
Press \ to open the Line Tool group and select the Rectangular Grid Tool. It’s usually the fourth tool in the group.
Live Keyboard Shortcuts (Most Important)
These shortcuts work WHILE YOU’RE DRAGGING, before you release the mouse:
| Keyboard Key | Effect | Visual Result |
|---|---|---|
| Up Arrow | Adds horizontal lines (more rows) | Grid divides into more horizontal sections |
| Down Arrow | Removes horizontal lines (fewer rows) | Grid consolidates horizontally |
| Right Arrow | Adds vertical lines (more columns) | Grid divides into more vertical sections |
| Left Arrow | Removes vertical lines (fewer columns) | Grid consolidates vertically |
| F Key | Skews horizontal lines (bunch toward top/bottom) | Creates perspective effect vertically |
| V Key | Skews vertical lines (bunch toward left/right) | Creates perspective effect horizontally |
| X Key | Mirrors the skew | Reverses the direction of perspective |
The Skew Keys (F and V): These are absolute game-changers. By pressing F or V while dragging, you can create grids that appear to recede into perspective, which is the foundation of isometric design.
The Dialog Box Settings
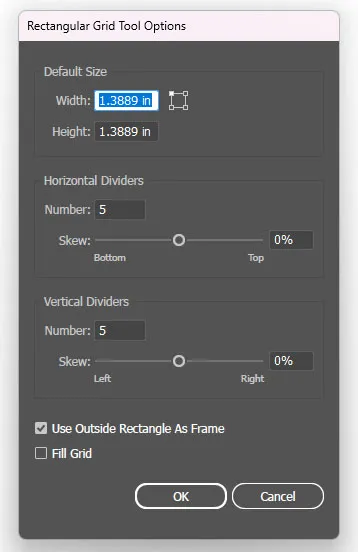
Click once instead of dragging:
Default Size (Width & Height):
- The overall dimensions of your grid.
Horizontal Dividers:
- Number: How many horizontal lines run across.
- Skew: A percentage (0-100) that pushes the lines toward the top or bottom.
Vertical Dividers:
- Number: How many vertical lines run down.
- Skew: A percentage (0-100) that pushes the lines toward the left or right.
Use Outside Rectangle as Frame (Checkbox):
- If checked, the outer rectangle is a separate object.
- If unchecked, it’s part of the group.
How to use Rectangular Grid Tool
You can make any grid or table with this tool. Just like other tools in the line segment tool’s list, this tool also works by clicking and dragging the cursor on your canvas.
And as you do so, you will get a grid, but if you hold shift key while drawing the grid then you will have a perfectly proportionate square grid.
To increase or decrease the number of squares or rectangle inside the grid you can hit the up or down arrow respectively.
Key things to remember here:
- The up and down arrow will change the number of horizontal lines
- The left and right arrow will change the number of vertical lines.
You can also change the number of divisions and other settings from the ‘Rectangle Grid Tool Option’ which you can get by clicking on the canvas while selecting the tool.
Creating a Retro 80s Synthwave Grid
This iconic design style features vanishing-point grids reminiscent of “Tron.” Let’s create one.
Project: Synthwave Grid Background
Step 1: Draw the Base Grid
- Select the Rectangular Grid Tool.
- Drag across your artboard to create a wide grid.
- While dragging (before releasing the mouse):
- Press Up Arrow 5-8 times to add many horizontal lines.
- Press Right Arrow 10-12 times to add many vertical lines.
- Release the mouse. You now have a fine lattice.
Step 2: Apply Perspective
- With the grid selected, use the Free Transform Tool (E) or go to Object > Transform > Perspective.
- Drag the bottom-right corner outward and upward to create a “floor” receding into the distance.
- The top of the grid should be narrower than the bottom.
Result: A vanishing-point grid that appears to stretch into the distance.
Step 3: Style with Neon Colours
- Select the grid.
- Set Stroke to a neon pink or neon purple (hex: #FF006E or #B312F9).
- Increase Stroke Weight to 2-3pt.
- Set Fill to None.
Step 4: Add Background
- Draw a rectangle behind the grid (same size as artboard).
- Fill with dark navy blue or black (#001a33 or #000000).
- Send it to the back (Ctrl + [ / Cmd + [).
Step 5: Optional: Add Sun
- Using the Ellipse Tool, draw a circle above the grid.
- Fill with a bright gradient (neon yellow to orange).
- Add a Glow Effect (Effect > Stylize > Outer Glow).
Result: A professional synthwave landscape that you’d find on album covers or retro-futuristic designs.
Related Topics:
- How to use Gradient Tool in Illustrator
- How to Create a Logo in Adobe Illustrator: Complete Step-by-Step Tutorial for Beginners
- Adobe Illustrator vs Photoshop for Beginners: Which Should You Learn First?
Polar Grid Tool – Radial Perfection
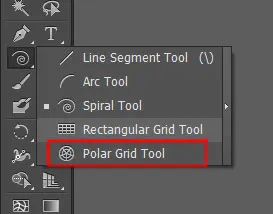
This is the last option in the fly-out menu of the line segment tool. Just like the rectangular grid tool, through polar grid tool, you can create concentric circular grids.
What It Is
The Polar Grid Tool creates concentric circles (rings) with radial lines (spokes) dividing them, like a dartboard or radar chart. It’s the most specialized tool in this group, but invaluable for specific design tasks.
How to Access It
Press \ to open the Line Tool group and select the Polar Grid Tool (usually the last in the group).
Live Keyboard Shortcuts
| Keyboard Key | Effect | Visual Result |
|---|---|---|
| Up Arrow | Adds concentric circles (more rings) | Grid has more rings radiating outward |
| Down Arrow | Removes concentric circles (fewer rings) | Grid has fewer rings |
| Right Arrow | Adds radial lines (more spokes) | Grid has more divisions around the center |
| Left Arrow | Removes radial lines (fewer spokes) | Grid has fewer divisions around the center |
| Shift | Constrains to perfect circle | Creates non-distorted radial grid |
The Dialog Box Settings
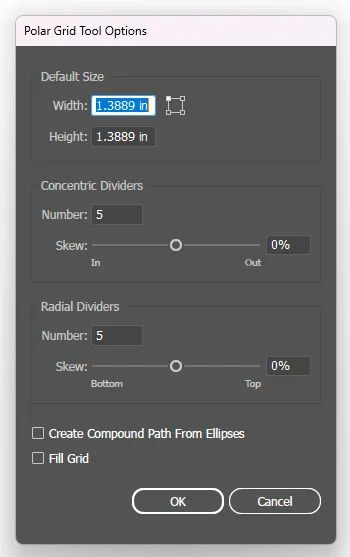
Click once instead of dragging:
Radius:
- The distance from centre to the outermost circle.
Concentric Dividers:
- The number of rings (circles) inside the outer perimeter.
Radial Dividers:
- The number of “spokes” (lines radiating from centre) dividing the rings.
Create Compound Path (Checkbox):
- If checked: Every second ring acts as a transparent “hole” (like a donut). Useful for advanced effects.
- If unchecked: All rings are just lines overlapping.
How to use Polar Grid Tool
The tool’s settings are similar to the ‘rectangular grid tool’ where you can set the stroke width, number of the concentric circle and the dividers.
A key thing to remember here:
- The up and down arrow will change the number of concentric circles.
- The left and right arrow will change the number of radial dividers.
Creating a Professional Target/Bullseye Logo
Let’s use the Polar Grid and Live Paint to create a professional target graphic.
Project: Geometric Target Icon
Step 1: Create the Polar Grid
- Select the Polar Grid Tool.
- Click once on your artboard.
- Set Radius to 200px.
- Set Concentric Dividers to 4 (5 rings total: the 4 dividers plus the outer circle).
- Set Radial Dividers to 8 (8 spokes, creating a pizza-like pattern).
- Click OK.
Step 2: Style the Grid
- Set Stroke to 2pt, black and Fill to None.
Step 3: Color Using Live Paint
- Press K to activate the Live Paint Bucket Tool.
- Select a color (e.g., Red) from your Swatches panel.
- Hover over the grid. Individual cells (sections between lines) will highlight.
- Click to fill a cell with the selected color.
- Change color and click adjacent cells in a checkerboard pattern.
- Alternate colors (Red, White, Red, White, etc.) around the grid.
Result: A professional-looking target graphic without drawing a single circle or spoke manually.
Step 4: Add a Centre Dot (Optional)
- Use the Ellipse Tool to draw a small circle in the very center.
- Make it a contrasting color (e.g., white or yellow).
- Add a drop shadow for dimension.
Tip: For a more dynamic look, use the Polar Grid with different numbers of rings and spokes.
For example:
- 6 rings + 12 spokes = Mandala-like appearance
- 3 rings + 6 spokes = Simple badge
- 10 rings + 20 spokes = Complex infographic base
Related Topics:
- Shape Builder, Live Paint Bucket tool in illustrator
- Width Tool in illustrator
- Selection Tools in illustrator
Advanced Techniques – Combining Tools for Professional Results
Using Multiple Tools in a Single Project
The real power of these tools emerges when you combine them. Let’s build a professional logo that uses Line Segments, Arcs and Grids together.
Creating a “Global Connections” Badge Logo
Project Brief: Design a circular badge suggesting global networks and connectivity.
Step 1: Create the Base Grid
- Use the Polar Grid Tool.
- Create a grid with 4 concentric circles and 8 radial dividers.
- Set Stroke to 1.5pt medium blue and Fill to None.
- This represents the globe/world.
Step 2: Add Connecting Lines
- Use the Line Segment Tool.
- Draw several lines connecting points on the Polar Grid (like connection lines between cities).
- Make these lines a different color (e.g., neon cyan or accent color).
- Set stroke to 1pt for a subtle effect.
Step 3: Create Accent Arcs
- Use the Arc Tool.
- Draw curved lines that span multiple rings of the Polar Grid, creating organic pathways.
- These arcs suggest movement or flow.
Step 4: Merge and Finalize
- Select all elements.
- Use the Shape Builder Tool (Shift + M) to merge or separate elements as desired.
- Group the final result (Ctrl + G / Cmd + G).
Step 5: Add Border and Text
- Draw a circle around the entire design using the Ellipse Tool.
- Add text around the circle using the Type on Path Tool.
- Example text: “GLOBAL NETWORK” or “WORLD CONNECTED”
Result: A professional, multi-element logo that looks complex but was built using simple geometric tools.
The Shape Builder Tool (The Game-Changer for Grid-Based Design)
When you combine multiple grids, lines, and arcs, you often end up with overlapping elements. The Shape Builder Tool allows you to:
- Merge adjacent cells into larger shapes
- Delete unwanted segments
- Create complex composite shapes
How to Use It:
- Select multiple overlapping objects.
- Press Shift + M to activate the Shape Builder Tool.
- Click to merge: Click on a shape to select it. Click on adjacent shapes while holding down the Shift key to add them to your selection. This merges them into a single shape.
- Alt + Click to delete: Hold Alt (Windows) / Option (Mac) and click on segments you want to remove.
This technique is invaluable for creating complex logos from simple geometric grids.
Related Topics:
- Perspective Tool in Illustrator
- How to use the Pen Tool in illustrator
- How to use Eraser tool in illustrator
Real-World Professional Projects
Project 1: Isometric City Grid for Infographic
Objective: Create an isometric building grid that suggests a modern cityscape.
Steps:
- Draw a Rectangular Grid with many dividers.
- While dragging, use F and V keys to skew both horizontally and vertically, creating an isometric perspective.
- Apply 3D Rotate effect (Effect > 3D & Materials > 3D Classic > Rotate).
- Set to isometric view from the top.
- Colour alternating cells with different shades of gray and blue to suggest buildings.
Project 2: Art Deco Pattern using Spirals
Objective: Create a repeating pattern inspired by 1920s Art Deco design.
Steps:
- Draw a Spiral with high Decay (loose spiral) and variable width.
- Duplicate and rotate 8 times using Ctrl+D.
- Add Line Segment rays radiating from the center.
- Use the Rectangle Tool to frame the design.
- Apply a gold stroke and black fill to create a vintage look.
Project 3: Data Visualization Wheel
Objective: Create a professional circular chart using the Polar Grid.
Steps:
- Create a Polar Grid with the desired number of rings and spokes.
- Use Live Paint to color segments based on data categories.
- Add text labels for each segment using the Type Tool.
- Create a legend showing what each color represents.
- Add icons or illustrations in the centre for visual interest.
Related Topics:
- What Is Adobe Illustrator? Beginner’s Guide & Photoshop Comparison
- Royalty Free Images
- Royalty Free Raw Images
Troubleshooting Common Problems
Problem 1: “My Lines Disappeared After Drawing”
Cause: The line has no visible stroke.
Solution:
- Select the line with the Selection Tool (V).
- Look at the Control Bar at the top or the Stroke panel on the right.
- Ensure Stroke Weight is at least 1pt (not 0).
- Click on the stroke color and choose a visible color (not white on white background, for example).
Problem 2: “I Drew a Grid but Can’t Color Individual Cells”
Cause: You’re using the regular Fill tool. Grids require the Live Paint Bucket.
Solution:
- Select your grid.
- Press K to activate the Live Paint Bucket Tool.
- Choose a color from your Swatches panel.
- Hover over individual cells. They will highlight.
- Click to fill the highlighted cell.
Problem 3: “The Arc is Curving the Wrong Way”
Cause: Standard Arc Tool behavior. Easy fix.
Solution:
While dragging (before releasing the mouse), press F to flip the arc direction.
Problem 4: “The Spiral is Too Tight (or Too Loose)”
Cause: The Decay value is too low (tight) or too high (loose).
Solution:
While dragging the spiral (before releasing the mouse), hold Ctrl/Cmd and move your mouse:
- Left: Decreases Decay (tighter spiral)
- Right: Increases Decay (looser spiral)
Problem 5: “The Grid Isn’t Symmetrical”
Cause: You need to constrain it during drawing.
Solution:
While dragging the Rectangular Grid, hold Shift to create a symmetrical (non-stretched) grid.
Problem 6: “I Want to Edit Individual Lines in My Grid”
Cause: The grid is grouped. You need to ungroup it.
Solution:
- Select the grid.
- Press Ctrl + Shift + G (Windows) / Cmd + Shift + G (Mac) to ungroup.
- Now you can select and edit individual lines.
Related Topics:
Advanced Keyboard Shortcuts – Quick Reference
Universal Shortcuts (Work with All Tools)
| Action | Windows | Mac |
|---|---|---|
| Select All | Ctrl + A | Cmd + A |
| Deselect All | Ctrl + Shift + A | Cmd + Shift + A |
| Duplicate | Ctrl + D | Cmd + D |
| Paste in Front | Ctrl + F | Cmd + F |
| Paste in Back | Ctrl + B | Cmd + B |
| Group | Ctrl + G | Cmd + G |
| Ungroup | Ctrl + Shift + G | Cmd + Shift + G |
| Make Guide | Ctrl + 5 | Cmd + 5 |
| Release Guide | Ctrl + Alt + 5 | Cmd + Option + 5 |
| Reflect | Ctrl + M | Cmd + M |
| Rotate 90° CW | (Rotate Tool, then Ctrl/Cmd + D) | (Rotate Tool, then Cmd + D) |
Tool-Specific Shortcuts (Line/Grid Tools)
| Tool | Shortcut |
|---|---|
| Line Segment Tool | \ (backslash) |
| Arc Tool | (Hold \ to reveal menu) |
| Spiral Tool | (Hold \ to reveal menu) |
| Rectangular Grid | (Hold \ to reveal menu) |
| Polar Grid | (Hold \ to reveal menu) |
| Shape Builder | Shift + M |
| Live Paint Bucket | K |
| Rotate Tool | R |
| Free Transform | E |
| Width Tool | Shift + W |
Related Topics:
Pro Tips & Insider Techniques
Tip 1: The Tilde Wave (Guilloché Pattern)
Hold the Tilde key (~) while drawing ANY of these tools to create multiple copies following your mouse path. Perfect for security backgrounds and artistic designs.
Tip 2: Transform Again (Ctrl/Cmd + D)
After using the Rotate, Scale, or other transform tools with the Copy option, press Ctrl + D / Cmd + D repeatedly to instantly duplicate and transform. This is how professionals create perfectly arranged geometric patterns.
Tip 3: Converting Grid Lines to Guides
- Draw your grid.
- With it selected, press Ctrl + 5 / Cmd + 5.
- The grid converts to cyan guides (non-printing, magnetic for alignment).
- Perfect for using grids as invisible layout frameworks.
Tip 4: Creating Perspective with Skew
When using the Rectangular Grid Tool, press F while dragging to skew horizontal lines. This creates depth and perspective, essential for isometric designs.
Tip 5: The Alt/Option + Click Origin Point
For almost any transform tool (Rotate, Scale, Reflect), hold Alt/Option and click where you want the origin point (center of transformation). This gives you precise control over how objects transform.
Tip 6: Combining Live Paint with Polar Grids
A Polar Grid is just lines until you use the Live Paint Bucket. Together, they become a powerful tool for creating complex, colorful radial patterns and infographics.
Tip 7: Variable Width Strokes
After drawing any line-based shape, press Shift + W to activate the Width Tool. Click and drag on the stroke to create calligraphic (variable-width) effects. This transforms simple lines into artistic elements.
Related Topics:
- 10 reasons Why you are not becoming a good artist
- Types of Image File Formats
- The Psychology of Typography: Font Influence
Conclusion: From Geometry to Design Mastery
The Line Segment, Arc, Spiral, and Grid tools are not “beginner” tools—they’re the foundation of professional geometric design. The difference between an amateur and professional designer often comes down to knowing which tool to use and understanding its hidden keyboard shortcuts.
Stop manually drawing circles and trying to eyeball perfect alignment. Let Illustrator’s geometric tools do the mathematics for you.
What You’ve Learned
- Line Segment Tool: Creating perfect geometric structures with transform techniques
- Arc Tool: Drawing natural-looking curves with F-key flipping
- Spiral Tool: Generating Golden Ratio spirals for organic designs
- Rectangular Grid Tool: Building modular layouts and isometric perspectives
- Polar Grid Tool: Creating radial patterns for infographics and badges
Your Next Steps
- Open Illustrator right now and practice each tool with the examples we covered.
- Master the keyboard shortcuts listed in Part 9. These are what separate amateurs from professionals.
- Try the projects: Sunburst, Leaf Logo, Shell Icon, Synthwave Grid, Target, and Global Badge.
- Subscribe to our newsletter for more advanced techniques and professional design tutorials.
- Share your work: Tag us on social media with your geometric designs.
Practice Challenge
Create a logo design that combines at least three of these tools (Line, Arc, Spiral, Grid). Share it in the comments or tag us on Instagram. We’ll feature the best designs in our next newsletter.
Remember: Geometry is the language of design. Master these tools, and you’ll communicate fluently in that language.
Related Topics:
About the Author
Lalit M. S. Adhikari is a Digital Nomad and Educator since 2009 in design education, graphic design and animation. He’s taught 500+ students and created 200+ educational articles on design topics. His teaching approach emphasizes clarity, practical application and helping learners.
Learn more about Lalit Adhikari.
Last Updated: Jan 2026
This guide is regularly updated with the latest information about Adobe tools and design best practices. Last Updated: Mar 2026
Related Topics:







Really good 👍
You appear to understand a lot about these tools in adobe illustrator, such as you wrote the e-book in it or something. These basic shapes such as Line, Rectangle and Circle etc., are also important in sketch and fashion designing. This is a magnificent blog. A great read. I’ll definitely be back.
Hi there, just became alert to your blog through Google and found that it is truly informative. I am going to watch out for all updates. I’ll be grateful if you continue this in future. Many people will be benefited from your design and technical writing about illustrator tools and photoshop. Cheers!
I enjoy what you guys are usually up too. This kind of informative design blog is rare! Thank you.
I’ve learned new things through your website. Thanks!
Thanks for your post.
Basics and yet a bit complex! Still, thanks for keeping things simple and easy.
I was wondering if you ever thought of changing the page layout of your website? Its very well written; I love how you have explained all about line segment tool, arc tool, spiral tool & other tools in illustrator. But maybe you could be a little more in the way of content so people could connect with it better. You’ve got an awful lot of text for only having one or two images. Maybe you could space it out better?
I like the valuable information you supply in your articles. I bookmark your blog and visit here regularly. I’m relatively certain I will learn lots of new stuff right here! Best of luck for the following!
This design blog is incredible! You obviously know about designing and adobe software. Excellent job. I really enjoyed what I learned here and more than that, how you presented it. Too cool!
I just realized how under-rated line segment tool, arc tool, spiral tool, rectangular grid tool & polar grid tool are! Great blog post.
This is a truly popular website. A lot of people comment here. It’s kinda hard to see now-a-days.
Greetings! I know this is somewhat off topic but I was wondering which blog platform are you using for this website? I’m getting tired of WordPress because I’ve had problems with hackers and I’m looking at alternatives for another platform. It would be fantastic if you could point me in the direction of a good platform.
Thanks alot : ) for your blog post.
This is very interesting, You are a very skilled blogger. I have joined your rss feed and look forward to seeking more of your excellent post. Also, I have shared your web site in my social networks!
I am continually browsing online for articles that can help me. Thank you!
Thanks for your interesting article.
I like the helpful info you provide in your articles. I will bookmark your weblog and check again here frequently. I’m quite sure I’ll learn plenty of new stuff right here! Good luck for the next!
Very good written article. It will be beneficial to everyone who uses it, including yours truly :). Keep up the good work – looking forward to more posts.
Howdy! I’m at work surfing around your blog from my new iphone! Just wanted to say I love reading your blog and look forward to all your posts! Keep up the fantastic work!
It is truly a great and useful piece of info. I am glad that you shared this helpful information with us. Please stay us up to date like this. Thank you for sharing.
I’ve been browsing on-line more than three hours today, but I by no means found any interesting article like yours. In my view, if all webmasters and bloggers made excellent content material as you probably did, the internet will be a lot more useful than ever before.
Thank you for sharing these kind of wonderful articles.
I have learnt some new things from your web-site about designing. Thank you!
Thank you!
It is quite helpful!