The Type Tool is one of Adobe Illustrator’s most powerful yet frequently underutilized features. Whether you’re creating logos, branding materials, posters or complex typography designs, mastering the Type Tool and its variations will transform how you work with text in vector design.
This comprehensive guide covers everything from basic point text creation to advanced techniques like text on paths, character manipulation, and professional typography optimization—skills that separate novice designers from industry professionals.
My name is Lalit Adhikari and we are at LTY. Let’s begin!
Table of Contents
Introduction to Illustrator’s Type Tools
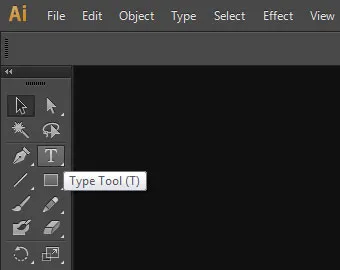
To access the type tool go to the toolbar on the left side of the Illustrator interface and select the ‘T’ Type tool. If you hover over the ‘T’ option can also see the name of the tool which is ‘Type tool’. Or for the shortcut, you can press T on your keyboard.
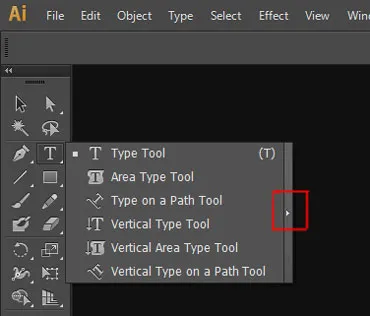
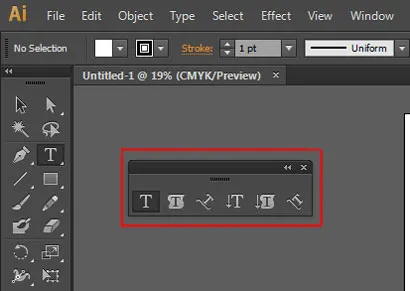
On the extreme right-hand side of the fly-out menu, there is a Chevron icon. And if you click on this triangle the fly-out menu will convert into a small dialogue box which will make your usage of type tool a bit easier.
Understanding the Type Tool Ecosystem
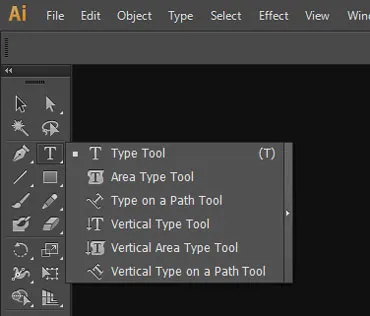
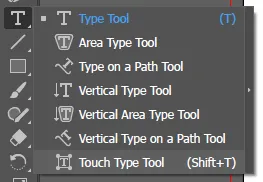
Adobe Illustrator provides seven distinct type tools, each designed for specific text applications:
- Type Tool (T) – Basic text creation (point text)
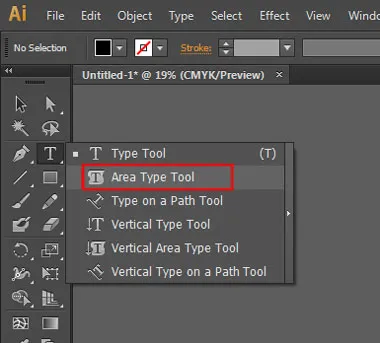
- Area Type Tool – Text within closed paths
- Type on a Path Tool – Text following path outlines
- Vertical Type Tool – Vertically oriented text (Asian typography)
- Vertical Area Type Tool – Vertical text within shapes
- Vertical Type on a Path Tool – Vertical text on paths
- Touch Type Tool (Shift+T) – Individual character manipulation
Understanding which tool to use for each situation is fundamental to efficient text handling in Illustrator. Each tool serves a distinct purpose and offers unique capabilities that, when combined, enable you to create sophisticated typography designs.
Why Master Type Tools?
Professional designers recognize that typography is more than just selecting a font and adding text. It’s about:
- Visual Hierarchy: Using type effectively to guide viewer attention
- Brand Identity: Creating distinctive visual language through custom typography
- Technical Precision: Controlling every aspect of letterforms for perfect designs
- Creative Expression: Using text as both communication and artistic element
- Production Efficiency: Mastering shortcuts and techniques to work faster
The Type Tool is your gateway to all these capabilities.
Related Topics:
- Master Paintbrush and Blob Brush Tool in Illustrator: Complete Guide
- How to use Eraser tool in illustrator
- How to use the Pen Tool in illustrator
Type Tools in Illustrator
Two ways to use Text tool:
- Point Text: For this, we have to click on the Artboard using Type Tool. A blinking cursor will appear which will means you can type your text.
- Text Frame: For this, click and drag, we have to make a box. Then we can type into this box or paste any text that you’ve copied.
What Is Point Text?
Point Text, as the name suggests, it is created in reference to a point. The point where we click with our Type tool. This point is called the Reference Point.
Point text is the simplest form of text in Illustrator. It begins at a single point where you click and expands as you type. Unlike area text (contained within a shape), point text flows endlessly in one direction, making it ideal for headlines, labels and single-line text elements.
Creating Point Text: Step-by-Step
Click and Type
- Select the Type Tool by pressing T or clicking the Type Tool icon in the toolbar
- Click anywhere on your artboard where you want text to begin
- A blinking text cursor appears
- Begin typing your text
- Press Escape to finish editing and return to selection mode
The beauty of this method is its simplicity—click once, type text and you’re done. The text box automatically expands as you type.
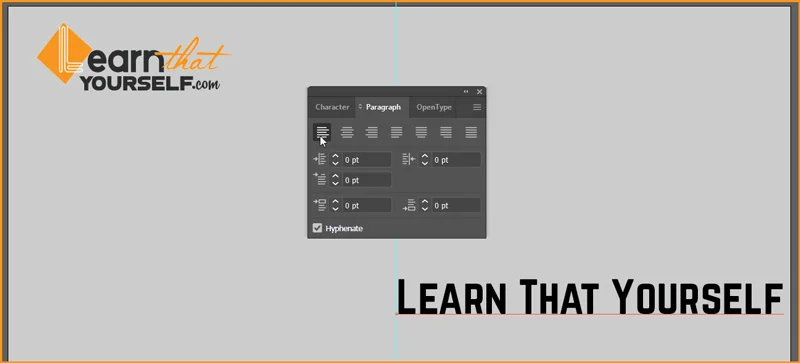
The image below shows a Point Text and Paragraph Panel. The Point Text was created by clicking at the approximate centre of the Artboard.
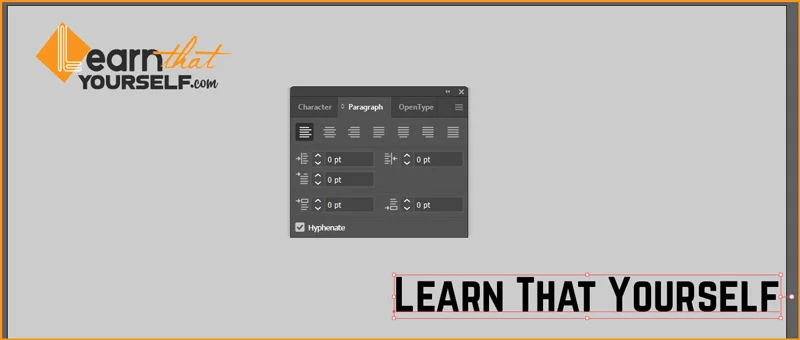
The Paragraph Panel currently shows that our text is Left Align. It is also the default alignment for text.
Now lets zoom in to the text, to locate the Reference Point of Text.
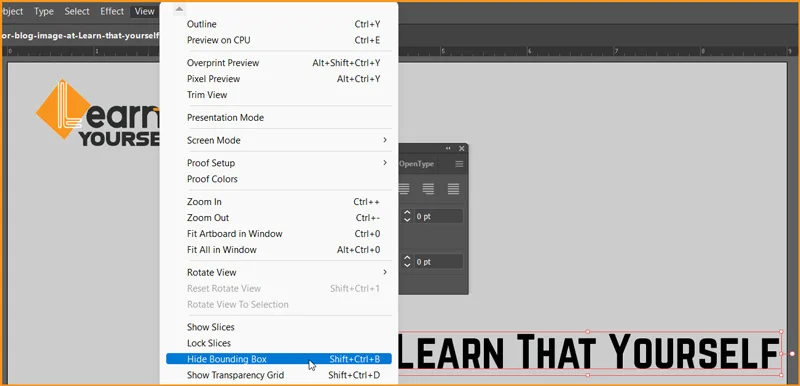
And as our text is selected, we can see a bounding box around the text, due to which its hard to see our Reference Point. So, let’s hide the Bounding Box by going to View menu and choose Hide Bounding Box option.
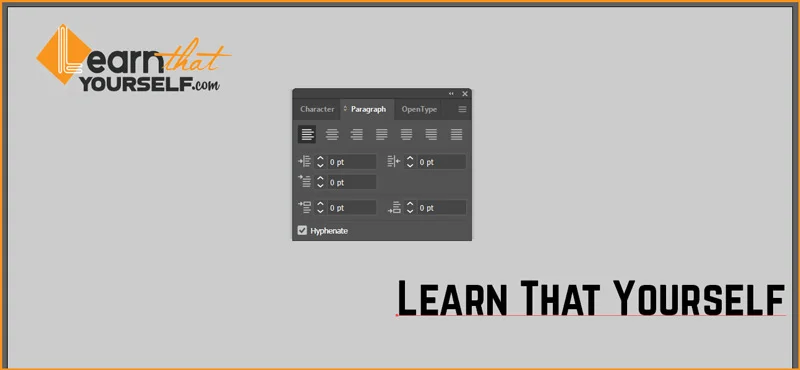
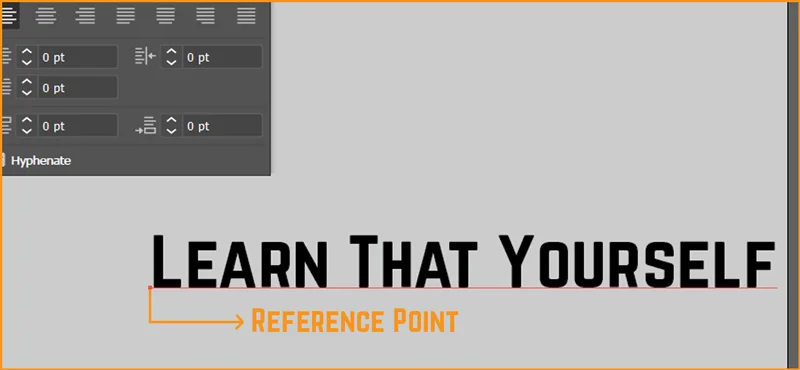
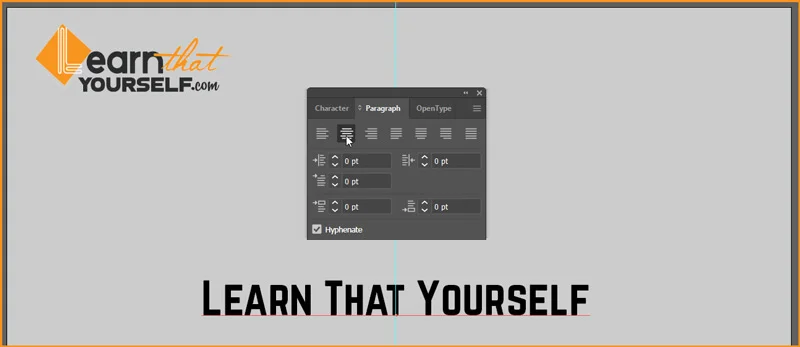
This is called Reference Point because this point doesn’t change its location unless we move it. It can be easily noticed if we just place a guide on the point and then change its alignment.
- Below image shows a Guide marks the position of Reference Point with text being Left Aligned.
- Text centre aligned. Image below.
- Text Right Aligned. Image below:
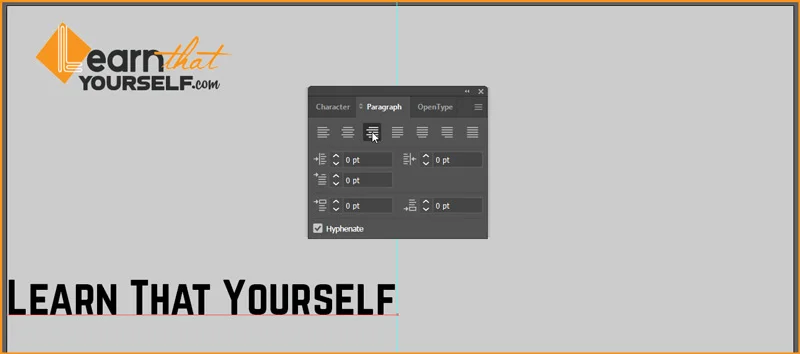
As we are on topic of Alignment too, I want to point out that Point Text can’t be Justified. As to Justify a text we need defined Left and Right edges. A Point Text is only defined at one point. So, we can’t use Justify Alignment with it.
We can drop Type Tool Selection by either clicking on the Selection Tool or press CTRL + ENTER or hit ESC on your keyboard.
Best Uses for Point Text:
- Headlines and titles
- Single-line labels
- Logo text elements
- Brief annotations
- UI/UX text labels
Selecting and Editing Point Text
Selecting Text:
- Select All: Ctrl+A (Windows) or Cmd+A (Mac) – selects all text in current text object
- Triple-Click: Selects entire paragraph
- Double-Click: Selects word
- Click-Drag: Selects specific characters
Editing Text:
- Type new content to replace selected text
- Delete key removes selected characters
- Backspace deletes characters before cursor
- Arrow keys move cursor position
What is Text Frame?
Text frame, as name suggest, we have to click and drag using Type Tool and create a Rectangular shape. As we drop the click, we can type inside the box.
Creating a Text Frame with Click-and-Drag
For more control over initial text box dimensions:
- Select the Type Tool (T)
- Click and drag on the artboard to create a text frame
- Define the width as you drag
- Release the mouse to set the frame
- Begin typing (text will wrap to fit the frame)
This method is useful when you have an approximate text area in mind and want to control text wrapping from the start.
The options in the Type menu of Illustrator is similar to the options of Type menu in Adobe Photoshop. To know more about Type tool option, you can read my blog post on Type Menu in Adobe Photoshop.
Keyboard Shortcuts for Type Tool Efficiency
| Shortcut | Action |
|---|---|
| T | Activate Type Tool |
| Ctrl+A / Cmd+A | Select All Text |
| Ctrl+B / Cmd+B | Bold |
| Ctrl+I / Cmd+I | Italic |
| Ctrl+T / Cmd+T | Show Character Panel |
| Escape | Exit Text Editing |
| Enter (Numpad) | Create New Paragraph |
| Tab | Insert Tab Space |
Related Topics:
Area Type Tool
What Is Area Type?
Area Type constrains text within a closed path or shape. This technique is essential for:
- Text wrapping within shapes
- Creating specific text boundaries
- Designing complex layouts
- Building text-based illustrations
- Professional typography compositions
When text fills an area and exceeds capacity, the overflow text remains selectable (indicated by a red plus sign), allowing you to resize the area or adjust text.
Creating Area Type: Step-by-Step
Step 1: Create or Select a Path
First, you need a closed path. This can be:
- A shape created with any of the Shape Tool in Illustrator
- A custom path drawn with the Pen Tool
- An imported shape or illustration
- Any closed vector path
Step 2: Access the Area Type Tool
Method 1 (Keyboard):
- No default keyboard shortcut (customize in Preferences)
- Navigate to Tools > Type > Area Type
Method 2 (Toolbar):
- Click and hold on the Type Tool
- Select “Area Type Tool” from the dropdown menu
Method 3 (Menu):
- Window > Type > Area Type (shows as panel option)
Step 3: Click on Your Path
- With Area Type Tool selected, click on your path/shape
- A text cursor appears inside the shape
- Begin typing—text automatically wraps to fit the shape boundary
Managing Overflow Text
When text exceeds the shape’s capacity:
Recognizing Overflow:
- Red plus (+) symbol appears at the shape’s edge
- This indicates text exists but isn’t visible
Dealing with Overflow:
Option 1: Resize the Shape
- Select Shape (not text) with Selection Tool (V)
- Drag corner/edge handles to enlarge the shape
- Text reflows to fit new dimensions
Option 2: Link to Another Shape
- Window > Type > Text Threading
- Use this panel to link overflow text to a new shape
- Creates a chain of text boxes
Option 3: Reduce Text
- Delete unnecessary words
- Reduce font size
- Adjust leading and tracking
Professional Area Type Applications
Use Case 1: Logo Integration
Create text that flows within brand shapes or letters, integrating typography with graphic elements.
Use Case 2: Editorial Design
Flow multiple paragraphs through custom shapes for sophisticated magazine or brochure layouts.
Use Case 3: Infographic Elements
Place descriptive text within circular, polygonal, or custom-shaped containers for professional information design.
Use Case 4: Custom Illustrations
Build text-based art where letters form shapes or illustrations themselves.
Related Topics:
- Shape Builder, Live Paint Bucket tool in illustrator
- Adobe Illustrator vs Photoshop for Beginners: Which Should You Learn First?
- How to Create a Logo in Adobe Illustrator: Complete Step-by-Step Tutorial for Beginners
Type on a Path Tool
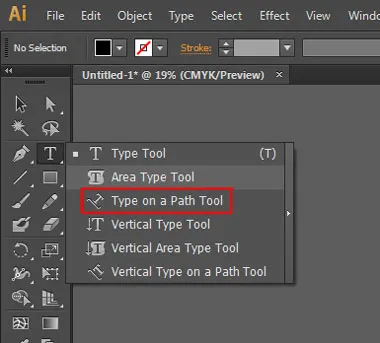
If you create any shape, let’s say ellipse. And then after selecting this type option, you can click on the edge of the path.
You will see a ‘Squiggly’ blinking cursor over the edge of your shape and as you type you will see that your text will cover the edge of your shape.
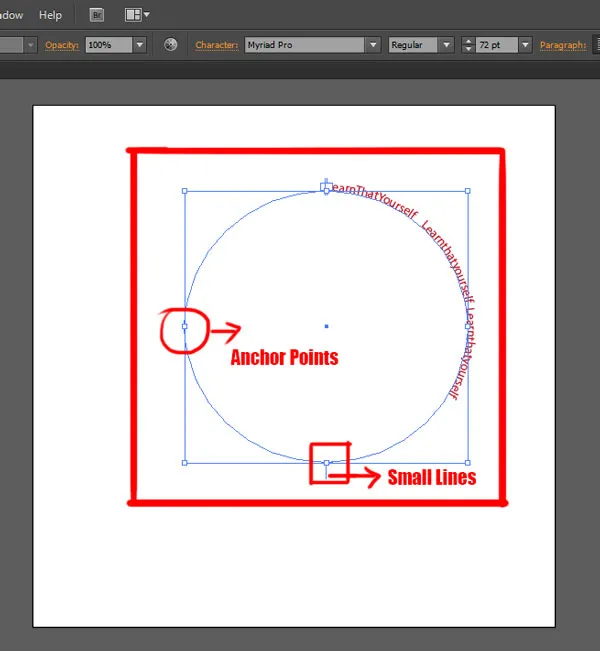
You can click on the ‘Direct Selection Tool’ and change the placement of the text by tampering with the ‘little lines’ sticking out of the shape.
And it can push your text around or if you hold Shift key and drag the text inside, your text will be inside the edge of the circle.
There is a small point in the edge of the path and you can manipulate the shape of the path by selecting the Direct Selection Tool while clicking and dragging on it.
This will not distort the type but it can distort the space of the type.
What Is Type on a Path?
The Type on a Path Tool creates text that follows the outline of any path. This powerful technique enables:
- Circular/curved headlines
- Logo text along curves
- Design-integrated typography
- Professional wordmark creation
- Decorative text arrangements
Unlike Area Type (which fills inside a shape), Type on a Path places text along the path itself, following its contours.
Creating Type on a Path: Complete Guide
Step 1: Create Your Path
Options include:
- Draw a curved path using the Pen Tool (P)
- Use predefined shapes (circles, custom shapes)
- Import paths from illustrations
- Use Bezier curves for specific effects
Step 2: Select Type on a Path Tool
- Keyboard: No default (recommend setting custom shortcut)
- Menu: Tools > Type > Type on a Path
- Toolbar: Click and hold Type Tool > select Type on a Path
Step 3: Click on Your Path
- Position cursor on the path you’ve created
- Click directly on the path line
- Text cursor appears and is ready for typing
- Type your text
Step 4: Adjust Text Position and Baseline
After typing, you’ll see three control handles (using Selection Tool V):
Start Handle (Left Triangle):
- Controls where text begins on the path
- Drag left/right to shift text along path
- Move inside/outside to position above/below
End Handle (Right Triangle):
- Controls text end point
- Adjust to truncate text or extend along path
Center Handle (Diamond):
- Flips text baseline (above/below path)
- Drag above path for text above
- Drag below path for text below
Type on a Path Effects
Illustrator provides five professional text effects for Type on a Path:
1. Rainbow Effect
- Text follows path smoothly without distortion
- Perfect for curves and organic shapes
- Most natural appearance
- Best for: Circular logos, flowing designs
2. Skew Effect
- Characters remain vertical but skew in perspective
- Follows path angle
- Maintains readability at various angles
- Best for: Architectural/technical designs
3. 3D Ribbon Effect
- Characters appear three-dimensional
- Creates depth illusion
- Text flows along path with dimensional appearance
- Best for: Modern, dynamic designs
4. Stair Step Effect
- Characters step vertically as path changes angle
- Creates discrete jumps rather than smooth flow
- Unique, geometric appearance
- Best for: Contemporary, structured designs
5. Gravity Effect
- Characters fall toward bottom of path
- Simulates gravitational pull
- Creates artistic, experimental effect
- Best for: Creative, unconventional designs
Applying Type on a Path Effects
- Select your Type on Path text object with Selection Tool (V)
- Menu: Type > Type on a Path > Type on a Path Options
- Choose desired effect from dropdown
- Adjust Baseline Shift and Distance settings
- Click OK
Real-World Type on a Path Applications
Application 1: Circular Logo Text
Create professional circular wordmarks by typing on a circular path. Industry standard for badges and seals.
Application 2: Curved Headlines
Design eye-catching headlines that curve along custom paths, creating visual interest and brand distinction.
Application 3: Decorative Borders
Place text along spiral or ornamental paths to create decorative design elements.
Application 4: Wave/Flowing Text
Use undulating paths to create flowing, organic text arrangements perfect for modern, creative designs.
Related Topics:
- How to use Gradient Tool in Illustrator
- How to use Mesh Tool in illustrator
- How to make a Semicircle in Illustrator
Vertical Type Tools
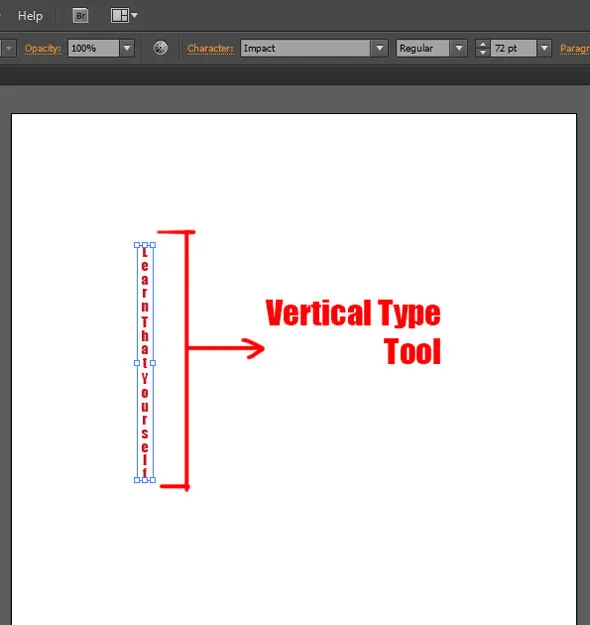
This is a Type tool where it types downwards. If you make a box and type any text like I’ve explained above while selecting this type option then the text will run from top to bottom instead of left to right.
It will be the same as the Vertical Area or Vertical Type on Path Tool.
Understanding Vertical Type
Vertical Type Tools are essential for East Asian typography (Chinese, Japanese, Korean) where text traditionally flows top-to-bottom, right-to-left. However, these tools are also used creatively in English designs.
Three Vertical Type Options:
- Vertical Type Tool – Point text flowing vertically
- Vertical Area Type Tool – Text within shapes, vertical orientation
- Vertical Type on a Path Tool – Vertical text along curves
Creating Vertical Point Text
Steps:
- Select Vertical Type Tool (Tools > Type > Vertical Type)
- Click on artboard where you want text to begin
- Text cursor appears in vertical orientation
- Type your text—characters flow top-to-bottom
- Press Escape to finish
Character Orientation:
By default, characters maintain their standard orientation. For authentic Asian typography:
- Select all vertical text (Ctrl+A or Cmd+A)
- Open Character Panel (Ctrl+T or Cmd+T)
- Look for “Character Rotation” or “Horizontal Scale” options
- Adjust rotation to 90° for true vertical orientation
Vertical Area Type Applications
Combining vertical type with shapes enables:
- Authentic Asian text layouts within branded shapes
- Bilingual designs mixing horizontal and vertical text
- Creative experimental typography using unconventional orientations
- International design projects requiring multiple language support
Professional Vertical Type Use Cases
Design Application 1: Bilingual Branding
Integrate English (horizontal) and Chinese/Japanese (vertical) text in sophisticated brand identities.
Design Application 2: Asian Market Design
Create designs specifically for Asian markets with proper text orientation and cultural accuracy.
Design Application 3: Creative Typography
Use vertical text in English designs for artistic, experimental effects that break conventional layout rules.
Related Topics:
- How to design a Retro Flower Pattern
- How to set Brush Pressure in Illustrator
- How to Create A Pressure Sensitive Brush in Illustrator
Touch Type Tool – Individual Character Manipulation
What Is Touch Type?
The Touch Type Tool (Shift+T) is a specialized tool that allows you to manipulate individual characters within a text block. Instead of editing character properties through panels, you directly manipulate characters with visual handles.
Touch Type Capabilities:
- Rotate individual characters
- Scale specific letters independently
- Move characters to custom positions
- Fine-tune character placement
- Create unique effects with selective manipulation
Accessing the Touch Type Tool
Keyboard Shortcut: Shift+T
Toolbar Access:
- Click and hold Type Tool
- Select “Touch Type Tool”
Menu Access:
Tools > Type > Touch Type Tool
Using Touch Type: Step-by-Step
Step 1: Activate Touch Type
- Press Shift+T or select from toolbar
- Your cursor changes to indicate Touch Type activation
Step 2: Click on a Character
- Click any character within your text
- The character becomes selected with visible handles
- A bounding box appears around the character
Step 3: Manipulate the Character
Using visible handles:
- Rotate: Drag corner handle in circular motion
- Scale: Drag corner handle toward/away from center
- Move: Drag character anywhere on artboard
- Skew: Drag edge handle while holding Ctrl/Cmd
Step 4: Repeat for Additional Characters
- Click another character to select and manipulate it
- Repeat the process for each character needing adjustment
Professional Touch Type Techniques
Technique 1: Baseline Offset
- Select characters with Touch Type
- Move selected characters slightly up or down
- Creates dynamic, interesting text arrangements
- Perfect for creating drop caps or emphasized characters
Technique 2: Selective Enlargement
- Use Touch Type to scale specific letters larger
- Creates visual hierarchy within words
- Draws attention to important letters
- Professional technique for poster design
Technique 3: Rotational Variety
- Rotate individual characters to different angles
- Creates dynamic, playful text appearance
- Modern design aesthetic
- Perfect for headers and display typography
Technique 4: Spacing Refinement
- Use Touch Type to adjust individual character positions
- Fine-tune kerning issues that standard tools can’t address
- Create precise, professional letter spacing
- Essential for high-end logo and branding work
Related Topics:
- How to Create Metallic effect in Illustrator
- How to Create Flower using Gradient Mesh in Illustrator
- How to Recolor Artwork in illustrator
Wrapping Text around Graphics
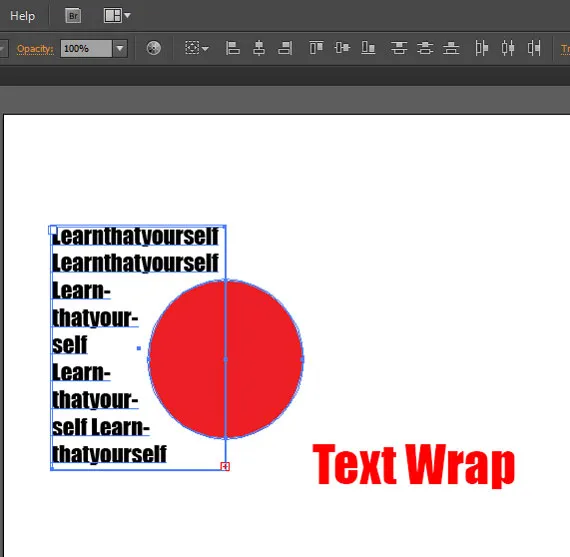
To wrap a text around any image of graphics, first you have to select the type tool and drag out the text box, then write or copy your text.
After doing that import the graphics, image or any shape you want to wrap around and place it over the text box like I did below.
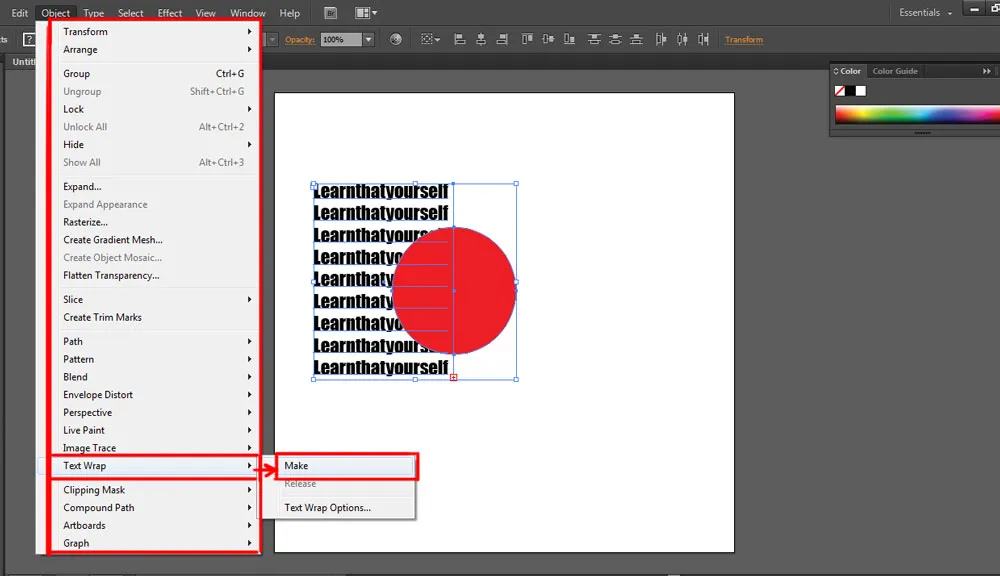
Then click on the first one and Shift click on the other one, go to object in the options menu bar and select the text wrap option.
A fly-out menu will open up as you hover your cursor over the text wrap option. The first option in this menu is ‘Make’ and you need to select on that.
And this option will automatically wrap your text around your object.
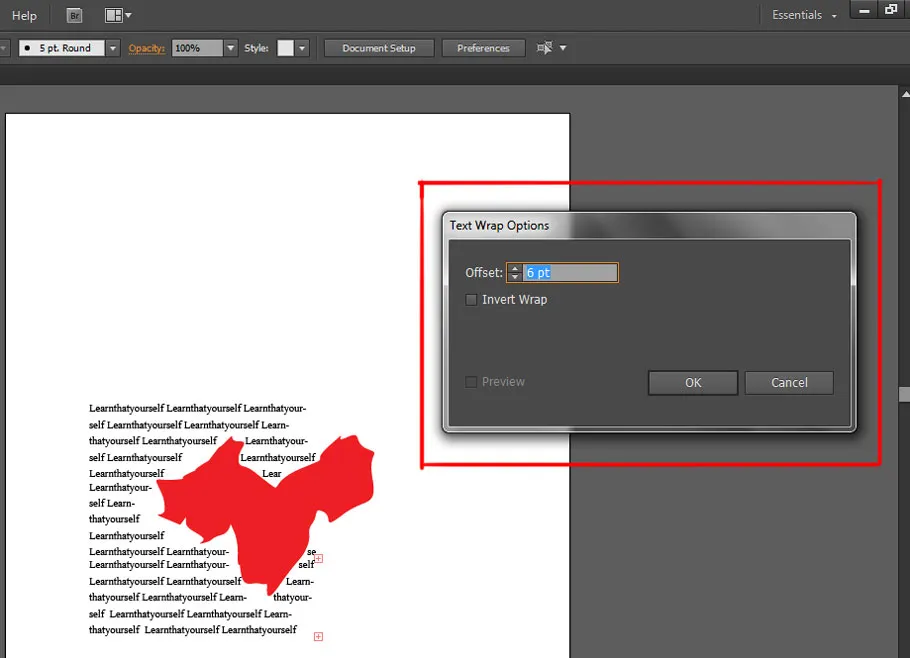
There is another option available in Adobe Illustrator for doing this wrapping is if you want to wrap your text around a bit more complicated shape. Drag the text box and write your text on the same way as I’ve described above.
Now, go to the object option, select the ‘Text Wrap’ and then in the fly-out menu select the ‘Text Wrap Options’ which is under the ‘Make’ option.
As you click on that option it will open up a dialogue box which has ‘Offset’ option where you can change the settings of the text wrap to fit more precisely around your shape or graphics.
Related Topics:
About the Author
Lalit M. S. Adhikari is a Digital Nomad and Educator since 2009 in design education, graphic design and animation. He’s taught 500+ students and created 200+ educational articles on design topics. His teaching approach emphasizes clarity, practical application and helping learners.
Learn more about Lalit Adhikari.
Last Updated: December 2025
This guide is regularly updated with the latest information about Adobe tools and design best practices. Last Updated: Mar 2026
Related Topics:
- Typography
- Laws Of Design
- Rule Of Thirds
- Golden Ratio
- Color Theory
- Types of Image File Formats
- The Psychology of Typography: Font Influence
- Basics of Design
- Elements of Design
- Graphic Design Fundamentals: Complete Guide for Beginners







Long but informative … really great.