In this Photoshop Lesson, we’ll be learning about ‘What is Gradient’, ‘How to use Gradient Tool in Photoshop’, ‘Types of Gradient in Photoshop’ and ‘How to create a custom Gradient in Photoshop’.
Till now, we have discussed few Photoshop tools like Brush Tool and Color Replacement Tool etc. There’s one thing common in them and that is, they work with Foreground Color or a single color. In order to fill multiple colors, we have Gradient Tool in Photoshop.
My name is Lalit Adhikari and we are at LTY. Let’s get started.
Table of Contents
What is Gradient
Gradient is a smooth blend between multiple colors. Graphic Designing applications, generally provide preset as well as allows to create our own custom gradient.
Below are few examples of Gradient.


Related Topics:
- Burn, Dodge & Sponge Tool in Photoshop
- Blur, Sharpen & Smudge Tool in Photoshop
- Foreground Color, Background Color, Stroke & Fill
Gradient Tool in Photoshop

Gradient tool is one of the most popular tools in Adobe Photoshop whether it is the actual gradient tool, the gradient editor or using gradient adjustment layer.
You can use gradients for so many purposes in Graphic Designing which makes it one of the essential tools. It is used in enhancing Photography to creating custom backgrounds for web banner etc.
How to use Gradient Tool in Photoshop
After choosing Gradient Tool in Photoshop, the cursor will change to hair cross as shown below:

We have Gradient slider on the Option Bar for Color Preset available for Gradient Tool in Photoshop. By default it has ‘Foreground color to Background color’ as Gradient.

To create a Gradient in Photoshop, after choosing Gradient tool, we need to click and drag in the required direction as shown below:

Here, point 1, represents the starting point of the Gradient. It means, till this point, our first color will be at full intensity. After this point it will gradually lose it’s intensity towards other color and the intensity of the other color will start increasing towards the point 2.
So, we click at point 1 then hold the click and dragged the cursor to point 2.
Point 2 is the end point of our Gradient. It is the point where our last color of the Gradient will reach its full intensity. As here we have our colors as Black in Foreground and White in Background, it will create a black to white gradient.

Related Topics:
Types of Gradient in Photoshop

Linear Gradient
In Linear Gradient, the shades from the starting point to ending point are in a straight line.
Radial Gradient
In Radial Gradient, the shades from starting to the endpoint are in a perfectly circular pattern.
Angular Gradient
In Angular Gradient, the shades are in a counter-clockwise sweeping pattern from its starting point.
Reflected Gradient
Symmetric gradients are used on either side of the starting point in Reflected Gradient.
Diamond Gradient
In Diamond Gradient, shades from starting point to the ending point forms a diamond shape.
Related Topics:
Blending Modes

There are different types of modes like darken, multiply and many others and you can apply this according to your artwork.
Opacity

You can change the opacity of the gradient, before creating it, by sliding the opacity bar.
Other options

In reverse option, it will just reverse the direction of the gradient. So, if you have a linear gradient from blue to white then it will change it to white to blue.
In the dither, it creates a smoother gradient so that it will have less bending.
In transparency option, if you keep this checked then it will give a transparent effect, otherwise, the gradient will be a solid color.
Related Topics:
How to Create a Custom Gradient
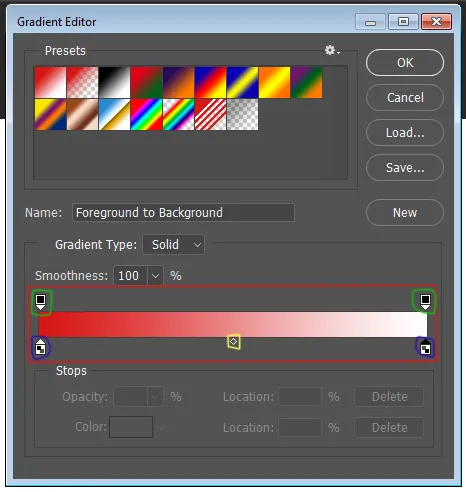
If we click on the gradient editor window, then we can see there is the area at the lower part of the panel where we can create a custom gradient.

So, you can start on by choosing one as a preset and then adjust it by clicking on the “color stops”(marked with blue in the image above)which is at the bottom part of the gradient editor bar.
After double clicking the color stop on the left side of the gradient bar you can choose the custom color and in the same way, double-clicking another color stop on the right-hand side of the slider we get a new gradient.
If you click on the “opacity stop” (marked with green in the image above) then you can change the opacity of the gradient.
In the middle area of the gradient bar, if any of the color stop or opacity stop is selected, there is a diamond shaped “button” (marked with yellow in the image above) which is usually set at 50%.
So, by sliding it you can change the location of that color or opacity in the gradient.
We can add on more color stops as well as opacity stop by simply clicking at the border of the slider.
Click at the bottom border for color stop and upper border for opacity stop. To delete the stop you can just click on the stop and hit delete.
In this panel, there is another gradient type apart from the solid gradient and that is “noise”. This creates a different kind of gradient with lot more hues.
If we change its roughness to 0% then it will look like our traditional gradient and if we slide it to 100% then it will have much more hues added to it. It is set to 50% default.
By clicking on the “restrict colors” option we can avoid the over-saturation of colors in certain areas. And by clicking “transparency”, it can add transparency to its parts as well.
There are three color models that we can possibly use.
The first is RGB (Red, Green, and Blue) and if we move the sliders then we can increase or decrease the hues of these colors in the gradient.
The other one is HSB (Hue, Saturation, and Brightness). And in this option, you can change the hue, saturation, and brightness of the gradient according to our need.
And the third option is the LAB (Luminance, A & B are chromatic Components). In this, if we temper the “L” slider then we can change the luminance of the gradient.
A and B are chromatic channels where we can further change the color of the gradient. By hitting “randomize” option we can change the pattern of the gradient.
Once you’ve created your custom gradient change its name and hit “new” button. Thus, you will get your custom gradient ready to use in the gradient preset.
Related Topics:
- Photoshop Channels
- Dual light effect
- Feather in Photoshop
- How to create New Document in Photoshop
- Color Settings in Photoshop
- Color Profile
- Color Mode
- Bit Depth
- How to Create Rain Effect in Photoshop
- How to Add Falling Snow in Photoshop


So closely described here, very nice
Linear and radial are my favorite gradients in Photoshop.