In this blog, I will show, How you can build your first GPU Mining Rig for Crypto currency Mining from scratch.
For this blog, I have taken images from one of my Mining Rig. Earlier, I used to mine Bitcoin with it but later on I shifted to Ethereum Mining (for profitability).
I built this GPU Mining Rig with 8 Graphic Cards and later on, after sometime, added 4 more GPUs in it.
Table of Contents

List of all components for Mining Rig
All the components of a Crypto Mining Rig can be divided into two parts:
- General components
- Necessary components
General components
General components are components which are common in normal PCs. These include:

Related Topics:
Necessary components
These are the components which are the absolute necessity for building a Mining Rig without these components, we can’t build a Mining Rig.
These components are different from a General PC or Gaming PC and a Crypto Mining Rig can’t be build without these components.
Component 1: Graphic Cards (GPUs)
Here, I have used the following GPUs:
| No. of GPUs | Graphic Card Name | Hash Rate/ card |
|---|---|---|
| 6 | GEFORCE GTX 1660 Super | 32 MH/s |
| 1 | GEFORCE GTX 1660Ti | 30 MH/s |
| 1 | GEFORCE RTX 2070 Super | 43 MH/s |


Component 2: SMPS (PSU)
I had bought two SMPS or PSUs.

Here, instead of buying two SMPS like me, you can go for two 850W SMPS. It will reduce your overall cost.
But I will not recommend it. As cutting cost on Motherboard and SMPS or PSUs are never recommended.
Component 3: Motherboard
I have used Biostar TB250-BTC Pro. It has 12 PCI express slots. So, it can be attached to 12 Graphic Cards (GPUs).

Component 3: PCIe Riser Adapter Card
- PiPlus™ Latest VER009S PCIE Riser (4 Capacitors)
- PiPlus™ VER0010S Plus Ultra PCIE Riser (8 Capacitors)

They are used to connect the GPUs to the Motherboard.
Component 4: PCIe Splitters
Place processor in motherboard
Follow this process, if you are placing an Intel processor in the Motherboard:
| Steps | Images |
|---|---|
| Open the processor socket in the Motherboard. | 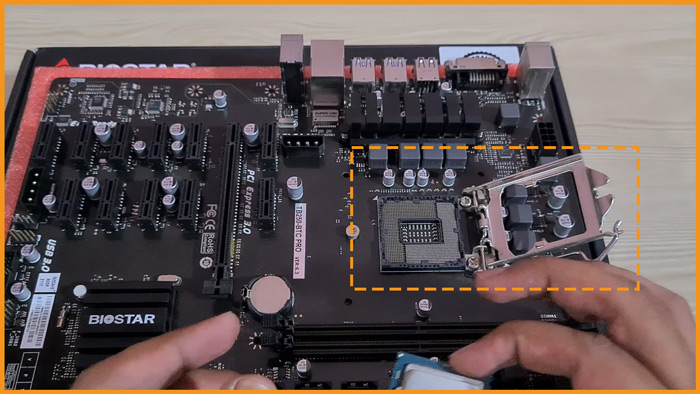 |
| Notice the triangle mark on the Motherboard near processor socket. | 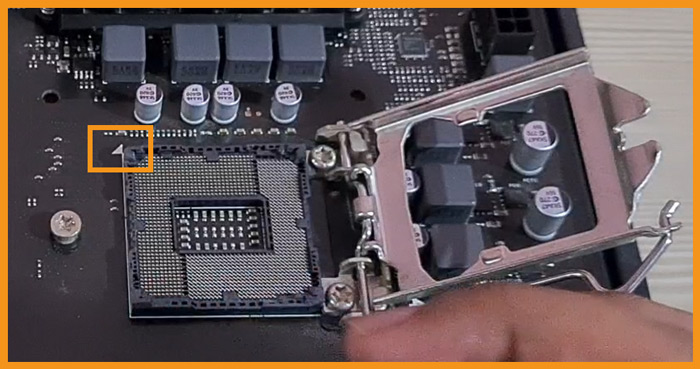 |
| You will find the similar triangle on one of the corner of the processor. | 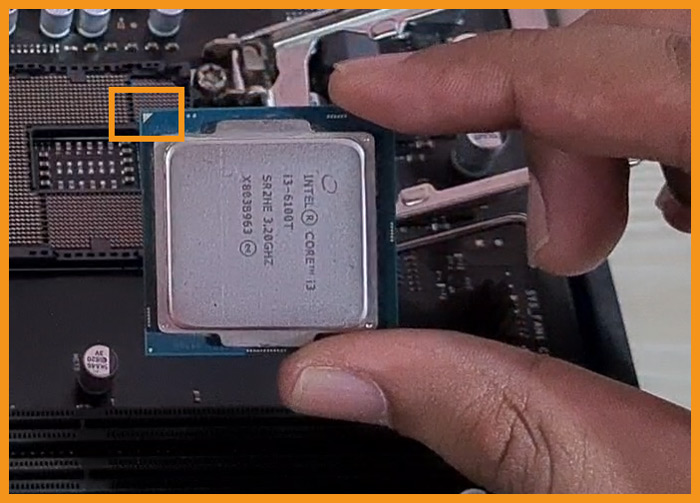 |
| You have to place processor by aligning these triangles towards each other. | 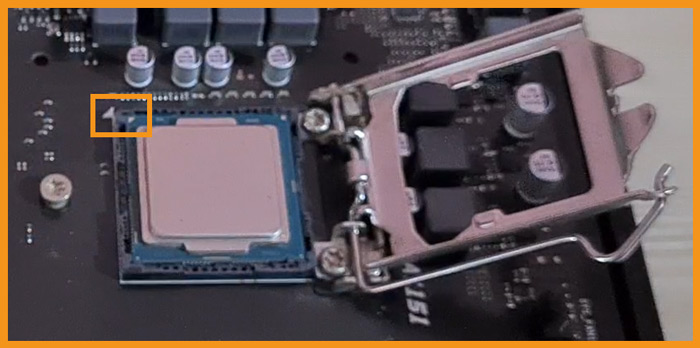 |
| Close the processor socket after placing the processor. | 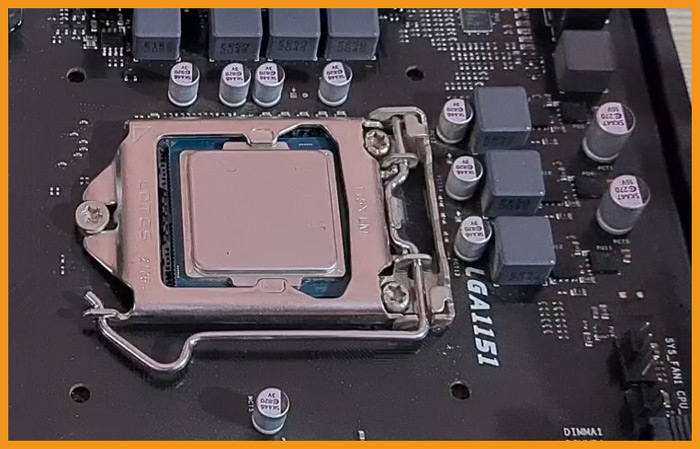 |
| Apply thermal paste on the processor. | 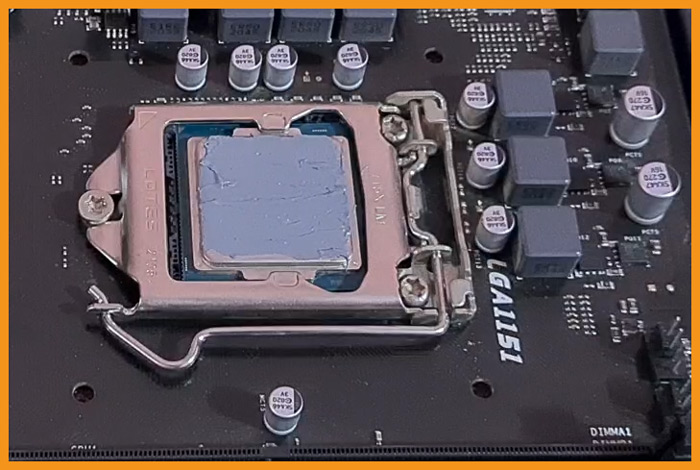 |
| Place processor fan over the processor. | 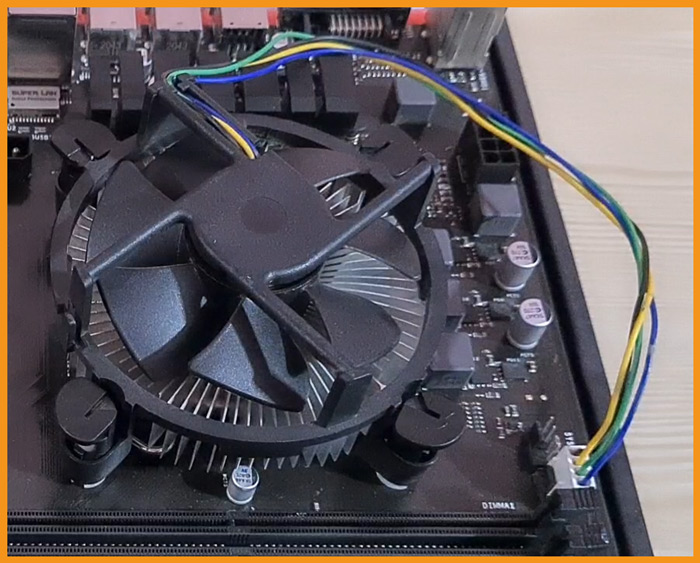 |
Placing RAM
We have to place the RAM in the DDR4 ports available in the Motherboard.

Match the cut in the RAM with the cut in the port. I will be placing 1 DDR4 RAM.

Mining Rig Frame
There are various options available in market now for Mining Frames. But for this Mining Rig, I preferred a DIY option instead of buying a ready-made frame.
I have made the frame structure using iron bars and placed wooden rods and to place GPUs.

GPUs will be placed in following manner:

Place Motherboard
As I was sure that I will not have to move my frame with time. So, I just put the Motherboard on it’s cover box and didn’t screw tight it to anything.

Power connections to Motherboard
To supply power for the motherboard and Graphic cards, I have placed both the power supplies along sides of the motherboard.

I will connect the 1000W to the motherboard and run the other one separately. 1000W power supply comes with detachable cables.

Find the cable with 24 pin, it is used for providing power to motherboard and a 10 pin cable to power up the processor.


24 pin ATX power cable gives power to the motherboard and the 10 pin power cable gives power to the processor. The ports on the motherboard had been marked below:


Connect SSD to motherboard
SSD has one SATA power port and other mini SATA data transfer port.


Place Graphic Cards in Motherboard
This Motherboard supports 12 Graphic Cards.

I will place the RTX 2070 Super on the PCI express slot and rest Graphic Cards by using PCIe Riser Adaptor cards on the mini PCIe slots.

As it’s a big Graphic Card, it covered most of the space and even 2 mini PCIe slots too. Now, take out the PCIe Riser Adaptor Card.

We will place our GPU on it.

Attach the USB wire to the USB port in the PCIe Riser Adaptor card.

Connect the other end of the USB cable to the PCIe male component.

Find the mini PCIe slot on the motherboard.

Insert the PCIe male into the mini PCIe slot.

Place the GPU on the frame with the help of screws.

Power up PCIe Riser Adaptor Card
Find the following cable in your PCIe Riser Adaptor Card bundle.

It is a SATA to 6 pin cable for PCIe cards. It comes with your PCIe Riser Adaptor Card bundle. This cable is used to supply power to the PCIe Riser Adaptor Card.
We have to connect the 6 pin side of the cable to the PCIe Riser Adaptor Card.

Now, connect the SATA end of the cable to the SATA output cable from the PSU.

Power up GPU
In case of GPUs, bigger the GPU bigger will be the power needed to run it. Here, look at the powering structure of RTX 2070 Super below:

Find the similar 8 pin and (6+2) pin power cords from PSU as shown below:


Now, the powering structure of GTX 1660 Super. GTX 1660 Ti have similar power structure.

I will be using the following power cables to power up this GPU.


How to switch on the second PSU
As our first PSU was connected to the motherboard, it will be powered on/ off using the power key on the motherboard. But our second PSU is not connected to any motherboard.
Hence it needs to be switched on manually. To do this, first remove any power connection to PSU then we need to insert a small metal wire in the following manner.

In the 24 pin ATX power cable coming out of the PSU, you need to drop 2 holes from the right and connect 3rd and 4th holes as shown in image above. This has to be done the side of hook on the cable.
After this you can connect the PSU to the main power and run it.
This blog is just for the hardware part and hence I am not covering the software part like installing windows and Graphic drivers for all the cards.
For mining you can use Binance pool or unminable. If you need detail on ‘where and what to mine’, comment below, I will add the information.


Thank you for sharing this info.
I had a question which mining product is best for cryptocurrency mining?
Asic miner are also good. You can search for them.
Thank you, it was very helpful!
What’s your take on using USB connectors for Graphic Cards?