In this Illustrator Lesson, I will explain, ‘How to use Eraser Tool in illustrator’. Eraser tool with Scissors tool and Knife are a great combination to use while creating digital illustrations.
My name is Lalit Adhikari and I’m a blogger at LTY. Let’s dive into our topic.
When you are working with any brush tools (Paintbrush or Blob brush) in Illustrator then the best tool for editing your artwork is the eraser tool.
Table of Contents
Introduction
Erasing in Adobe Illustrator is one of the fundamental skills every designer must master. Whether you’re refining vector shapes, removing unwanted brush strokes, or creating complex clipping masks, understanding how to use the eraser tool effectively can dramatically improve your workflow and design precision.
This comprehensive guide will walk you through everything you need to know about erasing in Illustrator, from basic eraser tool usage to advanced techniques using scissors tools, path erasers, and clipping masks.
Unlike pixel-based editing in Photoshop, erasing in Illustrator works differently because you’re working with vector paths and shapes. This means the erasing process is more precise and non-destructive when done correctly.
By the end of this guide, you’ll be equipped with multiple erasing methods and know exactly when to use each one for optimal results.
Related Topics:
Understanding the Eraser Tool: What Makes It Different in Vector Graphics
Why Vector Erasing is Different from Raster Erasing
When you erase in Adobe Illustrator, you’re not simply removing pixels like you would in Photoshop. Instead, you’re modifying vector paths and creating new anchor points.
This fundamental difference means that erasing in Illustrator is both more flexible and more precise than traditional raster erasing.
Vector-based erasing allows you to:
- Divide shapes into multiple editable parts
- Maintain smooth, scalable paths at any resolution
- Create anchor points along the erased path for further editing
- Work non-destructively when using appropriate techniques
- Scale designs infinitely without losing quality
Understanding this concept is crucial because it explains why certain erasing methods work better for specific situations. When you use the eraser tool on a vector path, it creates new anchor points at the beginning and end of the erased section, effectively breaking the path into separate segments.
Related Topics:
The Eraser Tool – Your Primary Erasing Solution
What is the Eraser Tool?
The Eraser Tool in Adobe Illustrator is a brush-based tool that allows you to remove portions of vector shapes, paths, and brush strokes by simply dragging across them.
It’s the most intuitive erasing method and works similarly to a physical eraser on paper, making it familiar to most users.
The Eraser Tool is particularly useful when you need to:
- Remove brush stroke marks quickly
- Delete parts of vector shapes with freehand precision
- Create organic, irregular edges
- Erase multiple overlapping objects simultaneously
- Break paths into separate, editable segments
How to Access the Eraser Tool

Method 1: Using the Keyboard Shortcut
The quickest way to access the Eraser Tool is by pressing Shift + E on your keyboard. This shortcut works on both Windows and Mac computers and is one of the most efficient ways to switch tools during your design workflow.
Method 2: From the Toolbar
Alternatively, you can click on the Eraser Tool directly from the left-hand toolbar. The tool icon typically shows a small eraser and is usually located near other transformation tools. If you can’t find it immediately, look for tools grouped together – the Eraser Tool often shares a menu with the Scissors Tool and other path-editing tools.
Step-by-Step Guide to Using the Eraser Tool
Step 1: Select Your Objects
Before you start erasing, identify which shapes or paths you want to modify. You can work on a single object or select multiple objects to erase across them simultaneously. Use the Selection Tool (V) to choose your objects.
Step 2: Activate the Eraser Tool
Press Shift + E or click the Eraser Tool icon in the toolbar. Your cursor should change to a circle (or your custom eraser shape) indicating the tool is active.
Step 3: Adjust the Eraser Size (Optional)
Before erasing, you may want to adjust the eraser size. Use these keyboard shortcuts:
- Press ] to increase eraser size
- Press [ to decrease eraser size
This allows you to match the eraser size to the area you want to erase.
Step 4: Click and Drag to Erase
Position your cursor over the area you want to erase and click and drag across it. As you drag, you’ll see the area being removed in real-time. The longer you drag, the more you erase.
Step 5: Release the Mouse Button
When you release the mouse button, Illustrator finalizes the erasing action. The erased area is now permanently removed from that object, and new anchor points are created at the boundaries of the erased section.
Understanding Eraser Tool Behavior on Different Objects
Erasing Paths
When you use the Eraser Tool on a path (created with the Pencil or Pen Tool), it breaks the path into separate segments. You’ll notice new anchor points appear where you erased, allowing you to edit these segments independently. This is extremely useful for creating complex, multi-segment paths from a single original path.
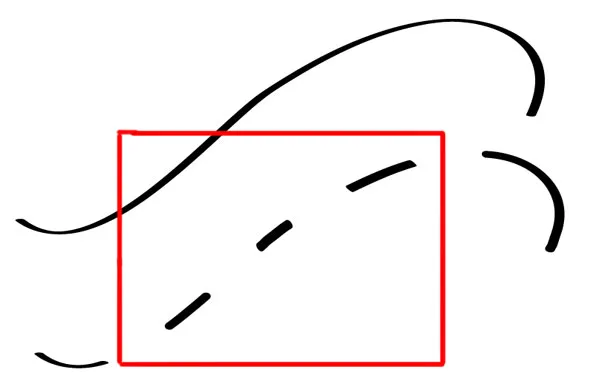
Erasing Shapes
When erasing closed shapes (circles, rectangles, polygons), the Eraser Tool creates an opening in the shape. The shape remains editable, and you can continue to modify it using the Direct Selection Tool or by applying additional erasing.
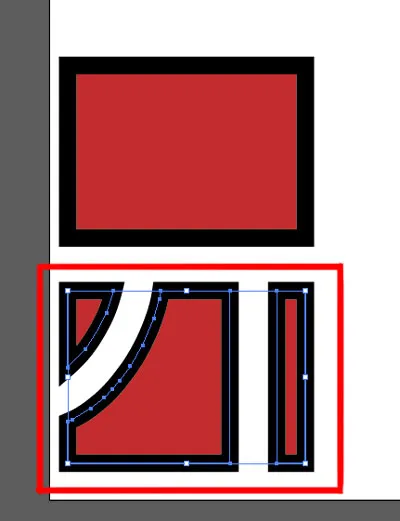
Erasing Multiple Objects
If you select multiple objects before erasing, the Eraser Tool will affect all selected objects along the path where you drag. This is useful for erasing across groups or compound paths, but requires precision to avoid accidentally erasing more than intended.
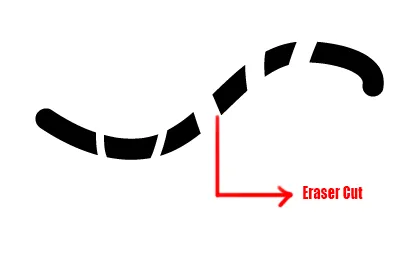
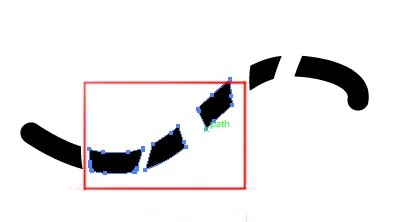
Note: The best tool for erasing the paintbrush path is a scissors tool which is in the fly-out menu under the eraser tool option which doesn’t drastically change the width of the stroke.
Related Topics:
Advanced Eraser Tool Customization and Settings
Accessing Eraser Tool Options
To access the detailed options for the Eraser Tool, double-click the Eraser Tool icon in the toolbar. This opens the Eraser Tool Options dialog where you can customize the tool’s behavior.
Key Eraser Tool Settings Explained
Size
The Size parameter controls the overall dimensions of your eraser brush. Values range from small (1 pt) to very large (500+ pt). Larger sizes erase broader areas but offer less precision, while smaller sizes allow detailed work but require more strokes.
Angle
The Angle determines the orientation of the eraser shape. This is particularly useful if you’ve set the Roundness to less than 100%, creating an elliptical eraser. You can rotate the eraser angle from 0° to 360°. Holding the Shift key while dragging constrains the eraser to straight horizontal or vertical lines.
Roundness
The Roundness value determines the shape of your eraser:
- 100% Roundness: Creates a perfectly circular eraser, ideal for most general erasing tasks
- 50% Roundness: Creates an elliptical eraser, useful for erasing in specific directions
- Lower values (0-49%): Create highly flattened erasers for precise line erasing
Pressure and Tilt (Graphics Tablet Users)
If you’re using a graphics tablet, you can enable pressure sensitivity and tilt sensitivity. These settings allow your eraser size to vary based on how hard you press the stylus or the angle at which you tilt it, creating a more natural, organic erasing experience.
Custom Eraser Brush Dynamics
For users with graphics tablets, setting up custom brush dynamics can significantly enhance your erasing experience. You can configure the eraser to:
- Vary in size based on stylus pressure
- Change opacity based on tilt angle
- Respond to rotation for directional erasing
- Adjust hardness based on speed of movement
These settings create a more natural, traditional erasing experience that many designers prefer when working on detailed projects.
Related Topics:
The Scissors Tool – Precision Path Cutting
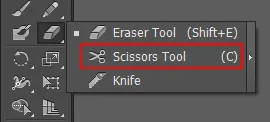
If you click and hold the eraser tool option you can find the scissors tool in its fly-out menu. The shortcut key for this tool is C.
After you select this option you can hover over your shape and make a click with your mouse or graphics pen to wherever you want to place the cut.
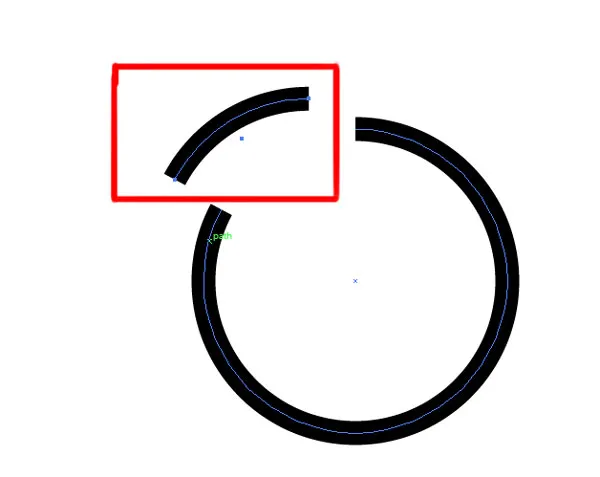
So, if you make two cuts like I did on the circle, then you can drag out the small cut path from the main circle by the selection tool. Therefore, it acts just like how a pair of scissors would act on real life.
Understanding the Scissors Tool
The Scissors Tool is a precision cutting instrument that allows you to cut vector paths at specific anchor points. While it’s not technically an erasing tool, it’s often used in conjunction with erasing to remove unwanted path segments.
The Scissors Tool is perfect when you need surgical precision and want to maintain complete control over which parts of your path remain.
Advantages of Using the Scissors Tool Over the Eraser Tool
Precision
The Scissors Tool cuts exactly where you click, making it perfect for removing specific sections without affecting surrounding areas.
Anchor Point Control
You can cut at existing anchor points or create new ones by clicking on the path. This gives you complete control over where cuts happen.
Non-Destructive Workflow
The Scissors Tool simply cuts the path without immediately removing it, allowing you to carefully select and delete only the segments you want to remove.
Complex Path Management
When working with intricate paths or paths that cross other paths, the Scissors Tool provides the precision needed to avoid accidental deletions.
Step-by-Step Guide: Using the Scissors Tool to Remove Path Sections
Step 1: Select the Scissors Tool
Press the C key on your keyboard to activate the Scissors Tool, or click it directly from the toolbar. You’ll notice it’s typically grouped with the Eraser Tool in the same toolbar menu.
Step 2: Locate Your Target Path
Identify the path or shape from which you want to remove a section. You don’t need to pre-select it; the Scissors Tool will work on any path you click.
Step 3: Click at the Starting Point
Click on the path exactly where you want to begin your cut. This could be an existing anchor point or any point along the path. Illustrator will create a cut point at this location.
Step 4: Click at the Ending Point
Click at the point where you want to end your cut. This creates another cut point, effectively isolating the section between your two clicks.
Step 5: Select the Isolated Section
Switch to the Selection Tool (V) and click on the path segment you want to delete. The section between your two cuts should be highlighted.
Step 6: Delete the Unwanted Section
Press the Delete key to remove the selected segment. The path is now edited, with the middle section removed and clean anchor points at the cut locations.
Advanced Scissors Tool Techniques
Creating Precise Gaps in Shapes
Use the Scissors Tool to create clean openings in closed shapes like circles. Cut at two points directly opposite each other to create a perfect gap, then delete the middle segment.
Cutting at Path Intersections
When paths cross, the Scissors Tool can cut at the exact intersection point. This is useful for removing crossing segments while maintaining clean anchor points.
Working with Complex Compound Paths
The Scissors Tool excels at cutting compound paths into separate, editable shapes. This is particularly useful when you need to isolate specific elements from a complex grouped design.
Related Topics:
Knife Tool
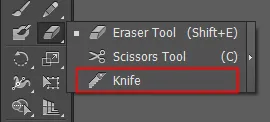
This is the last option in the fly-out menu of the eraser tool. The main difference between this tool and other tools in the eraser tool fly-out menu is that it only works on closed paths.
So, before applying the knife tool make sure that your shape is a closed path.
To use the knife tool, you first need to select the shape that you want to cut with the direct selection tool. Then select the knife tool, click away from the object, hold and while moving your mouse or graphics pen draw a cut line.
You can’t change the path of the cut after you’ve applied the cut and thus you get two separate shapes.
Related Topics:
Advanced Techniques: Beyond Basic Erasing
Combining Multiple Erasing Methods
Professional designers often combine multiple erasing techniques within a single project:
- Layer Protection Strategy
Before erasing, lock or hide layers you don’t want to affect. Use the Layers Panel to click the eye icon to hide layers and prevent accidental erasing.
- Isolation Mode Erasing
Enter Isolation Mode (double-click a group) to erase only within that group without affecting other design elements. This is especially useful for complex designs with multiple layers of elements.
- Shape Builder Tool Alternative
For more advanced path manipulation, the Shape Builder Tool combined with Alt/Option key allows you to delete overlapping path segments where paths cross, providing an alternative to direct erasing.
Working with Stroke Styles During Erasing
One common challenge is maintaining stroke styles when erasing. Here’s how to handle this:
- Preventing Style Loss
Use the Path Eraser Tool instead of the standard Eraser Tool, as it preserves stroke properties better.
- Post-Erasing Style Application
After erasing, you can reapply or adjust stroke styles using the Stroke Panel. Select the erased path and modify stroke weight, caps, joins, and dash patterns as needed.
- Compound Paths
When erasing compound paths, the results can sometimes be unpredictable. It’s often better to decompose compound paths first (Object > Compound Path > Release) before erasing, then recompose them if needed.
Erasing Across Grouped Objects
When you have grouped objects and want to erase across the entire group:
- Method 1: Ungroup First
Ungroup the objects (Ctrl+Shift+G or Cmd+Shift+G), erase as needed, then regroup.
- Method 2: Enter Group Isolation Mode
Double-click the group to enter isolation mode, then erase within the group. This prevents accidental changes to objects outside the group.
- Method 3: Make a Clipping Mask
Create a clipping mask that defines the visible area across the entire group, which is often cleaner than erasing individual grouped elements.
Related Topics:
About the Author
Lalit M. S. Adhikari is a Digital Nomad and Educator since 2009 in design education, graphic design and animation. He’s taught 500+ students and created 200+ educational articles on design topics. His teaching approach emphasizes clarity, practical application and helping learners.
Learn more about Lalit Adhikari.
This guide is regularly updated with the latest information about Adobe tools and design best practices. Last Updated: Mar 2026
Related Topics:











Saved as a favorite! on How to use eraser tool in illustrator, I love it! This blog also has working of Scissors tool and Knife tool in illustrator. Thank you
It’s really a nice and helpful piece of info. I’m satisfied that you simply shared this useful information with us. Please keep us up to date like this. Thanks for sharing.
Pretty nice post. I just stumbled upon your weblog and wished to say that I have truly enjoyed surfing around your blog posts. In any case I will be subscribing to your rss feed and I hope you write again soon!
I like reading your content. Have you got a twitter i can connect to?
It’s really a nice and helpful piece of info on eraser tool, scissors tool and knife tool in adobe illustrator. I’m satisfied that you simply shared this detailed information with us. Please keep us up to date like this. Thanks for sharing.
Post writing is also a fun, if you be familiar with then you can write if not it is complicated to write. Great work on this topic of eraser tool in illustrator.
I think this is a real great blog article on how to use eraser tool in adobe illustrator. It also includes scissor tool and knife tool. Thanks Again. Great.
This is really the best detailed post for Eraser tool in illustrator and I guess that’s why it tops the Google search results! Good work mate!
I like the helpful info you provide in your articles especially this one about eraser tool in adobe illustrator.
I will bookmark your blog and check again here regularly. I am quite sure I’ll learn plenty of new stuff right here!
Good luck for the next!
Terrific post however, I was wondering if you could write a little more on this topic? I’d be very grateful if you could elaborate a little bit further. Thank you!
I like the helpful information you supply for your articles about designing and adobe software. I’ll bookmark your blog and take a look at once more. I’m somewhat certain I will learn a lot of new stuff proper here! Best of luck for the following!
Everything is very open with a very clear description of how to use eraser tool in illustrator with other tools included. It was really informative. Your site is very useful.
Thanks for sharing!
I have to thank you for the efforts you’ve put in penning this blog.
I really hope to see the same high-grade blog posts by you later on as well.
In fact, your creative writing abilities has encouraged me to get my own blog now 😉
My family, all the time, say that I am killing my time here at web, however I know I am getting knowledge every day by reading such good articles. Good read about eraser tool in illustrator. Thank you!
Hi, Neat post. Thank you.
You are giving us something informative to read. Thank you!
An intriguing blog is worth comment. To the next! All the best!!
It’s an remarkable blog in support of all the budding designers; they will get advantage from it I
am sure.
Thank for this article. Helpful! Thank you again!
Great post however , I was wondering if you could write a little more on this topic? I’d be very grateful if you could elaborate a little bit more. Bless you!
I was suggested this web site by my cousin. You are incredible! Thanks!
Thank you!
I need to to thank you for this wonderful read!! I absolutely learned from every bit of it. I have got you bookmarked to check out new stuff you post…
It is quite helpful! Keep writing such articles.
There is definitely a great deal to find out about this topic. I really like your way of explaining eraser tool.
Thank you!
It was really helpful. I wasn’t able to find few tools in illustrator. It helped a lot! Thanks.
I developed a good understanding of these tools in illustrator from your blog articles.
Nice post. I was checking continuously this blog and I am impressed! Extremely useful information particularly on Graphic Design and I also loved Food For Thought category. 🙂 I care for such info a lot. I was looking for this certain info for a long time. Thank you and best of luck.